RoboRealm Options Page
- Video Tab
- API Server Tab
- Web Server Tab
- Startup Tab
- Application Tab
- Kiosk Tab
- Faceless Tab
- Watchdog Tab
- Ser2Net Tab
- Virtual Camera Tab
- Other Tab
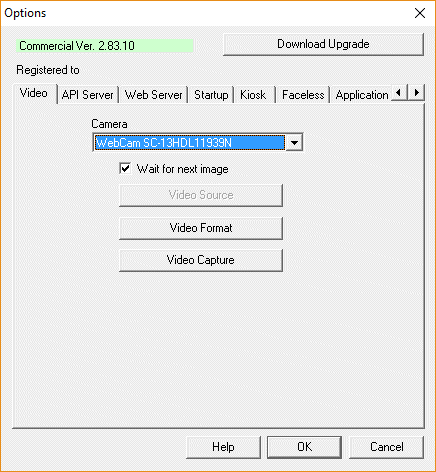
- Camera - Provides a list of recognized cameras currently available on your computer. You can select any of the items in
that list to switch to that camera and begin processing its video. Note that this list will appear in other RoboRealm modules
to allow you to access multiple cameras at a time. For Firewire cameras see the Firewire Camera module.
For Internet IP cameras see the HTTP Read module or the DLink Internet Camera.
- Video Source/Format/Display/etc - Once a camera is selected the appropriate buttons will be enabled that provide access directly to that cameras driver information and allows you to configure low level information (such as video format) that the camera and camera driver will produce. The most relevant is Video Format which will dictate what format (RGB32, YUV, I420, etc) that is passed back to RoboRealm. RoboRealm supports many formats but may not support your exact format. If you receive a format error message box try to change the format to RGB32 or other format that RoboRealm supports.
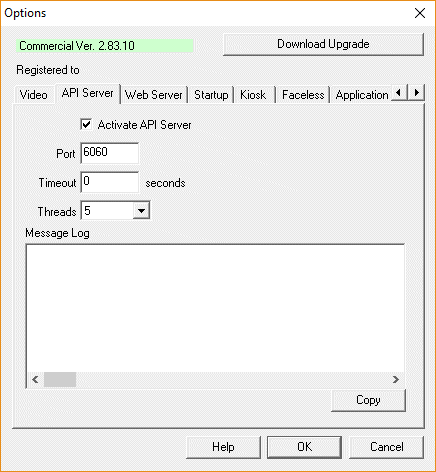
- Active RoboRealm API Server - by default RoboRealm does not activate the API server port. To communicate with RoboRealm using the API this checkbox must be selected.
- Port - the network port that is used to communicate to RoboRealm. The default is 6060.
- Timeout - the connection timeout that is used to wait for new commands. If RoboRealm does not receive any commands within the specified timeout period it will automatically terminate that port connection.
- Threads - specifies how many simultaneous connections the API server will handle. If you want more than once machine to connect to RoboRealm switch to a value higher than the default 1.
- Message Log - a log of the interactions that a remote program is sending the RoboRealm API server.
- Be sure to see the API documentation page for more information about interfacing with RoboRealm.
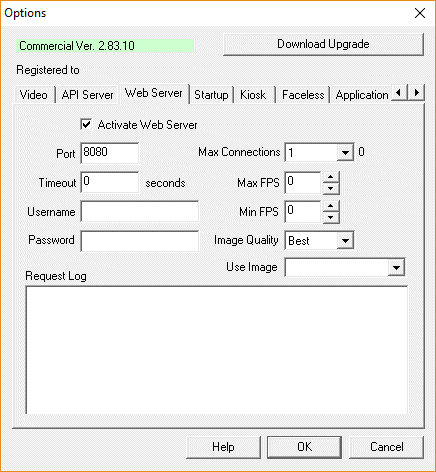
- Active RoboRealm Web Server - by default the embedded webserver in RoboRealm is no on. You need to select this checkbox to enable the webserver.
- Port - the webserver network port that RoboRealm will use. The default is 8080. Note that if you change this port you will need to also change the url used to connect to the RoboRealm webserver too. The port in the url is located inbetween the hostname and before the first path specification.
- Username - to provide secure access to the webserver you can specify a username that must be typed in (the user will be prompted) in order for the video stream to be accessible.
- Password - the password required for access. Default is blank which means anyone can view the video stream without requiring authentication.
- Max Connections - specifies how many simultaneous connections the Web server will handle. If you are expecting many users to connect via the web to a value higher than the default 5.
- Max FPS - the maximum number of frames per second that the webserver will send to clients. This setting can help you decrease your bandwidth requirements.
- Min FPS - the minimum number of frames per second that the webserver will send to clients. If your viewer requires a set number of frames per second this can help ensure that the rate is maintained even if new images are not present (old ones are sent to maintain the connection).
- Image Quality - allows you to specify how good a quality image is sent out to connected browsers. Setting this to Worst will send the smallest image but will affect the image quality. Setting it to Best will send a very high quality image but will use a lot of bandwidth.
- Use Image - By default the webserver will send back the processed image that is seen at the end of the pipeline. Sometimes this is not desired so you can select which image or which marked image (via the Maker module) should be send via a web server HTTP request.
- Request Log - a web browser request log to monitor who is connecting to the RoboRealm webserver.
- See RoboRealm WebServer for more information.
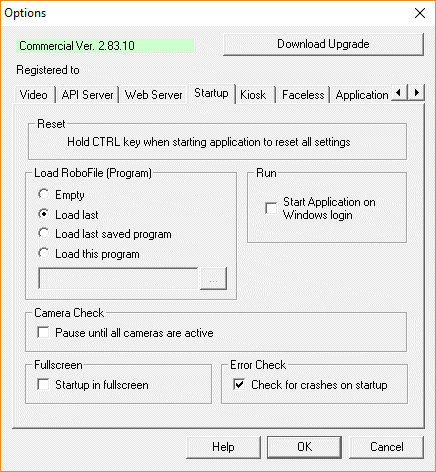
- Start when Windows starts - Select if you want RoboRealm to startup without
having to first login into the computer. This is very handy when running RoboRealm
automatically and it should startup when rebooted.
- Load RoboFile - by selecting a load option you can change the way RoboRealm first starts
up. By default "Load last program" is set.
- Empty - startup RoboRealm with a new/empty/clear pipeline program.
- Load last program - loads in the very last pipeline program that you were working with. This configuration is saved to a working.robo file at the last time you exited RoboRealm.
- Load last saved program - loads in the last program you saved. This will overwrite any changes to the pipeline you were last working on.
- Load this program - loads in the program specified in the below text box. This is a great way to ensure that regardless of what you do within RoboRealm that it always starts up with the same pipeline program.
- Camera Check - causes the execution of the processing pipeline (program) to wait until all cameras specified in the pipeline are active and producing images. A popup will occur that will indicate that a camera is missing which will then disappear when the camera is found or when the user clicks to ignore this issue. This is very useful when first starting up the operating system where RoboRealm may be run before all the cameras have had a chance to initialize. This can cause instability in the system and cause control issues on the robot during startup.
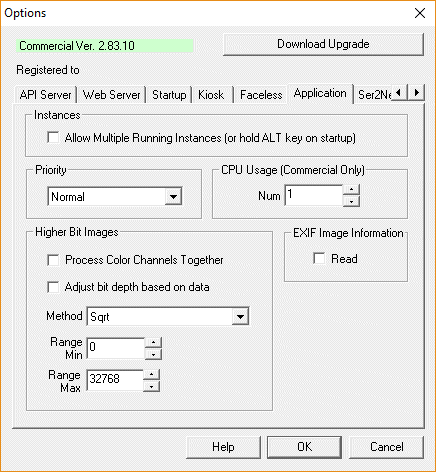
- Instances - by clicking on "Allow Multiple Running Instances" you can have more than
one copy of RoboRealm active within your desktop. By default anytime you double click on a
.robo file the currently running RoboRealm application will focus and execute that file. This
option overrides that behavior.
- Priority - You can select what priority RoboRealm uses when running. Higher priorities
will give RoboRealm more CPU time but remove it from other applications. Lower priorities
will force RoboRealm only to run when there is available processing power (idle time).
- CPU Usage - RoboRealm can utilize more than one CPU at a time to process the pipeline. This
feature is ONLY available in the Commercial Version as it requires special care in how the
pipeline is structured. In most cases, your pipeline will work as expected when using more
than 1 CPU but process the pipeline much faster. In some cases, because of how state information is maintained
in the pipeline, adding more CPUs will cause the pipeline to malfunction and/or run slower
than expected. Please Contact Us if you experience these types of issues
as we can help to resolve these situations.
- EXIF Info - Select if you want to load an image's EXIF information into the RoboRealm
variable table.
- Higher Bit Images - RoboRealm operates on 24 bit RGB for performance reasons. When loading
in images with higher bit depths RoboRealm needs to know how to process the image into a
24 bit image. There are many ways this can be accomplished:
- High - Uses the upper 8 bits of the image
- Low - Uses the lower 8 bits of the image
- Sqrt - Square root's the image pixel to the 8 bit range
- Inv Sqrt - The Sqrt function will favor darker pixels, the Inv Sqrt favors lighter
- Center Mean - Forces the high bit range to be centered at the image mean
- Below Mean - Shows only pixel below the image mean compressed into 24 bits
- Above Mean - Shows only pixel above the image mean compressed into 24 bits
- Around Mean - Similar to Center Mean but thresholds values on either side to improve contrast
- Normalize - Determines image low and high values and scales to 24 bit
- Pseudo X - Translates image intensity into a higher color range for improved visibility
- Reinhard/Drago - High Dynamic Range reduction techniques as specified in the FreeImage.dll
- Logarithm - Takes the logarithm of the image pixel and then stretches to 8 bit range
- G->RGB - Spreads all bits of the single green channel into all RGB channels such that the true value of that single channel can be processed.
- Range Min / Max - Scales the specified range into 0 to 255 with clamping below min and above max values.
- Process Color Channels Together - Specifies that color channels will be considered a single channel such that the relative color amounts will not change. Unselected, each color channel will be processed independently which can improve or worsen an images overall appearance.

The Kiosk mode provides a way for you to run RoboRealm without all the controls that are used to modify and create RoboRealm programs. The Kiosk mode provides a customized view (can be as simple as just the video feed) to allow just those parts of the program to be available to the end user. This is very useful when running RoboRealm in environments where you would prefer no one has access to reconfigure the running program.
It is worth noting that for an insecure system the Kiosk mode username/password can be broken by deleting the regedit entry for the RoboRealm program. To ensure a fully secure system you would have to disable user editing of the registry.
- "Press CTRL-K to toggle Kiosk mode" - by clicking this button you will immediate enter into the Kiosk mode of RoboRealm. Note that at any time you can toggle between Program and Kiosk mode by pressing CTRL-K.
- Contents/Index/Search - to show/hide the module navigation on the left side of the main RoboRealm interface toggle this checkbox
- Program Pipeline - to show/hide the program listing seen below the video image and all the edit buttons that are related to the program mode toggle this checkbox
- Buttons - to show/hide the zoom, option, help and run buttons toggle this checkbox
- Status - to show/hide the status bar seen at the bottom of the interface that includes the current mouse location, pixel color at that location and the current fps toggle this checkbox
- Caption - to remove the blue title caption seen at the top of the interface toggle this checkbox. Note that without the caption users will not be able to move, resize or quit using the upper rightmost buttons.
- Allow Keys - if this checkbox is unchecked the user will not be able to use any keyboard shortcuts like Alt-O to open files, etc. Normally if you disable the user from using buttons you will probably want to prevent them from using keyboard shortcuts too.
- Allow Exit - if this checkbox is unchecked the user will not be able to exit the RoboRealm application by clicking on the upper rightmost X button, using ALT F4, or by right clicking on the caption bar.
- Always on top - when enabled this checkbox will ensure that the RoboRealm window is always ontop of other windows.
- Allow Move - allows the user to move the window by dragging the caption area
- Allow Resize - allows the user to resize the application interface using the corner stretching and shrinking. Note that when disabled this mode also disables minimization.
- Fullscreen - shows just the image area in fullscreen mode. Note, in this mode none of the GUI window is shown.
- Authentication - to prevent users from breaking out of Kiosk mode by pressing CTRL-K you can specify a username and password that are required in order for Kiosk mode to be broken. When these are set a Login prompt will appear when exiting Kiosk mode to ensure that the current user is knowledgeable enough to do so. Note that if you forget your username/password you will have to remove the RoboRealm registry entry. See the FAQ for how to do so.
- Startup - select if you want RoboRealm to jump into Kiosk mode once the program is activated. Note that if you start RoboRealm in Kiosk mode, have a username/password to break out of Kiosk mode AND are holding down the CTRL key you will be requested for that login before the system resets to the default settings. This prevents anyone without the username/ password from resetting the system without that knowledge.
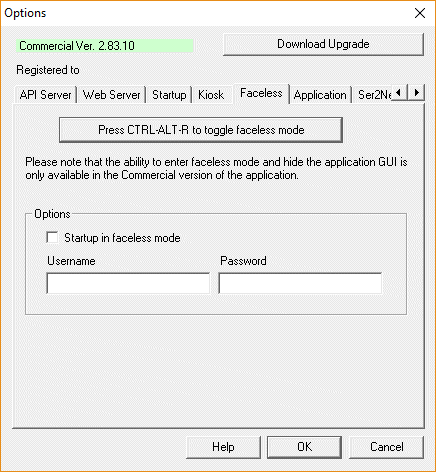
The faceless mode of RoboRealm provides a way for the RoboRealm application to function while being invisible to the user. More can be read about this mode in the FAQ. This faceless mode can be entered using several techniques:
- Specify the command line argument "-faceless" (without the quotes like -api_port) when running RoboRealm. This can be added
either when running RoboRealm from your desktop or included in the startup process as seen in the C++ API.
Included in the RoboRealm download is an example file called RoboRealm_Faceless.bat that shows what this technique looks like.
c:\Program File (x86)\RoboRealm\RoboRealm.exe -faceless
- The Options button -> Faceless tab interface can be used to enter into the faceless mode (by pressing the top button) and also
set the faceless mode on startup. When specifying the faceless mode on startup RoboRealm will run without an interface
unless the "-display" command is provided in the command line (the -facless command is not needed in this mode).
This startup checkbox will ensure that each time RoboRealm is started it will not show any GUI interface.
- You can send the API request faceless to hide the display request
to show it.
- Press the key combination of CTRL-ALT-R to toggle the interface display/faceless on and off.
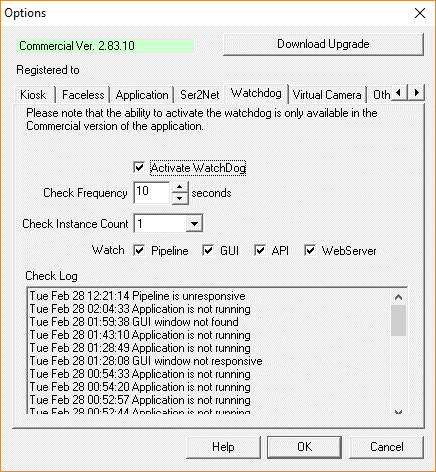
The Watchdog tab provides an interface to the RoboRealm Watchdog Windows Service that is used to monitor the RoboRealm application for any system failure. On detection of this failure the Watchdog Service will restart the RoboRealm application. This functionality is typically desired in production settings where failure of the system needs to automatically be logged and restarted.
- Activate - Will turn on the Watchdog Service (and install it if needed). This option will then switch on the options within the interface that allow specific configuration.
- Frequency - Specifies in seconds how often the Watchdog Service should check the RoboRealm application. Typical configuration is once a minute or 60 seconds.
- Instance Count - Because several instances of RoboRealm might be running (each with their own configuration) you can specify how many Instances the Watchdog should check. Unless you are running more than one instance of RoboRealm this should be set to the default of 1.
- Check Pipeline - When selected the Watchdog will check that the pipeline continues to loop. This ensures that the pipeline is being iterated at least once every X seconds. Note, this ensure that the pipeline loops and will assume an error if a single module is running but refusing to let the pipeline continue. When this happens a restart is triggered.
- Check GUI - When selected a simple GUI request is made to the application to ensure that it is still responsive to GUI requests. If this simple request fails to return back the correct information a restart is triggered.
- Check API - When selected the Watchdog will issue a quick API call to the defined port to ensure that the API is responding to requests. If the API does not respond or responds with the wrong result this will trigger a restart.
- Check Webserver - Issues a quick webserver request to ensure that the webserver is reponsive. If no information is returned a restart is triggered.
- Log - Every time a restart is triggered a small note of the time and specific reason the restart was triggered is added to the Watchdog log. Note, while the log will include many past events it is limited to 4K in data to avoid causing memory issues.
The ser2net tab provides a way to configure remote serial ports (hostname and port) that exist on another machine but can be accessed as if local on a machine running RoboRealm. This provides a flexible way to control remote serial devices on embedded systems that are not capable of running RoboRealm.
Why is this a big deal? If you happen to have any of the recent embedded processors like the Raspberry PI, BeagleBone Black, PCduino, TP-Link Router, etc. you can use these to provide a wireless connection to your laptop and control a serial device from RoboRealm.
ser2net NEEDS to be installed on the remote machine and configured as appropriate. ser2net can be downloaded here. Once installed you need to configure it to access the local port. Note that all parameters (baud, stop bits, etc.) MUST be specified on that machine. For example, the following will run ser2net with a configuration appropriate for an Ubuntu installation to access an Arduino microprocessor. In this case, it is a TP-Link router that connected to an Arduino using a USB cable.
sudo ./ser2net -C "7070:raw:1000:/dev/ttyACM0:115200 NONE 1STOPBIT 8DATABITS XONXOFF LOCAL"Note the use of sudo which ensures that ser2net has access to your serial port (if you know your current user has access you can remove the sudo command). Also note that the above example uses /dev/ttyACM0 as the serial port. This may be different on your machine. Finally the baud rate is set to 115200 which is what the default Arduino sketch used for the Sparkfun_Arduino module expects to use.
Connecting your device to an embedded processor STILL requires the needed drivers to be loaded by the device. In most cases, a generic serial connection will suffice but it is very possible that your embedded processor fails to load the needed drivers which would normally load without issue within a Windows environment. The only option you have at that point is to contact the vendor of the peripheral device and request drivers for your appropriate embedded device.
Once configured, the name that you specify will appear in the COM Port dropdown in those modules that require a serial interface to operate. By selecting this name, the connection will automatically connect to the remote processor and appear as if the connection were done locally. Thus by simply changing the port specification in a module you can now operate the device remotely (assuming ser2net has been configured on the remote processor).
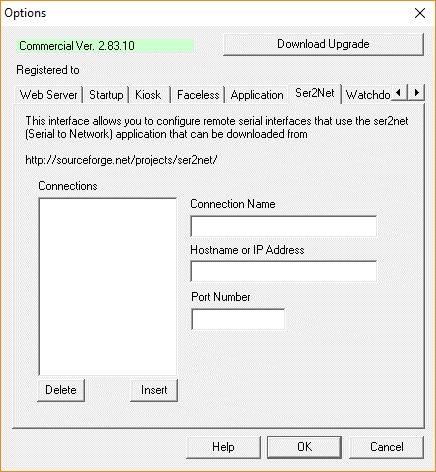
- Connections - Shows the list of currently configured remote connections. Clicking on a connection name will populate the hostname and port number to the right of that list.
- Connection Name - The name you chose to call the specific configuration. Its best to use something descriptive.
- Hostname or IP Address - The hostname (i.e. www.roborealm.com) or IP Address (i.e. 192.168.0.2) of the REMOTE machine (i.e. Raspberry PI, BeagleBone, TP-Link, etc.) that RoboRealm will connect to in order to use its local serial connection.
- Port Number - The port number of the TCP connection to the above hostname that is waiting for a connection that is tied to a serial port. Default is 7070 which is specified in the above configuration line for ser2net. As long as your configure this number in both ser2net and in this RoboRealm tab, you can use any number you'd like. Note that ports below 1000 in most Unix systems require root privileges.
- Delete / Insert buttons - Delete currently select Connection or Insert a new one.
To read more about the Virtual Camera capabilities within RoboRealm please see Virtual Camera Driver (VCam) page for more information.
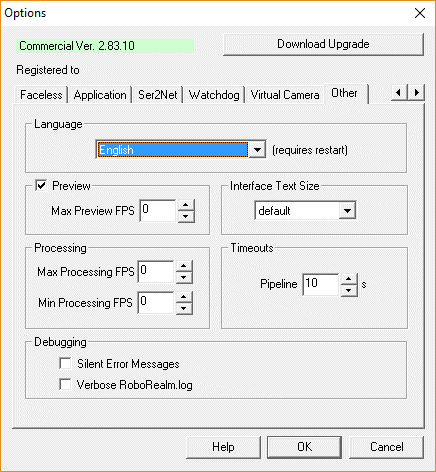
- Language - Select which language you would like the main RoboRealm interface to use. When you restart the application, your selected language will be used for the main interface text AND module tooltips.
- Preview Checkbox - to disable viewing the processed video unselect the preview checkbox. This will allow RoboRealm to continue to process and react to visual images BUT will stop display of those images on your computer screen. This can help to increase processing performance as the rapid display of images using a slow graphics card or over the network can limit the total processing speed of the system.
- Interface Font Size - if the RoboRealm interface appears a bit hard to read you can change the text font size used in the interface to something more appropriate. The default setting will conform RoboRealm's text size to that of what other Windows applications are using (set in Windows Control Panel Display setting).
- Max Preview FPS - instead of completely disabling preview you can also modify the FPS to slow the preview rate down. For example, typing in 1 will limit the preview of processed images to a maximum of 1 per second. If you type in 0.5 that will limit the update rate to 1 frame every 2 seconds and so on. Note that this does not limit the number of frames that are being processed but just how many of those processed frames you are viewing.
- Max Processing FPS - if you want to slow the processing of images down modify the FPS to something slower than the typical 30 fps. For example, if you specify 5 then RoboRealm will process a maximum of 5 frames every second or 1 frame every 0.2 seconds. Note that your preview rate will also be affected as the preview rate will decrease with a slower processing rate. You can also use decimal numbers such as 0.25 which will cause RoboRealm to process 1 frame every 4 seconds.
- Min Processing FPS - if you want to ensure that the processing of images happens even if a new image is not available you can set the Min Processing FPS to some number above zero. This will ensure that RoboRealm does not wait too long for a new image and instead run the pipeline again with the same image. This is useful if you have some form of polling occurring in the pipeline that needs to run regardless of it any new images are made available.
- Silent Errors - As RoboRealm is often used as a server process it is not desirable for error messages to cause a popup that requires user interaction in order for the application to continue functioning. Once this checkbox is selected all errors are saved in RoboRealm.log instead of causing a popup to occur. The RoboRealm.log file will be created in the current folder where RoboRealm is being executed. To warn of this event a red square text area in the main GUI window will appear for 15 seconds to remind you that errors are being logged instead of alerting via popups. Note that this red square will NOT be part of the image being processed and is only displayed as a reminder.
- Verbose RoboRealm.log - Often if you have a particular problem when using RoboRealm we will ask you to turn on extra debugging that helps us understand where the application is failing. When using the Verbose RoboRealm.log at lot more statements are added to the RoboRealm.log file in order to help us determine where things are failing. You need not use this checkbox unless directed by us. Please note that this checkbox is cleared each time the application is restarted.
| New Post |
| Related Forum Posts | Last post | Posts | Views |
|
Camera Bug
Hi, I am using a Basler GigE camera in RR. The software picks up the c... |
7 year | 2 | 3315 |
|
Request to increase VCam limit to 8
Hi Steven, We have a high speed sorting/positioning application which uses four Basler USB 3.0 came... |
7 year | 2 | 2542 |
|
VCam
Hi, I am trying to setup a virtual camera, but the drivers will not install. I get the following me... |
8 year | 2 | 2764 |
|
RoboRealm Crash
i wanted to change camera module but once i press the option button, the roborealm crashed i used 2... |
8 year | 7 | 2795 |
 Camera FPS vs Processing FPS
Hello, Is there a difference when changing processing FPS (through"other" tab) or camera FPS (throu... |
9 year | 5 | 3123 |
