
Virtual Camera Driver
The RoboRealm Virtual Camera Driver provides a way to utilize the processed image results from RoboRealm in up to 5 other applications that supports frame grabbing from WebCameras or other capture devices. This allows you to interface any camera that RoboRealm can connect to as a regular webcam device to other applications.This image relaying is accomplished by installing the RoboRealm Virtual Camera (VCam) drivers that will create new webcam drivers in your system that can be connected to like a normal webcam. This setup works as follows:
1. RoboRealm is running and grabbing images from the actual webcam driver
2. RoboRealm process the image
3. RoboRealm then send its processed image to its VCam driver (ensure that the Options->Virtual Camera->Virtual Camera #1 is set)
4. Your application connects to the RoboRealm VCam driver and grabs the processed (or original) image
Note that this functionality can also be used to provide the source image from a single camera to both RoboRealm and another running application that requires a webcam. This can be accomplished by the same setup as above by ensuring that the processed image in RoboRealm is unchanged from the source. You would specify the "source" image within the Virtual Camera Options tab. Likewise, if you wish to feed a particular image to other capture applications you can accomplish this by setting a Marker module within the pipeline and specify that image in the "Use Image" dropdown menu.
Opening single static images or playing movie files in RoboRealm will also cause the VCam to update too.
Installation
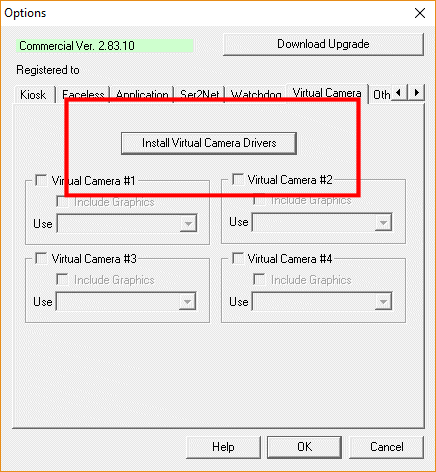
To install the Virtual Camera Drivers proceed to the Options Button->Virtual Camera tab->Install button. This will install or replace the current drivers for the Virtual Camera. Please note, this requires admin permissions and will take a while to complete ... so please be patient. Once done, you can enable the virtual cameras by selecting the checkboxes below the install button.
IF for any reason this installation fails, the install process below is provided to install the drivers manually.
Windows XP Installation
As the VCam driver is not actually attached to a physical device the installation is a more manual process than hardware based plug and play drivers. The following outlines the installation steps for Windows XP. (Windows 2000 and Vista have similar installations).
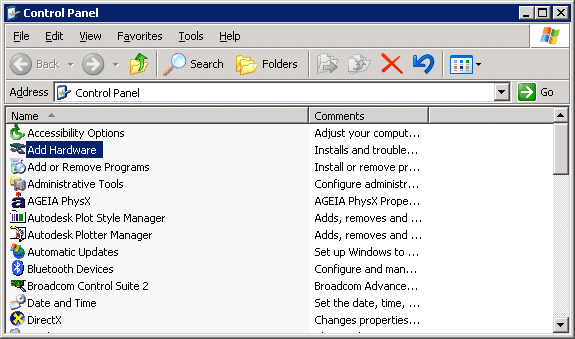 1. Click on Windows Start Button -> Select Settings -> Select Control Panel. In the Control Panel click "Add Hardware"
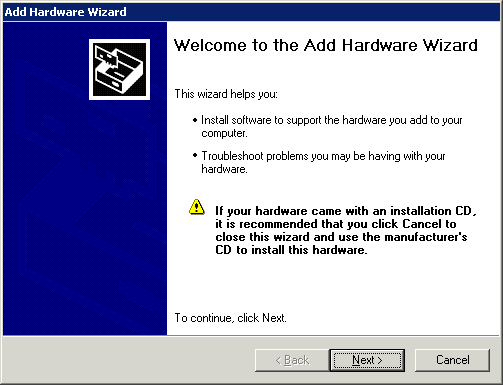 2. Click Next on Add Hardware Wizard.
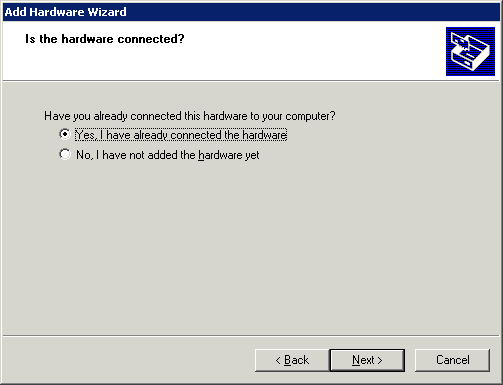 3. Select "Yes, I have already connected the hardware". Again, as no hardware is actually connected to the VCam
driver you need to manually tell the system where to locate the drivers.
3. Select "Yes, I have already connected the hardware". Again, as no hardware is actually connected to the VCam
driver you need to manually tell the system where to locate the drivers.
 4. Select "Add a new hardware device". Then select Next.
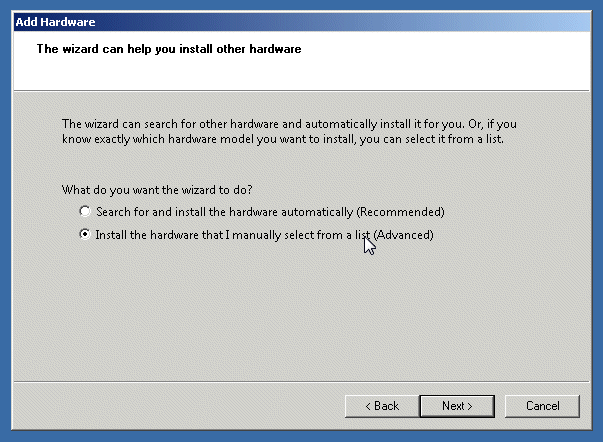
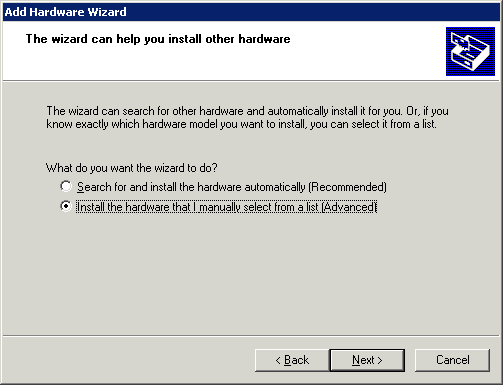 5. Select "Install the hardware that I manually select from a list (Advanced)". Then select Next.
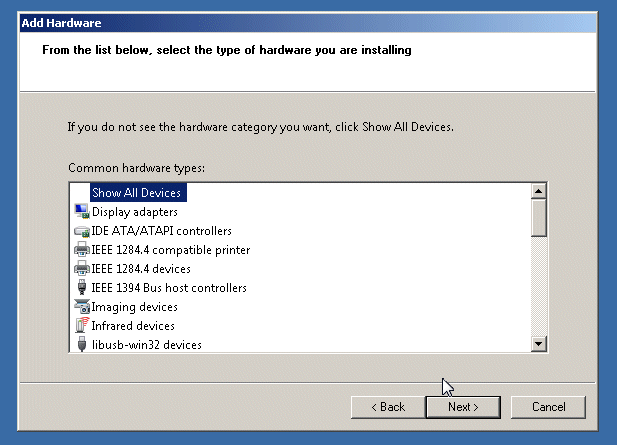
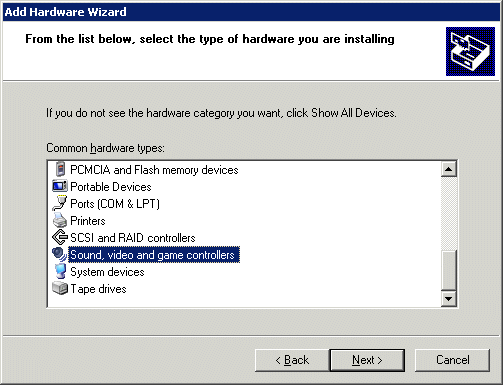 6. Select the hardware type "Sound, video and game controllers". Then select Next.
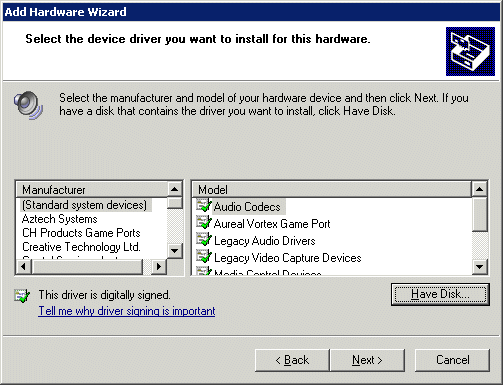 7. Click on the "Have Disk" button. Note that you will not find RoboRealm in the Manufacturer list nor the
VCam in the Model list.
7. Click on the "Have Disk" button. Note that you will not find RoboRealm in the Manufacturer list nor the
VCam in the Model list.
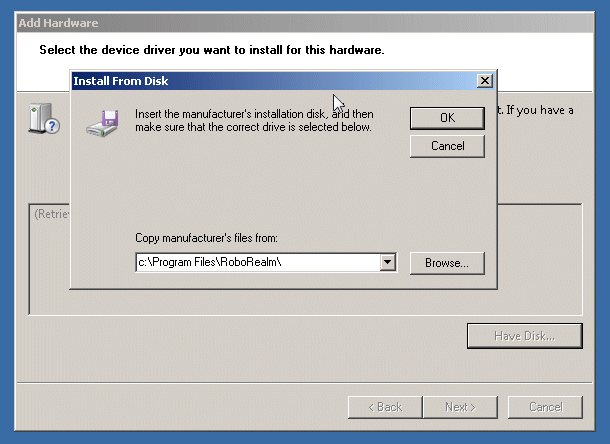
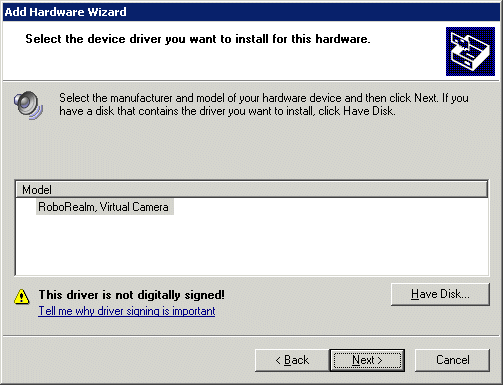 8. Once the Browse dialog pops up select the RoboRealm folder where you unzipped/installed the RoboRealm
application (you can target the RoboRealm.inf file which is what the system is currently looking for). All
the needed files are in that folder. Once selected you should see "RoboRealm, Virtual Camera"
in the Model list. Select Next to continue.
8. Once the Browse dialog pops up select the RoboRealm folder where you unzipped/installed the RoboRealm
application (you can target the RoboRealm.inf file which is what the system is currently looking for). All
the needed files are in that folder. Once selected you should see "RoboRealm, Virtual Camera"
in the Model list. Select Next to continue.
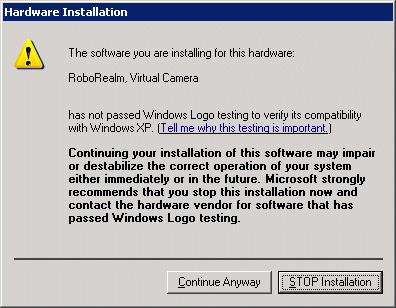 9. You will see some form of verification screen that claims the Driver has not passed "Windows Logo testing".
Click "Continue Anyway" or "Ignore" to continue.
9. You will see some form of verification screen that claims the Driver has not passed "Windows Logo testing".
Click "Continue Anyway" or "Ignore" to continue.
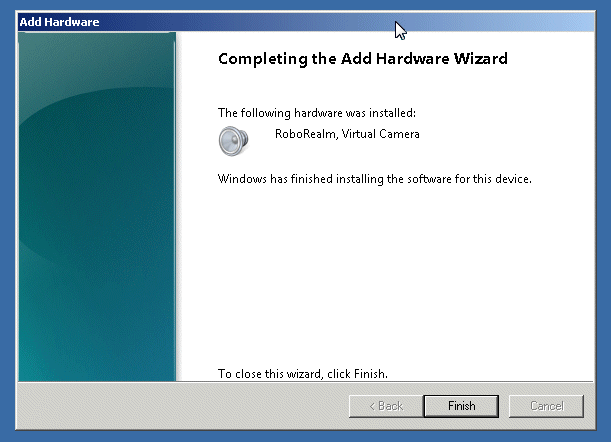
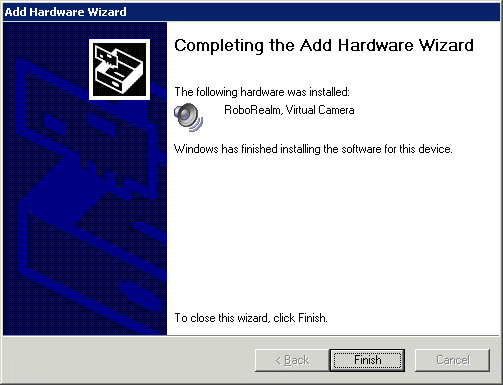 10. The system will now copy files into the appropriate location. You *may* get another popup searching for
the RoboRealm.sys file. If so, again, select the same RoboRealm folder that you unzipped/installed
RoboRealm in. Once all files are copied the finished installation screen will appear. Click "Finish"
to end the installation. You are now ready to run the RoboRealm VCam!
10. The system will now copy files into the appropriate location. You *may* get another popup searching for
the RoboRealm.sys file. If so, again, select the same RoboRealm folder that you unzipped/installed
RoboRealm in. Once all files are copied the finished installation screen will appear. Click "Finish"
to end the installation. You are now ready to run the RoboRealm VCam!
Be sure to have enabled the VCam capturing (Options Button->Virtual Camera->Virtual Camera #1) and installed the VCam driver (see steps below) before attempting to use the VCam functionality. Be sure to have at least DirectX9.0 installed.
Windows 7/Windows 8 Installation
Windows 7 (especially the 64bit version) requires that all kernel drivers be signed. You will get a popup asking if you trust RoboRealm, LLC. You should accept that (it's us) to continue the driver installation.
 1. Click Windows Start Button->Control Panel->Device Manager to Open up the Device Manager.
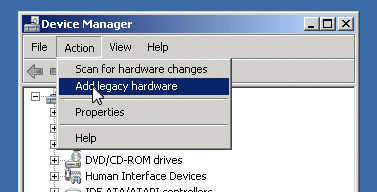 2. Within that Window click on the Computer and then on the Add Legacy hardware menu. Note that the
menu option will NOT appear until you select the Computer subtree.
2. Within that Window click on the Computer and then on the Add Legacy hardware menu. Note that the
menu option will NOT appear until you select the Computer subtree.
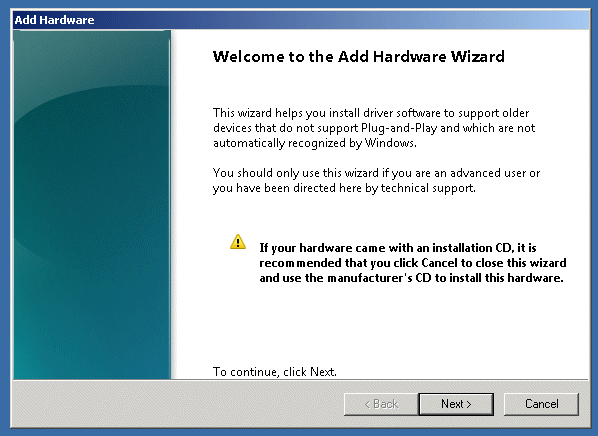 3. You should now see the Add Hardware GUI. Click Next.
 4. Select the "Install the Hardware that I manually select from a list (Advanced).
 5. Ensure that the Show All Devices option is selected and click Next.
 6. Click on the Have Disk button and specify the path where you installed RoboRealm. Press OK and then Next.
 7. Click on Next and finally Finish once the Driver has been added.
IF things do NOT work on Win7 and you have a yellow exclaimation mark next to the VCam drivers in the device manager that's most likely because you've not updated your Windows system with a SHA256 hash fix for drivers. This update came out in Oct 2014 and can be read about here. Our drivers use SHA256 (since SHA1 will be invalid starting 2016) and thus require that Win7 update to fix this issue. Note, Windows 8 already has this update and need not be updated.
Testing
1. Open AmCap or other webcam viewing software
2. Select "RoboRealm VCam" as the driver or image source. The image will appear black or gray until RoboRealm is run
3. Run RoboRealm. Ensure that the Activate VCam checkbox in the Options Button->Virtual Camera tab is set
4. Connect to your actual hardware camera using RoboRealm.
5. You should now see your webcam image in RoboRealm and AmCap.
6. For optimal speed ensure that the AmCap Capture Pin size is the same or similar as to what RoboRealm is capturing otherwise
RoboRealm will resize the image before sending it to the VCam driver which can add to performance delays.
Troubleshooting Tips
1. Did you install the VCam driver?
2. Did you click on Options Button->Other Tab->Activate RoboRealm VCam check box in the RoboRealm application?
3. Do you have at least DirectX 9.0 installed? See Microsoft DirectX End-User Runtime for installation.
4. If you are not running any hardware cameras RoboRealm may startup by connecting to its own VCam driver. In this case unclick the
Camera button and drag or open an image into RoboRealm. Exit RoboRealm to ensure that on startup it will only load in the image instead
of connecting to a WebCam.
| New Post |
| Virtual_Camera_Driver Related Forum Posts | Last post | Posts | Views |
| None |