
Crop
Crop allows you to remove parts of the image that are not of interest. Often due to NTSC conversion camera’s have spurious beginning or ending lines that are not colored correctly. To remove those erroneous lines from the processing pipeline use the crop function to cut those parts of the image out. For example, if the top line of the image is bad in a 320x240 image use
X Start 0
Y Start 0
X End 320
Y End -1
Note that negative or zero numbers in the "End" coordinates will cause the current width or height to be added before cropping to that number. This allows the crop module to crop relative to an images size even if that size changes.
If you would like to use variables to control the crop parameters simply type in the variable name surrounded by [] as in a [variable] expression. For example, if you enter in [image_count] into one of the provided text box the image will be cropped according to the image count. I.e. as the image is updated image_count is updated which will cause the cropping to change. See Set Variable to create new variables.
Interface
Instructions
1. Dimensions - Specify the crop dimensions by either typing in the appropriate number or use the
up/down buttons to adjust the numbers. Note that numbers larger than the current
image size are ignored and do not contribute to cropping.
Note that you can use the [variable] expression format in each of the coordinate boxes in order
to programatically change the values.
2. Resize canvas - Normally the crop will resize the current image to include only those cropped areas. As this does change coordinates within the image it is sometimes desirable to keep the image dimensions and just black out the non-active areas. When this checkbox is selected the image retains its dimensions and blacks out the rest of the image.
3. Alignment - Given the crop coordinates specify the alignment bias of the crop. This allows you to move the crop window relative to different sides of the image. For example, if you wanted the right 100 pixels of the image regardless of image size you would specify xstart:0, ystart:0, xend:100, yend:0 and any of the right sided radio buttons under alignment. Note that a ending coordiante of 0 implies the width or height of the image (it is assumed a size of 0 would not be desired).
4. Automatic - Select this checkbox to turn on automatic cropping. Images often taken as screen shots, scanned images or images from devices with extra borders around them can be automatically cropped by detecting the box around the image in which to crop to. The Automatic option causes the Crop module to automatically detect this box and crop the image to those dimensions. Note that autocrop assumes that the image is surrounded by perfectly horizontal/vertical lines having been introduced by GUI interfaces or are digitially introduced.
5. Automatic Tolerance - When searching for the border lines you can increase the tolerance which will allow for pixels in vertical and horizontal lines that are slightly different in color to be considered a continious line.
6. Automatic Maximum Crop Size - Sometimes the autocrop routine will detect a much smaller box within the image and crop too much out of the image. Specifying a low crop percentage will ensure that the image is not cropped too much. I.e. it is assumed that the crop coordinates will be more towards the border of the image rather than in the center.
7. Provide End_CROP to restore image - When selected this will change the functionality of the Crop module to be more like an ROI (Region of Interest) in that it will place the currently cropped image (and any transformations on that image) back into the original pre-cropped image. This allows you to selectively crop certain areas of an image and place the results back ontop of the original image for context.
Once selected and the End_Crop module appears in the pipeline, move/insert the modules that are to process the cropped area within the Crop and End_Crop modules in the pipeline. Once End_Crop is encountered the image with the cropped changes will be restored.
Example
| Source | Cropped |
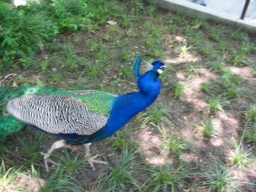 | 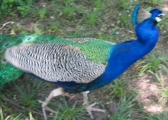 |
Variables
CROP_X_START - holds the x start (left) of the crop transform used

CROP_Y_START - holds the y start (bottom) of the crop transform used

CROP_X_END - holds the x end (right) of the crop transform used

CROP_Y_END - holds the y end (top) of the crop transform used
See Also
Scale
| New Post |
| Crop Related Forum Posts | Last post | Posts | Views |

Hi STeven I often need to mask off areas when using the Blob_filter. It takes ages t... |
11 year | 4 | 3656 |
|
Cropping problems
I have just downloaded the Robo update and experiencing some funny effects on the Crop Module. When... |
12 year | 3 | 3841 |
|
Crop display
Hi STeven, when I use the 'Crop' module, the display looks like you are using the wrong extents (... |
12 year | 2 | 3342 |
|
aperture
Perhaps I just can't find it....... In a complex image, I just want to work on a ce... |
12 year | 2 | 3281 |

Hi, I have a big white particle board on which my robots moves. I have mounted a camera on a L shap... |
13 year | 2 | 3518 |
|
Trapezium crop
Hi STeven, Is it possible to crop trapezium shapes? As the area gets smaller due to perspective, i... |
14 year | 7 | 5696 |
|
Avoid bottom border
Hi STeven, I want to apply a filter that avoids the bottom border only. Can this be done?... |
14 year | 10 | 4116 |
|
Applying two filters
In an effort to improve vision performance outdoors i have an idea to apply two filters on the color balanced image. The bottom... |
14 year | 2 | 3483 |
|
Is there a way to track only in a given section of the camera? Like a cropped section, without having to crop out the entire vie... |
14 year | 2 | 3480 |
|
Hi, Is there a way to put the cropped processed image on top of the original image (just the white... |
15 year | 3 | 4069 |
|
Analysis of specific area of image
I must be blind, but can someone tell me how to specify a particular area of an image for analysis after which point further ins... |
15 year | 2 | 3913 |
|
Hi STeven, Using RR version 2.5.9, I noticed that when I Crop a 320x240 image to a lesser width, sa... |
17 year | 11 | 5240 |
|
Hi STeven, I'm using the latest and greatest RR 2.1.0.0 and I think there may be a bug when the Ge... |
17 year | 3 | 4487 |

I think there maybe a problem when cropping an image using variables generated from point location(etc). If these... |
17 year | 11 | 4980 |

New to RR (very impressive), so I'm not sure about where or how to post. I have a series of trans... |
17 year | 13 | 5826 |