

Counting Objects
Many objects can be segmented from the background just using color. Working with multiple colored objects can be tricky to keep track of and quantify. This tutorial shows two possible solutions for segmenting M&M candy from the background and provides a summary count of what is found in the image.
Technique #1
The first technique is to use the circular nature of the M&Ms to first segment them from the background. We do this by first running the Canny edge detector.
We then use the Circle module to identify circle. We annotate the location of each circle using a white disk 5 pixels smaller than the originally found circle. This ensure that circles are NOT overlapping. This ensures successive analysis will consider each M&M individually.
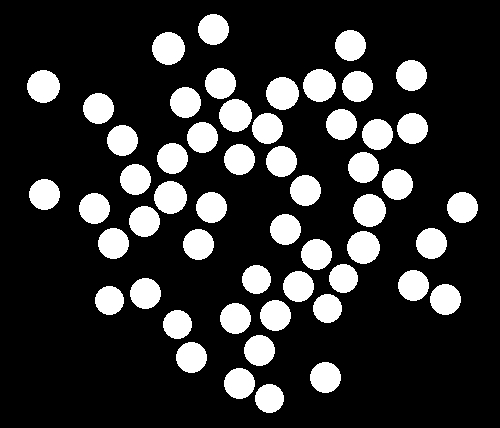
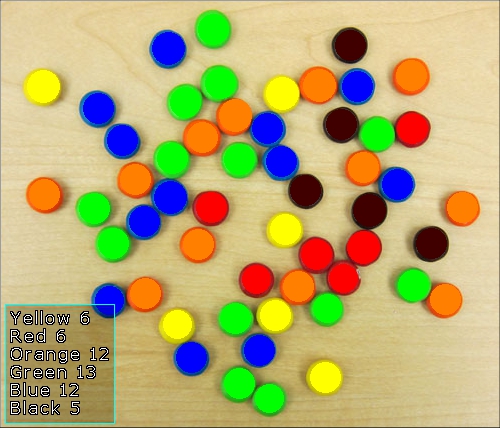
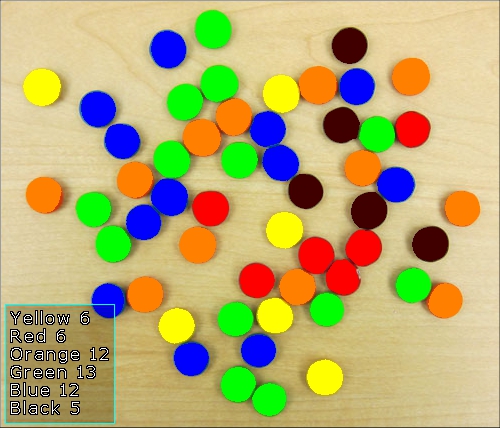
Now that we have a mask for each M&M we replace each disk by the color nearest to the mean color of all the pixels that exist in the same location in the original image. The Blob_Colorize module allows us to do this. Instead of simply replacing each blob with the mean average color of the pixels the white discs are over, it checks first checks within its list of colors for the nearest color and replaces the blob/disc with that color. This performs a crucial step. When the replacement happens, the module also generates an array of the X,Y location of the blob AND includes a label that we create along with those coordinates. The label is important since each green M&M can have very different colors. In order to count all the 'green' M&M's we need to force green colored M&M's into a single label. The nearest color search does this. In other words a blob with mean of 0,245,33 and 4,246,2 which are both green in color will be labeled with 'green'.

Because we now have an array of blobs (BLOB_COLORIZE_LABELS) and their labels we can use a basic VBScript to loop through all the elements in the array in order to count the occurrence of each color.
green=0
blue=0
red=0
yellow=0
orange=0
black=0

list = GetArrayVariable("BLOB_COLORIZE_LABELS")
if isArray(list) then
  if ubound(list)>0 then
    for i = 0 to ubound(list) step 6
			if list(i+2) = "green" then green=green+1
			if list(i+2) = "blue" then blue=blue+1
			if list(i+2) = "red" then red=red+1
			if list(i+2) = "yellow" then yellow=yellow+1
			if list(i+2) = "orange" then orange=orange+1
			if list(i+2) = "black" then black=black+1
    next
  end if
end if

SetVariable "Orange", orange
SetVariable "Blue", blue
SetVariable "Yellow", yellow
SetVariable "Red", red
SetVariable "Green", green
SetVariable "Black", black
The main part of the VBScript code is
if list(i+2) = "green" then green=green+1for each color which simply increments a variable (with the same name as the color we are counting) each time that label is seen in the array. By processing the full array we can get a count for each color. These are then set into RR variables so that we can use the Display_Variables module to show the results. By using the Math module we can merge the full color results back into the original image to verify that we didn't miss anything.
Technique #2
The first technique works well by utilizing the circle module to find the initial M&M's. This works well for circular objects but suppose we had other objects that could not be so easily discovered by their shape. In the second technique we assume the objects are not circular but instead JUST rely on color.
The first step is to reduce the actual number of colors in the image. Any image made up by 1000s of pixels will have very subtle color changes which are not exactly the same. By using the Reduce_Colors module we effectively reduce the image into blobs of similar colors. These blobs will never be perfect in terms of circular shapes but we have to start somewhere.
Now that the image has been reduced to a few colors, we want to remove those parts of the image that are not relevant to our analysis. This includes the tan background (originally the wooden table) and parts of the image that make up the shadows of the M&M's. The Circle detection module in Technique #1 avoided this problem.
The best module for removing unwanted blobs is the Blob_Filter module. This module is perhaps the largest module within RoboRealm because it encompasses so many characteristics that can be filtered. Keep in mind that the blob filter will see each different colored group of pixels as an individual blob. The module reports that 202 blobs are found before the module runs. As we only want around 60 actual blobs we have to do a bit of work to remove the 140 that we don't want.
At this point we could also go back and use a circular shape as an attribute to remove all non-circular blobs, but we will stick with color and size to show more generic filtering. In our case we remove objects smaller than 215 pixels since our M&Ms are larger than that, remove objects larger than 5000 pixels (which eliminates the background table blob) and then remove any blob that doesn't have a strong color. Objects such as shadows will not have a strong hue and thus are removed. The problem, however, is that same filter ALSO removes the black M&M's ... since after all black is not a very strong color!
To remedy this issue we have a second filter within the Blob_Filter module that selects blobs that are much darker than most in the image. This combined with a size filter successfully selects JUST the dark M&Ms. This result is then merged into the primary or Main filter to create the final image which includes both colored AND dark blobs.
The problem now is that many of the blobs are still touching each other. In order to count them correctly we need to split them into individual blobs. Before we start splitting we need to fill in the empty holes in the blobs. This is done using the Fill module.
To split the blobs we separate them using the Erode module. By eroding the blobs by a 10 pixel perimeter which will break them into individual blobs.
Because we want to preserve the approximate size of each M&Ms we then use the Dilate module to dilate each of the remaining blobs by 10 pixels BUT we ensure that no blobs will reconnect. This will then result in each blob being separated from each other.

We can now follow a similar process as Technique #1 by utilizing the Blob Colorize to color in each of the remaining blobs with their source mean color.
and then use the same VBScript to sum up the results.
While the results are the same for both techniques, the pixels that determines a final M&M is a little different. You can see that the color technique does use more of the pixels to define an M&M (i.e. the final area is a bit larger) but as that was not a final measurement we were interested in either technique will work.
In terms of performance, the color technique #2 (while including more modules) is 40% faster than the circle detection technique #1 just for this specific image.
Download the ![]() Count using Circles robofile to see Technique #1
and
Count using Circles robofile to see Technique #1
and ![]() Count using Color robofile to see Technique #2.
Count using Color robofile to see Technique #2.
The End
That's all folks. We hope you've enjoyed this little adventure into an application of machine vision processing. If you have any questions or comments about this tutorial please feel free to contact us.
Have a nice day!
| New Post |
| Counting Objects Related Forum Posts | Last post | Posts | Views |
| None |