
Object Recognition
The Object Recognition module provides a way to identify specific trained objects within the current image. Once the module is trained with sample template images it will identify those objects within the current image depending on the filtered parameters of confidence, size, rotation, etc.Serveral of the techniques will account for different object sizes, location and in plane rotation (roll) of the object aswell as variations in lighting and contrast. It will NOT account for significant rotation of the object in the X and Y (pan and tilt) directions. Should you need to identify a 3D object in any orientation you will need to include template examples of each orientation.
Templates are created by including images into a folder that is used as the training samples for this module. Thus you can use any image editing application to edit and manage those templates as needed. Note, it is always best just to include the object to be identified without any background parts of the image. Only one folder at a time can be selected into a single object Recognition module. By changing the folder you change those objects that are to be identified. Note that you can also use more than one Object Recognition module within the pipeline.
It is recommended to use as large a template image as possible that will appear in the scene. One that encompasses as much of the image size as possible is best. This is because the Object Recognition module will only seek out objects from the template size down to a minimum of 1/3th the template size. Thus having the template contain the most amount of detail will provide the best results. If you specify too large an object then smaller versions of the objects may not be recognized as they may fall below the 30% size limit.
Several recognition methods are provided. As many objects/environments differ in task the module provides various methods that can be switched between in order to determine the best technique for your use. Note that while you can switch between the techniques by selecting the appropriate radio button the module will NOT update the template database when you switch to that method. Thus if you add a new image and want to experiment with all techniques you will have to switch to each method and you MUST press the Train button in order to ensure that the template database is up-to-date.
Feature Points
This method will identify interesting points within the template using a modified fast Harris feature detector and match those points with those detected within the current image. The identified points are typically corner-like points that exhibit restraining forces in each direction (i.e. the highest edge signal in both X and Y directions will be maximal at the point's position). This helps to stabilize point choices in both the template and image such that most (but not all) points will be detected between the template and image. Once this correlation has been done the most likely template is then tested for at that location using a slower cross correlation technique. This technique is a good standard technique assuming there is enough internal texture within the object (think of a book cover) and is fast enough for most purposes.
Keep in mind that as this technique mainly uses corners as features motion blur will cause all those features to disappear and therefore not match correctly. Thus if you have a lot of motion blur within images you wish to match against you may need to decide on an alternative technique.
Objects to be detected MUST have internal texture as this module relies in inner feature points as the primary object identification technique. If you are interested in just the shape of an object the Shape Matching module will be of better use or the Shape method mentioned below.
This method will check for translation, scale and orientation.
Shape
The shape matching method is similar to the Shape Matching module but this method works on intensity images contrary to the Shape Matching module which uses binary (Black&White) images. The shape method will analyze the template and current image for correspondences in shape and determine which parts of the image best contain a particular template.
Due to its reliance on shape the shape matching method can determine any size and orientation (including X and Y location) of the template image within the current image in about the same time as the cross correlation method does just X and Y location. Its speed and flexibility make the shape matching method very useful when limited internal template texture is available. For example, labels, street signs, text, logos, fiducials, etc. are all ideal templates for the shape matching method as they consist of non-textured areas and rely on shape as their primary form of identification.
It is recommended to use templates that are as large as possible with regards to what may be seen in the current image. If small templates are used and matching to larger possible targets in the current image is attempted a mismatch will occur as more detail will be in the current image than what is contained within the template. Thus it is important to use a template by cropping the largest size seen of the template in any test or production images.
This method will check for translation, scale and orientation.
Haar
A very popular face recognition technique uses Haar like filters to determine a set of pixels comparisons that best represents the concept of a face. While this has its uses the Haar technique can also be applied to specific object recognition. In this scenario many high intensity versus low intensity checks are created that when run in sequence will identify a template with a high probability. These checks can be run across the image very quickly and even adapt to size differences but they cannot be quickly rotated and thus are restricted to a single orientation.
Note that contrary to typical Haar training this method only requires ONE sample image to recognize the image and does NOT create a generic class based on that image. Thus if you want to recognize a class of objects you will need to include a couple images to best represent that class.
This method will check for translation and scale.
Cross Correlation
This method uses a well known and established technique for object recognition. The normalized cross correlation method has been widely used in many applications and can be one of the more stable techniques to use. The algorithm behind the cross correlation technique is, unfortunately, very CPU intensive and therefore should be used with care otherwise significant time may be spent on searching for objects within an image.
The cross correlation algorithm will use the template as saved in the trained folder and compare the template pixel by pixel at each pixel location within the current image. For example, if your template is 50x50 pixels large and your current image is 320x240 large this will mean there are approximately 2500x76800 = 192,000,000 pixel comparisons to make. This brute force method is entirely too slow for reasonable usage so tradeoffs between the size of the template versus the size of the image is made in order to speed up comparisons. While this does significantly speed up the algorithm some accuracy is forfeited as a result of that speed.
While normalized cross correlation does attempt to best deal with lighting changes between the template and the current image it is not performed within the image itself, thus while the template and current test image can be overall darker or lighter if a shadow is cast across the template that is not also within the current image the recognition process will fail.
To further reduce performance requirements the cross correlation method ONLY checks for templates of the same size AND orientation. Thus a template is only searched in the X and Y direction. If the current image contains the template at a different size it will NOT be recognized (but can still be tracked). If this is a requirement for your project and you decide to use cross correlation you will need to add the template in different sizes to the training folder. We recommend changing template sizes in increments of 10% which typically will provide adequate coverage.
If orientation is required you may attempt to use the Orient Image module prior to cross correlation which will help to specify a standard orientation prior to matching. Note that you will need to add the 180deg rotated template within the training folder if you decide on this direction as the Orient Image will most likely have a 180deg symmetry and therefore not always align to the same 180 direction.
For comparisons that are image to image (meaning NO change in X or Y) the cross correlation technique can be one of the fastest. Thus if you goal is to find an image that exists within a known database without any size, orientation, horizontal or vertical shifts the cross correlation technique is a good technique to attempt.
Interface
Instructions
1. Train - Press the train button and enter the full path to the templates folder that you want to train on. Press the START button to start training. After it is complete press the ok button.
2. Display - You should now notice the objects being recognized in the main RoboRealm window. Matches are displayed as green boxes. Note that the 'name' of a object is the name of the template image filename without the extension. So you can change the names by changing the filenames and re-train. Note that size is based on the size of the trained template where 100% is the same size as the trained template.
By default the Filename and Confidence are displayed. You can add or remove information from being displayed by changing the checkboxes in the Display area. Note if too much information is displayed you might want to change the Font size to a smaller size.
- Filename - the name of the object.
- Confidence - how strongly the module believes this object matches one in the database folder.
- Coordinates - the location of the matched object.
- X Translation - the X location with respect to the center of the screen of the object.
- Y Translation - the Y location with respect to the center of the screen of the object.
- Size - the size of the object relative to that in the database.
- Orientation - the Z rotation or angle of the object (spin)
3. Box Color - You can change the match box color by changing the Box Color.
4. Check - If you want to restrict where the module will search for a template you can restrict the search space by un-checking the appropriate checkboxes. For example, if you know the template will always appear in the same size you can uncheck the Scale checkbox. Removing search requirements will help to speed up the search. Note that if you remove X then the module will search along the vertical center of the image for the template, likewise with removing Y will cause the search in the horizontal direction. If you remove both X and Y then the center of the image will be checked for the presence of the template.
5. Tracking - Recognizing objects can be a very taxing process on your CPU. To remove some of this load you can chose to have tracking enabled which will quickly look for the recognized object in the previous image in its immediate area and adjust for any movement. Tracking is much faster than recognition and can also track in more dimensions than the original recognition method. For example, if you use the Cross Correlation technique to recognize an object and have tracking turned on, once recognized the template can now be scaled and rotated and still be identified even though Cross Correlation does not support scale or orientation changes!
6. Tracking Confidence - Once an object is recognized the actual tracking (recognizing from one image to the next) can use a lower confidence since the movement of an object can cause temporary distortions or highlights/shadows within the image. You can use the Tracking Confidence threshold to be lower than the recognition threshold to ensure that once objects are recognized they will still be tracked under harsher image conditions.
7. Filter Confidence - Many candidate objects do pass the basic match requirements but do not match with a known object very well. You can remove those unwanted matches by increasing the Min Confidence. This removes bad matches from being made.
8. Filter Scale - Each recognized object has a scale associated with it that can be used to remove larger or smaller matches.
9. Filter Orientation - by default objects are recognized in any orientation. You can use the Filter Orientation to remove those objects outside of your desired orientation. For example, 15, 345 would remove any object +=15 degrees from that what is in the database.
10. Stabilization - When moving the camera motion blur can cause incorrect low confidence matches to appear. By increasing the "Present After" you are requiring a object to appear for a set number of frames before being reported as a match. This essentially removes the "flickering" of low matched objects that can cause noise in the results. Note that if you are working with static images you will need to set this to zero! In the same way the "Absent After" number will only remove an object from being tracked after the specified number of frames. This will help prevent the momentary disappearance of the object due to pixel noise.
11. Filter Matching - If you know you only want to track a single object you can specify a 1 in the top matches box which will only return a single best recognized template from the current image. Likewise, if you know that you will never have more than 3 recognized objects you can specify 3 in the same box. This helps to remove lower matching templates without having to adjust the confidence threshold.
12. Overlap - Specifies the amount of allowed overlap between objects. Often similar objects may be detected in a similar location which may not be desirable. The amount of overlap will remove those less confident objects to result in a single dominant recognition. You can use this (default setting of 20%) to ensure that no objects overlap by more than 20% or by whatever percentage you use.
13. Variables - To use the results of the object module in your own application or in other RoboRealm modules you can select that the object array be created. This array has all the collected information about a detect object. See below for the array format.
14. Treat black as mask - Select if your templates contain pure black areas that should NOT be used in matching a template with a potential match. This helps to eliminate parts of a non-square template and create a higher confidence match result.
15. Display Results - By default No Change is selected which does not modify the current image in any way other than annotating the objects with the above colors. If you want to use the results in other modules you can select to see
- Colored - displays only the objects with their original pixel colors
- Inverted - displays everything else but the object (which is blacked out).
- White Mask - white where the objects are, black everywhere else
- Black Mask - black where the objects are, white everywhere else
Example
| Source | Object_Recognition |
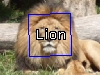
| Recognition of a basic shape. As the object becomes less planar the match confidence will decrease. | 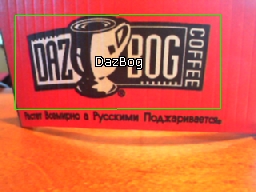 |
| Scale invariant recognition of the same object. Notice significant lighting change. |  |
| 180 degree rotated objects are still recognized. | 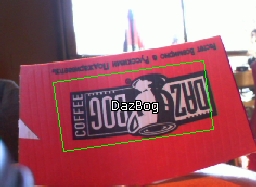 |
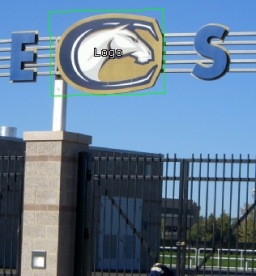
| These recognition methods are useful for parts identification and verification. But try to keep a perpendicular view without too much camera distortions. | 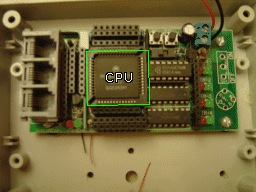 |
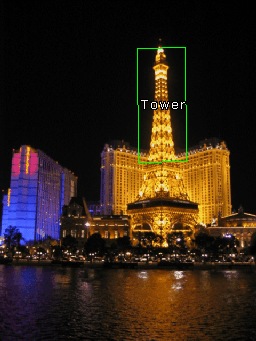
| These techniques can work on 3D objects but not if the view angle (X&Y) changes significantly. Taking images of far away objects will normally work better as you'd have to move quite a bit to change the view angle. |  |
 | |
 | |
| Different techniques will work better on different objects. In this case there are not enough feature points to detect the object ... but the Shape technique has plenty to work with. | 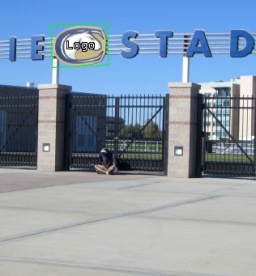 |
 | |
| These techniques are good for specific object identification but do NOT work as a general classifier for objects. In this case while very similar the open window is different enough to fail as being identified as a window. You can always include more templates but there is a limit. | 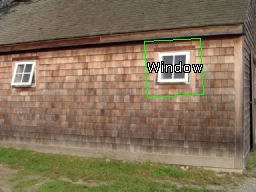 |
Variables
OBJECTS - contains an array of detected objects.
OBJECTS_PATH - string that contains the names of the objects.
  This single string contains all the names and is used
  by #13 and #14 below to extract out the actual name.
OBJECT_COUNT - the number of objects recognized and the
  total size of the OBJECTS array (OBJECT_COUNT*15)

The array contains blocks of 15 values per detected circles. The
elements are as follows:

The OBJECTS array is composed of 15 numbers as follows:
Offset      Contents
0           Match Confidence 0-100
1           Point 1 X coordinate
2           Point 1 Y coordinate
3           Point 2 X coordinate
4           Point 2 Y coordinate
5           Point 3 X coordinate
6           Point 3 Y coordinate
7           Point 4 X coordinate
8           Point 4 Y coordinate
9           Translation in X
10          Translation in Y
11          Scale 0-100
12          Orientation 0-2PI (radians)
13          Path start index
14          Length of path

For example, to print out all found objects use the VBScript module
and the following script.

objects = GetArrayVariable("OBJECTS")
names = GetStrVariable("OBJECTS_PATH")

if isArray(objects) then
  if ubound(objects) > 0 then
    for i=0 to ubound(objects)-1 step 15
      nstart = objects(i+13)
      nend = objects(i+14)
      write "Conf: " & objects(i) & "%  Path: " & _
        mid(names, nstart, nend) & vbCRLF
    next
  end if
end if

If you wanted to write the COG to a file you can VBScript to format and write it to a file.

objects = GetArrayVariable("OBJECTS")
if isArray(objects) then
  if ubound(objects) > 0 then
    Dim fi
    Dim fso
    set fso = CreateObject("Scripting.FileSystemObject")
    set fi = fso.OpenTextFile(CStr("c:\temp\test.txt"), 8, true)
    if err.number = 0 then
      fi.writeLine "x,y"
      fi.writeLine (ubound(objects)+1)/15

      for i=0 to ubound(objects)-1 step 15
        x = (objects(i+1)+objects(i+3)+objects(i+5)+objects(i+7))/4
        y = (objects(i+2)+objects(i+4)+objects(i+6)+objects(i+8))/4
	    fi.writeLine x & "," & y & "," & objects(i+12)
      next
    end if
    fi.close
    set fi = nothing
    set fso = nothing
  end if
end if

For ease of access the largest object's information is
also available in the following variables

OBJECT_CONFIDENCE - the confidence of the best matched object
OBJECT_NAME - the name of the matched object
OBJECT_FILENAME - the filename of the object
OBJECT_FOLDER_X - the folder sequence that the object is in
  (replace X with 1, 2, etc.)
OBJECT_SIZE - the size of the best matched object
OBJECT_X_COORD - the x location relative to center screen of
  the best matched object
OBJECT_Y_COORD - the y location relative to center screen of
  the best matched object
OBJECT_ORIENTATION - the orientation (spin/roll) of the largest object
See Also
Shape Match
Fiducial
Image Matching
| New Post |
| Object_Recognition Related Forum Posts | Last post | Posts | Views |

I've tried to call other objects recognition in section 2 by passing Cscript but It's also returned to call object re... |
3 year | 2 | 4493 |
 Recognition center of object
I recognition object with "Object recognition" with Cross Correlation module and i want to find the center of object ... |
7 year | 2 | 2725 |

Hi STeven, Is there a way to programmatically train images for matching - for example for "Object M... |
8 year | 8 | 3531 |
|
Object Recognition_Template folder samples
Colleagues: By any chance are there sample folders of template images available on-line for down lo... |
8 year | 4 | 3235 |

Hi all, I am completly new at Roborealm. My current task is to recognice the center of Black&White ... |
9 year | 2 | 3234 |
|
visual data scraper
would I be able to use this in tandem with a Python program to scrape web data? first training it with each website and then let... |
9 year | 4 | 3100 |
 If a Different Object Recognized= Different Robot Action
Hello, I have three different objects. The Object Recognition module performs excellent and if any of the three ob... |
9 year | 4 | 3671 |
|
Object recognition or image matching
Dear Steven, Good Morning, It's observed that when I use object recogn... |
9 year | 2 | 3389 |
 Roborealm Crashes without reason
Hello Steven, I have some problems with my Roborealm, it always crashes after working some minutes. I logged detai... |
10 year | 5 | 3648 |
 Best shape to detect upper-left corner of a table
Need to find X,Y coordinates of upper-left corner of each table in [Temporary 2.jpg]. I use Object_Recognition module -> Shap... |
11 year | 6 | 3628 |
 WaitVariable - how to use it
I wrote an application in Delphi. Application utilize Robo-Realm (see attached RRTest.Pas procedure) to analyze image (Temporary... |
11 year | 15 | 8612 |
|
banknote recognition
Hello all, I am working on a small project to detect all the banknotes pass in front of camera. I d... |
11 year | 4 | 3182 |
|
Limit on images in object recognition module
I'm attempting to use the object recognition module for face tracking, training faces in different poses. This will take quite a... |
11 year | 3 | 3666 |
|
I'm using the Object Recognition Module. Once my object is detected, I want to be able to open the same detected image, original... |
11 year | 3 | 3125 |

Hello. I'm trying for a few days to run Roborealm to work with recognizing position and angle blob (lighter). Ligh... |
11 year | 13 | 4756 |