
Serial Communication
The serial module is used to communicate from RoboRealm to serial based controllers. The module can be used to communicate to SSC, Parallax, etc. type controllers. Before embarking on using the serial module check that the specific device is not already supported by another RoboRealm module as that will be easier than understanding and implementing a particular device's protocol.The serial module allows you to configure the serial port for various communication parameters (baud rate, stop bits, etc.) and specify the communication protocol for initializing, sending and receiving data. The text boxes allow you to enter in the necessary command numbers for each respective sequence type (read or write).
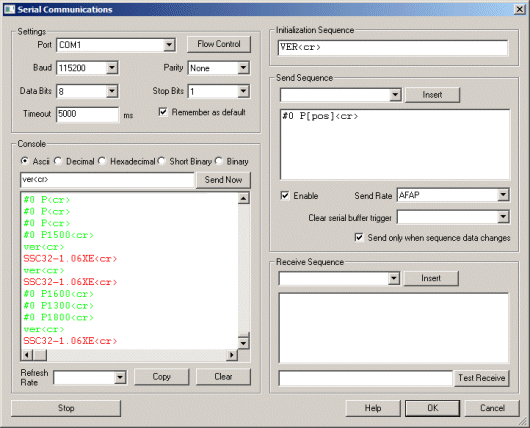
Interface
Instructions
1. Port - Select the COM port to use. Note that COM1-4 are typically assigned directly to hardware ports. COM5+ are typically assigned to virtual ports created by USB devices.
2. Baud - Specifies how fast communication will occur between the PC and serial device. Typically rates are 9600 with the fastest being 115200. Note that if you see irregular characters being received from the serial device this many indicate a mismatch between baud rates.
3. Data Bits - Indicates how many bits are reserved for data communication between the serial device and the PC. Typical value is 8.
4. Parity - Indicates what kind of error checking that is performed during serial communication. Even means the last bit is set to ensure that an even number of bits are used, whilst odd means the last bit is set to ensure that an odd number of bits are used. When the receiving side sees a discrepancy (i.e. an odd number of bits being transmitted when even parity is required) the device knows a transmission error has occurred. Typical value is None.
5. Stop Bits - Refers to how many bits are used to indicate a delimiter between data bits.
6. Flow Control - Allows you to set the flow control options for the serial device. By default
RoboRealm sets all flow control to off/disabled. By clicking on the Flow Control button you can
set the following options
7. Wait for reply - Forces the module to wait for a reply after characters have been sent. This ensures that the module pauses until a reply has been received from the remote device. Note, this can cause the pipeline to slow down due to the pause for a reply. Only select this checkbox if you require a reply before continuing the pipeline.
8. Session Timeout - when receiving information from a serial device this number represents how long the module will wait for a character until giving up and resetting the connection. Note that the value is in milliseconds, where 1 second = 1000 milliseconds. The default is 5000 or 5 seconds.
9. Message Timeout - When receiving information from a serial device this number represents how long the module will wait for the next character until giving up and assuming the message is complete. Note that the value is in milliseconds, where 1 second = 1000 milliseconds. The default is 100 or 0.1 seconds. This is very useful when no delimiter is specified and a complete message is determined by the lack of new characters for a small period.
10. Console - if the device supports reading you will start to see a large amount of numbers scrolling by in the console. This
shows the current values being read from the device
and provides a log of the ongoing communication activities. The green text is from RoboRealm,
the red text are characters received and the green text are characters sent by RoboRealm to the device.
To copy the log click on the Copy button, likewise to clear it click on the Clear button. Note that the
console log only shows several lines at a time with older information being discarded.
You can switch the output to various formats for better viewing:
11. Send Now - often you need to quickly test the device by sending a certain sequence of characters. To
do so just type in the character sequence (using
12. Refresh Rate - to slow the scrolling of the numbers select a different refresh rate for the console. This will just slow down
how quickly RoboRealm reads information from the device.
13. Initialization Sequence - The initialization data sequence sends the provided string to the serial device
on initialization of communication. You may want to use
this to command the receiving device into a specific mode ready for communication with RoboRealm. This initialization
sequence is sent each time the serial communication is reset. This happens when you click on the "Stop" button in
this interface, change one of the above parameters (Baud, Port, etc) or when the RoboRealm starts running for the
first time. It is NOT sent when the Run button in the main RoboRealm interface is toggled.
See the Text Formats page for additional information about the text string format.
14. Send sequence - Used to enter commands sent per pipeline loop (i.e. image processed) by RoboRealm. You can
use this sequence to transmit variables created by other RoboRealm modules to the
serial device. Each time an image is captured and processed the serial module will
interpret the Send Sequence text and send the result to the serial device.
See the Text Formats page for additional information about the text string format.
15. Enable - Allows you to temporarily disable sending text to the serial device while performing
edits. Note that the Send Sequence textarea will turn red to indicate this setting.
16. Send Rate - Some serial devices cannot handle data streams even given a slower baud rate. Use this
dropdown to select how quickly you want the data to be sent. At AFAP (As Fast As Possible) the data
will be sent out about 30 times a second (this assumes a camera running at 30 fps).
17. Clear serial buffer trigger - there are cases when too much data may be buffered on the serial
port that needs to be cleared due to some event. In this case specify a variable whose value when set
to "clear" will remove all data scheduled to be sent over the serial port.
18. Send only on change - If your data does need to be sent out to your serial device every iteration
through the processing pipeline loop this selection will prevent the same data from being sent to the
serial device that was last sent. This is also an elegant way to reduce the data bandwidth to the
device if your sequence does not change rapidly.
19. Receive sequence - used to receive and parse text send from the serial device. The
text string is matched against the incoming serial bytes. When a match is found
variables are added into RoboRealm for use in other modules. Reading into variables just
requires adding in a variable at the appropriate spot within the receive string similar to the
scanf routine in C/C++. The Receive sequence works similar to an expect string, i.e. you need to
specify patterns that match the incoming text and substitute the areas that need to be
fed into variables with the [ variable_nane ] format. Note that even if you are missing
one space or newline the patter will not match and the variable will be zero or blank.
See the Text Formats page for additional information about the text string format.
20. Test Receive - instead of waiting for the correct data bytes to come from your serial device
you can type in a test sequence that will be parsed by the receive sequence. This can be handy when
first testing that your receive sequence is picking up the right bytes.
To learn more about what text can be used in the the Sequence boxes please refer to the
Text Formats page.
To read digital inputs from a VEX Robotics System robot over the serial port you can configure the settings to port COM5, baud 115200, 8 data bits,
no parity, 1 stop bit with the sequences as:
Initialization Sequence
Send Sequence
Receive Sequence
which would command the Vex in the online mode (be sure to download that code to your
Vex robot) and read in the digital inputs into variables din1, din2, din3, etc. You can add
the Watch Variables module to see these variables change when you press
a bump switch on the Vex.
Note that the Vex online mode needs to be downloaded prior to using this serial sequence. Be sure
your Vex is reacting to the online interface provided by Vex to ensure correct online operation.
Example
\x0f\x0f\x08\x40\xb8\x04
\xaa\x55\x00\x00\x00\x0B\x00\x00
DIN [din1] [din2] [din3] [din4] [din5] [din6]<lf>See Also
MCU Communicator
SSC
Parallax
For more information
CodeGuru: Serial Communications in Windows
The Code Project: Serial library for C++
New Post
Serial Related Forum Posts Last post Posts Views
Hardware interface
Hi STeven
Do you know the method/interface most commonly used to interface to RR, in industrial sys...7 year
3
3891
Display object recognition values as integers
I'm trying to configure the serial communications module to send object orientation as only an integer. I've seen that this is p...8 year
2
3606
![]() Serial Communication Arduino Uno
Serial Communication Arduino Uno
Hi, good days. im unable to perform serial communication to arduino. i attach robo file and arduino source code for your referen...9 year
5
4779
numbers vs strings
I am trying to control motors with a microbasic ARC32. The problem is when I send wheel speed info over serial, RR sends strings...9 year
3
4157
Syntax to receive char from arudino to vbscript
hey guys. I'm doing a project which uses roborealm vbscript and arduino (using serial module). the vbscript will send a characte...9 year
2
4286
![]() navigation by computer vision
navigation by computer vision
am writing a simple vbscript for navigation of car by computer vision ie. image processing
i want to send serial c...10 year
27
6949
![]() Socket Client data to Variable
Socket Client data to Variable
STeven,
I'm successfully getting TCP data sent to me from a radar device. Data looks like this and updates at 1 Hz...10 year
8
4876
hardware lab
program to do serial communication using usart
how to transfer data from kit to pc
may i have mnemon...11 year
2
4307
![]() Display Serial Data
Display Serial Data
Hi,
I have serial data displayed but it flashes on and off at the at the serial data refresh rate.
I...11 year
5
4840
xy table
Hi Everyone- Well, I'm brand new to the forum, so please bear with me......What I'm trying to do is this: I am in manufacturing,...11 year
5
5377
 serial communication code
I am trying to control a Pelco D protocol PTZ camera using rs-232 to 485 convertor and the serial module found in roborealm.
11 year
4
4877
serial defaults
Hi STeven
Looking at the serial screen, most of the fields are blank. What are these...11 year
2
4698
Serial Module skips/sends/returns wrong data
Greetings STeven! Thank you for this impressive software.
I am trying to identify and sort various ...11 year
4
4537
RobotC
My nxt brick is currently running the robotC firmware on it, this is different from the nxt firmware that comes out of the box. ...11 year
2
4711

![]() RR Crash every few minutes
RR Crash every few minutes
Both RR 2.61.8 and 2.61.9 crash every few minutes, no matter what I am doing - running, editing, ignoring...
Pleas...12 year
19
5264
Serial Communication
Hi, I am using RR to interface with my PIC based embedded system, using the serial module to send commands to the board. Using t...12 year
2
4317