
Screen Capture
The screen capture module provides you with the ability to capture the video output of any application that has a display on your computer screen and process that output within RoboRealm as if it were just another webcam video stream. For example, the very popular virtual environment Second Life can be used as a simulator to test out computer vision algorithms without needing a robot or scenery to physically exist. The benefits of using simulators during robotic development has been well known (see the MSRS simulator) but having multiple games and simulators act as robotic hosts allows one much more flexibility in testing and designing for the physical world. Plus games already have a particular goal surrounding the environment and many human individuals to contend with, learn from and stimulate challenging situations.Including this module with the Keyboard Send or Mouse module provides a method to automate the interaction with virtual environments in a way that has previously not been possible without significant integration work.
While convienient, the capturing of application interfaces is this way is not ideal. If you elect to capture a specific application the application always needs to be at the foreground of the desktop otherwise the screen capture will show the other overlapping applications within the captured image of your application. In the GUI controls for this module you can specify to have your application always on top which should help to reduce this issue. Note that this module is best used with a very large screen where you can have the RoboRealm application and the desired to be captured application running side by side.
Note that applications that run within a Window will work best to automate. Games that switch resolution into fullscreen may not work correctly due to DirectX conflicts. Check your specific game as to how to run it within a Window. For example, using "halo -window" will run Halo within a window and allow the interaction between programming an automated character using RoboRealm much easier to do.
Interface
Instructions
1. Entire Desktop - Select if you wish to capture your entire desktop and start processing it with RoboRealm.
2. Active Application - This selection will always cause the current focused application to be captured. Note that as you switch from application to application the captured image will adjust to the new window size. Also note that offscreen parts of the captured window will appear black.
3. Specific Application - Select the application you wish to capture. This will ensure that only the application specified will be captured. Note that if the "Keep on Top" checkbox is NOT selected the application may disappear behind other applications and the captured image will appear to be incorrect. This is not an error of the capture function but due to the Z-buffering that is used in your windowed desktop environment. To ensure that the window is captured completely ensure that the window is always fully visible.
4. Coordinates - Specify the specific screen coordinates that you wish to capture. This may or may not include several applications and will not adjust to follow moved applications as option #2 and #3 will do.
5. Flash Capture Area - Select this checkbox if you want to check what coordinate area you are capturing by flashing a box along the specified coordinates.
6. Include Title Bar - When #2 or #3 above is selected you can elect to not include the title bar as that is often not an essential part of the image to be captured.
7. Keep On Top - To ensure that option #3 only captures the selected application select the "Keep On Top" checkbox to force the specified application to always be on top. This causes other windows to move "under" the selected window ensuring that every capture does not include parts of other applications.
8. Frequency - As the computer screen does not have a specified "frames per second" you can elect the speed at which the frames should be grabbed from the screen. If you specify a very very high frequency your computer may become sluggish or stop due to the high CPU requirements for the capture. Normally, a capture around 100 milliseconds which translates to roughly 10 fps should do the trick between keeping the frame motion smooth and your CPU rate at a workable speed.
9. Method - Select which method to perform the screen capture. The GDI or Graphics Device Interface should work well with most windowed applications whereas the DirectX method may be needed for some applications or games that change video resolutions.
Example
| Second Life Screen Capture | Processed for Red |
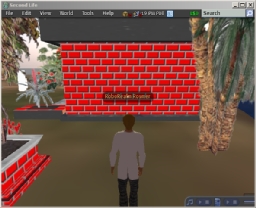 | 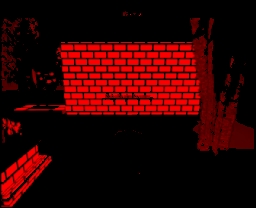 |
See Also
Mouse
Keyboard_Send
| New Post |
| Screen_Capture Related Forum Posts | Last post | Posts | Views |
|
visual data scraper
would I be able to use this in tandem with a Python program to scrape web data? first training it with each website and then let... |
9 year | 4 | 3165 |
|
Youtube Live stream as video source?
Is it possible to somehow select a Youtube live stream as the video source?... |
12 year | 2 | 3385 |
|
Displayed image recognition and respond by running script software
Hi, I'm looking for a method by which I can recognize a certain image on a computer screen (it's... |
14 year | 2 | 3618 |
 Activating the server check box
Hi all, I have downloaded the demo of robo form. I want to try using the API. The first step is to activate the ro... |
14 year | 7 | 4231 |
|
my program takes the responsibility of reading camera image
Hi I have a question. Can I make my program takes the responsibility of reading ... |
15 year | 5 | 4165 |