
Mouse
The Mouse module provides access and control of your desktop mouse. Using the Mouse module you can read in the current mouse coordinates and button status. Using the exact same interface you can also control the mouse position and button status. The interface is bidirectional in that sense.If the variables specified in the interface change based on some other module or VBScript program those values will be used to position the desktop mouse to those coordinates/button status. If, however, the current pipeline does NOT change the variables specified then AND the mouse changes position then those values are put into the specified variables. Thus, if you change the variables specified the mouse will respond accordingly, but if you only read the variables then the values of the actual mouse position and button status will be used to populate the variables. The direction is based on how you use the variables.
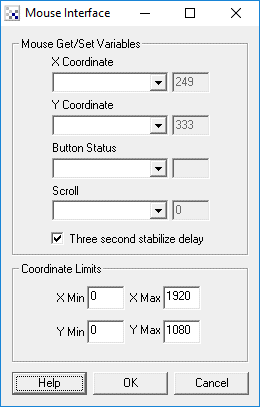
Interface
Instructions
1. Get/Set - Specify the variables that will either contain the values to set the mouse cursor or are used to read in the current mouse position and button status.
2. Three second stabilize delay - Normally the module will not change the mouse position (Set) unless the mouse has stopped moving for 3 seconds. This is to ensure that you do not have to fight over control over the mouse. If you uncheck this checkbox then the module will attempt to set the mouse position each time. Keep in mind the ALT-R key which will toggle the run button and cause the pipeline to stop allowing you control back over the mouse.
3. Limits - To ensure that the mouse coordinates remain within a specified boundary specify the minimum and maximum limits that the mouse values can range from.
You can set the button status by using one of:
- LEFT_CLICK
- RIGHT_CLICK
- LEFT_DOUBLE_CLICK
- RIGHT_DOUBLE_CLICK
- MIDDLE_CLICK
- LEFT_DOWN
- RIGHT_DOWN
- MIDDLE_DOWN
- LEFT_UP
- RIGHT_UP
- MIDDLE_UP
When reading the button status the value will be one of:
- LEFT_DOWN
- RIGHT_DOWN
- MIDDLE_DOWN
Example
![]() Click here
to load a configuration to move the Mouse based on the position of a red object! We configured the
mouse button to fire when the ball becomes > 50 pixels. You may need to change that based on
your red object size and how close you are to the camera.
Click here
to load a configuration to move the Mouse based on the position of a red object! We configured the
mouse button to fire when the ball becomes > 50 pixels. You may need to change that based on
your red object size and how close you are to the camera.
Moving a red object in front of your camera will cause the mouse to also move. Note that moving the object up moves the mouse down. If you move the object towards the camera (zooming) and the COG_BOX_AREA is above 50 then a mouse button click is simulated. So if you start out with a really large red object your desktop will probably get quite crazy as simulated mouse clicks are spread around. The best way to start this demo is to not have any red objects around, then introduce a small red object (like a object the size of a gold ball) and then gradually move the object towards the camera to click.
Clicking on a window is very tricky. You have to keep your hand steady with respect to the camera while approaching the camera to ensure that the mouse does not move away from the window bar.
You can still use your mouse even when RoboRealm is trying to control it. Once RoboRealm sees the mouse moving it will wait until the mouse is stable for 3 seconds and then start setting its position again. When you run the above example, wait for 3 seconds, and you should then start to see your mouse jumping around. The above configuration is created for a 320x240 camera meant for a 1280x960 screen. Thus there is a scale factor of 4 in the VBScript that you may change based on your screen and camera size. The larger the camera size the more stable the mouse will become.
Variables
SCREEN_WIDTH - specifies the desktop screen width
SCREEN_HEIGHT - specifies the desktop screen height
See Also
Joystick
| New Post |
| Mouse Related Forum Posts | Last post | Posts | Views |
|
Cursor hide
Is there a method to hide the mouse cursor? I will be using physical buttons for all functions, and in kiosk mode... |
12 year | 3 | 3332 |
|
Hi, I would want to know if it is possible to move the mouse and to make click on the coordinates from me you est... |
13 year | 4 | 4404 |
 Mouse Button Status
Hi, I am having trouble reading the mouse button status. I have tried;... |
14 year | 3 | 3600 |
|
Hey there, I recently downloaded RoboRealm 2.37, and I was trying to use the "Mouse_example1" pro... |
14 year | 5 | 4896 |
|
Copy & paste text
Hello, It so happened that my boss wants to mimic the mouse movement of copying and pasting of cert... |
17 year | 4 | 4261 |

Hello! Im using RoboRealm to play tictactoe versus my robotic arm. I use a webcam to watch the board. This image is then convert... |
17 year | 5 | 5209 |
|
Mouse module
I would like to use the mouse to track the motion of the surface below it. The idea is to continualy acquire the mouse position.... |
17 year | 5 | 4583 |