
Lego NXT Ball Grabber
The following tutorial illustrates how a modified Lego Mindstorm NXT robot can use machine vision to find a blue ball, pick it up and move it over towards an orange cone.If you are impatient you can skip to the last page of this tutorial and watch the videos!
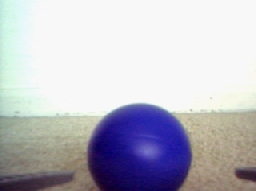
The NXT robot is a modified TriBot with the touch sensor removed and a wireless camera attached in its place. The wireless camera transmits the image to a base station PC that processes the image using RoboRealm. Using bluetooth the appropriate motor commands are then transmitted back to the NXT. This combination of a PC and NXT provides a great degree of processing power and flexibility but does limit the operational range of the NXT to within a couple feet of the base station.
;)
We can build a more powerful TriBot by using a wireless camera and
receiver.
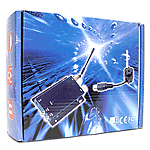
The wireless camera was attached using lego parts and can be purchased for around $40.00 from
Computer Geeks.com.
The camera's receiver requires a NTSC digitizer that can be purchased for around
$50.00 from Hauppauge. The digitizer connects to the PC
via a USB connector. For around $100.00 in COTS (Commercial Off The Shelf) parts you
can provide your Lego NXT robot with machine vision capabilities.

Using this equipment the control loop is as follows: camera -> wireless transmission -> wireless receiver -> digitizer -> USB 2.0 -> PC -> RoboRealm -> Bluetooth -> NXT brick -> motor movements and then back to vision. This loop is someone longer than having an on-board vision processor BUT it does have a PC in the middle of the loop which is capable of a lot more processing than most onboard processors can provide.
In this tutorial we introduce a sequence that relies completely on vision without using any other sensors on the NXT (this is possible to do but that is for another tutorial). The sequence that we wish the TriBot to perform are:
- Spin around in the current position looking for a blue ball
- Approach the ball until sufficiently close enough to grab it
- Grab the ball using the TriBot grippers
- Spin around again looking for an orange cone
- Approach the cone until sufficiently close
- Drop the ball close to the cone
While this sequence is quite simplistic there are many problems that one encounters when using a vision system. So let's get started by understanding the camera setup first ....
Lego NXT Camera
Note that you can click on any of the below images to get a larger view.As mentioned the camera used is a small wireless NTSC transmitter. The camera requires a 9 Volt battery as a power source. The one used in this tutorial was purchased from Computer Geeks.com and cost around $40.00.
;) The wireless camera connected to a 9 volt battery. The camera gets mounted right before
the grippers with the 9 volt battery being stowed behind the NXT processor.
The wireless camera connected to a 9 volt battery. The camera gets mounted right before
the grippers with the 9 volt battery being stowed behind the NXT processor.
;) As you can see from this picture we used the parts designed to be the ball holder for the
TriBot to instead contain the camera. The camera holder requires lego parts to slightly overlap the front and
back to ensure that the camera does not slip out. Since the lego parts do not fit the dimensions of the
camera exactly the sides of the camera holder are left to slide in along the bars so that the fixture
can be compressed to hold the camera tightly. The rubbery parts that the ball holder uses act as a nice
buffer between the camera and the lego parts and grip the camera nicely. The white parts in the back of the
holder are used to fix it to the TriBot whereas the white parts in the front of the holder slip
over the front of the camera but do not obstruct the camera view. (The photo displays the camera holder
from the back) The longer gray parts in the back of the holder
slip over the back of the camera to hold it in place.
As you can see from this picture we used the parts designed to be the ball holder for the
TriBot to instead contain the camera. The camera holder requires lego parts to slightly overlap the front and
back to ensure that the camera does not slip out. Since the lego parts do not fit the dimensions of the
camera exactly the sides of the camera holder are left to slide in along the bars so that the fixture
can be compressed to hold the camera tightly. The rubbery parts that the ball holder uses act as a nice
buffer between the camera and the lego parts and grip the camera nicely. The white parts in the back of the
holder are used to fix it to the TriBot whereas the white parts in the front of the holder slip
over the front of the camera but do not obstruct the camera view. (The photo displays the camera holder
from the back) The longer gray parts in the back of the holder
slip over the back of the camera to hold it in place.
The battery pack is strangely the perfect size for a 9 volt battery for a tight fit. The battery holder
is very basic and held on behind the NXT by a single bar slipped through the last remaining hole
behind the NXT.
;) Here we can see the camera being slipped into its fixture from behind. Note the rubber parts
grasping the camera and the sides of the surrounding box being adjusted to miss the screws on the
sides.
Here we can see the camera being slipped into its fixture from behind. Note the rubber parts
grasping the camera and the sides of the surrounding box being adjusted to miss the screws on the
sides.
;) Now the camera is in its fixture and the lower back gray parts have been lowered to hold the camera
in place.
Now the camera is in its fixture and the lower back gray parts have been lowered to hold the camera
in place.
;) This is the final assembly of the camera and battery ready for mounting on the Tribot. You can
also see the camera holder from the front with the two small bars holding the camera in place. Note
that they are much shorter than the gray bars in the back to ensure that the camera's view is
not obstructed.
This is the final assembly of the camera and battery ready for mounting on the Tribot. You can
also see the camera holder from the front with the two small bars holding the camera in place. Note
that they are much shorter than the gray bars in the back to ensure that the camera's view is
not obstructed.
;) An image of the TriBot with the touch sensor missing. The camera will go right at the end of the
shorter inner gray parts which have the small black connectors on the end.
An image of the TriBot with the touch sensor missing. The camera will go right at the end of the
shorter inner gray parts which have the small black connectors on the end.
;) The camera has now been mounted.
The camera has now been mounted.
;) A shot from the other side of the camera mount.
A shot from the other side of the camera mount.
;) The battery goes behind the NXT. Slide the gray holds off from the black bar and thread it behind
the NXT through the battery pack and out the other side. Put back on the gray holds to ensure that
the bar does not slip out during operation.
The battery goes behind the NXT. Slide the gray holds off from the black bar and thread it behind
the NXT through the battery pack and out the other side. Put back on the gray holds to ensure that
the bar does not slip out during operation.
As you can see from the picture we used the parts designed to be the ball holder for the
Tribot to contain the camera and mounted it inbetween but above the grippers. The position
of the camera is very important as the current placement can see straight ahead which
provides the furthest field of view. The camera can also still see the surrounding area even
when a ball is within the grippers. Mounting the camera lower would allow for easier ball grabbing logic
BUT once the ball is within the grippers you would lose any possibility of seeing where you are going!
On the computer side connect the wireless receiver to its power supply. Connect the RCA type connector from the receiver (the yellow plug) into the digitizer. Plug the digitizer USB into your PC, wait for the installation popup and then pop in the purchased Hauppauge installation CD that came with the digitizer.
Note that the camera receiver's tuner is very touch sensitive and care should be taken before any run to adjust the tuner to the best picture quality. Even the slightest bump will change the tuner and cause the image to become unusable.
Now that we have a camera attached we can start looking for a blue ball ...
Searching for Blue
The first step in our tutorial is to spin in place while looking for a blue ball. To do this we added an RGBFilter for the color blue. This module is similar to the Color Filter but provides a quick way to detect primary colors. This module works nicely in that it can detect a blue ball.
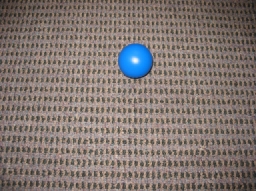
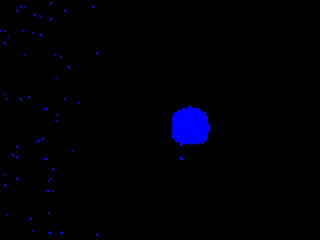
But in certain environments this is actually more problematic than one may expect as the color blue is often detected in shadow or dark areas (especially outside where shadows will contain blue areas due to the reflection of the sky). Blue color detected in shadows have a flickering type quality to them in that they do not reliably detect the color blue in the same pixel per each frame. We used the Flicker module to remove these areas of blue that are not stable.
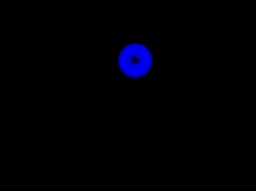
For example, notice the blue areas detected in the following image. The flicker module helps to reduce this noise.
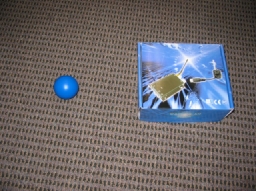
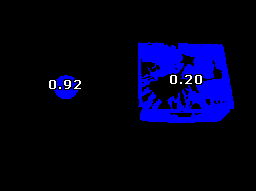
Additional problems arise when there are other blue colors seen while the robot is spinning around looking for the blue ball. For example, if you happened to have the camera box lying around an image like the following could occur.
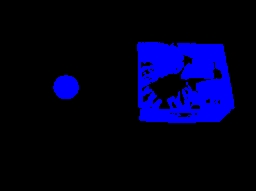
But we can quickly see that the shape of the box is not quite like the shape of the ball. To ensure that the NXT Tribot ignores the box we can use the blob filter to help us out.
Blob Filtering
From the previous slide we can see that the blue ball is very round while the detected camera box is not. By adding in the Blob Filter module and adding in a circular criteria above 0.65 we can eliminate all but the most circular blobs.
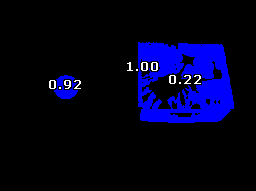
You will notice that 3 blobs have been detected. The 3rd blob is within the camera box and is a small circular blob not connected to the rest of the box. This often happens as objects with pictures will not always connect. To eliminate this false blob we could use the morphological Fill module to fill in any holes within objects. This would cause the inner blob to merge with the rest of the box and therefore become one object. We could also use the Convex Hull to create a solid object with the same convex hull as the detected blob. While these techniques are certainly possible we chose to add in another criteria within the current blob filter to ensure that all detected objects are 'outer' objects. This filter criteria specifies that if a blob is contained within another blob it should be eliminated from the current active blobs. Adding this criteria yields:
To ensure that we get the closest ball we also add in a 'bottom' criteria to the blob filter. This will ensure that a ball lower down on the screen will be given higher weights. Likewise, we also add in a 'largest' criteria to ensure that we go for the largest blue blob (this assumes that larger is closer). Finally we also add in a 'belowY 120' criteria to ignore anything above the ground plane in case the robot starts to track some guy in a blue shirt! Given all these criteria we begin to narrow the focus of the robot to tracking blue balls that are within a certain size on the floor.
Next we have to go and grab the ball.
Blob Grabbing
We are now able to somewhat reliably identify a blue ball. We can steer towards the blue ball by centering on its Center of Gravity and move in such a way to ensure that the COG of the ball stays in the center of the screen. We already have a tutorial about tracking the center of gravity at Color Object Tracking so we will not get into detail about that here.
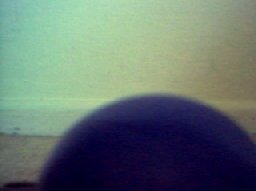
We do, however, have a new problem that once we get really close to the ball we need to know when to grab it. The issue we have is that when we are ready to grab the ball the ball is now out of camera view!
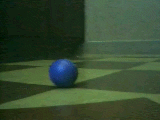
Knowing when to grab the ball requires that the robot 'know' without seeing the ball. We accomplish this by keeping track of the COG of the ball. When the ball becomes quite large within the image we know we are getting closer and begin a different kind of tracking. This tracking will notify us when the ball's COG suddenly disappears out of sight. At this point ( assuming the ball was not suddenly picked up by someone) the ball should have just slipped by under the camera view and is now just in range of the grippers. Based on this assumption we can now close the grippers.
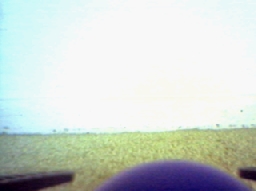
Below you can see this from the Robots perspective. The first image is when the ball is outside of the robots grippers. You can see the gripper ends on the left and right side of the image. The second image shows when the ball is within the grippers and almost out of view.
Interestingly enough, when the grippers close, the ball pops back into the camera view! While not done in this tutorial this is a nice effect that can be used to ensure that we actually grabbed the ball, i.e. if the grippers close and no COG of blue is found then we probably missed the ball. Best to backup and try again.
Below we can see what the image looks like when it had grabbed the ball. Notice that the top of the ball is once again in view.
Once we have grabbed the ball we need to find our destination cone ...
Finding a cone
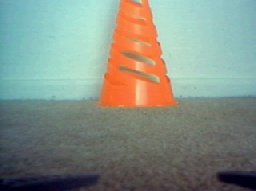
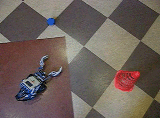
Our destination cone looks somewhat like a real traffic cone except that it is much smaller for the sake of our purposes but its color is still very distinct. We can now use the RGBFilter to look for something reddish as orange has red it in. The images here are taken from the wireless camera from the point of view of the Lego Tribot.
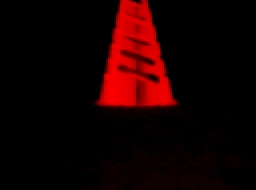
To eliminate other red objects above the ground plane we again use our blob filtering to remove small red objects and anything above the Y coordinate of 120. This results in a nice easy to track red object. We again use the same tracking and movement code as we did before to now move towards the orange cone.
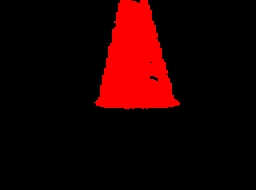
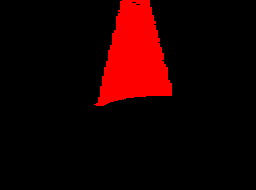
Once enough of the cone is in view we assume that we are close enough and can drop the ball. It is worth noting that the ball is obstructing the view of the cone. In reality the processed image looks as below. Regardless, there is still enough of the cone in view to steer towards it even with the blue ball in the grippers.

Now we know how to find the initial blue ball, when to grab the ball and are able to track the destination code all using vision. We need to communicate this information back to the Lego Mindstorm NXT to tell it what to do.
Talking to the NXT
To communicate with the NXT brick we use the RoboRealm Lego NXT module under the control category. This module provides us a way to use variable values to control or read aspects of the Lego NXT. The module uses serial communication over bluetooth to communicate with the Lego NXT. See the documentation for more information about the setup.We will only be using the motor commands to steer the Lego NXT robot to its destination. While all the other sensors can be used this tutorial only focuses on the motors of the robot.

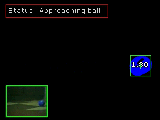
From the interface image you can see that we have 3 variables that are required in order to move the robot. Depending on the values of LEFT_MOTOR and RIGHT_MOTOR the appropriate commands will be sent over bluetooth to the NXT in direct mode to command the left and right motor to move. Be sure that your left and right motors are plugged in the right way round otherwise your robot will move left when it should have moved right!
Note that the gripper on the Tribot is also a motor. BUT you don't want to leave that motor on for long otherwise you will stress the structure and potentially pop the grippers AND camera off from the robot (this was done numerous times while developing this tutorial). The gripper motor should only be activated for a short period of time to open the gripper but once the ball has been grabbed you will need to leave the motors on to ensure the ball stays in place.
The last part that we need for this project to work is to connect what the vision system produces with these motor commands. For that we need a bit of programming code ...
NXT Vision VBScript code
To translate the vision properties to motor command variables we need to add the VBScript module. This module will allow us to use VBScript programming to calculate the appropriate motor commands to send to the NXT and also know what mode we are in. There are 7 modes that we need to perform in this tutorial.
- Open the grippers for 3 seconds. Then switch them off.
- Spin around in place until you see a blue and big enough ball.
- Move towards the ball and stop when it goes under the camera's field or view
- Spin around looking for a reddish cone
- Move towards the cone and stop when close enough
- Release the ball by opening the grippers for 3 seconds
- Cleanup ready for next round.
' the speed of the robot motors (a constant)
SPEED = 30
' grab what state we are in using the
' getvariable routine
state = GetVariable("state")
' jump to the appropriate state
select case state
case 0:
SetVariable "Status: ", "Opening grippers"
' start the open gripper timer if it is not already
' initialized
if GetVariable("GRABBER_OPEN") = "0" then
SetVariable "GRABBER_OPEN", Timer()
end if
' only execute this step for < 2 seconds
if Timer() - GetVariable("GRABBER_OPEN") < 3 then
' set the grabber variable to open ... this is
' passed to the NXT as a motor command
SetVariable "GRABBER", 180
else
' set the grabber variable to neutral
SetVariable "GRABBER", 128
' re-zero the time so we can use it again below
SetVariable "GRABBER_OPEN", 0
' transition to the next state
SetVariable "state", 1
end if
case 1:
SetVariable "Status: ", "Searching for ball"
' grab the COG size that is created by the COG
' module
size = GetVariable("COG_BOX_SIZE")
xw = (GetVariable("IMAGE_WIDTH")/2)
' if a big enough blob is seen then proceed to
' the next state
if size > 20 and GetVariable("COG_X") > xw - 60 _
and GetVariable("COG_X") < xw + 60 then
SetVariable "MAX_SIZE", size
SetVariable "state", 2
else
' otherwise turn left until we see something big
' enough to track the left and right motor
' variables are passed to the NXT
SetVariable "LEFT_MOTOR", 128
SetVariable "RIGHT_MOTOR", 215
end if
case 2:
SetVariable "Status: ", "Approaching ball"
size = GetVariable("COG_BOX_SIZE")
maxSize = GetVariable("MAX_SIZE")
if size > maxSize then
SetVariable "MAX_SIZE", size
end if
' if we passed over the ball we are near enough to
' the ball to grab it this is determined by the COG
' going blank OR the ball suddenly got much smaller
' since we probably picked up a bit of blue noise
' once the ball when out of view
if (size < 20 or GetVariable("COG_Y") = "") _
and maxSize > 100 then
' stop the motors
SetVariable "LEFT_MOTOR", 128
SetVariable "RIGHT_MOTOR", 128
' turn on the grabber
SetVariable "GRABBER", 40
' continue to the next state
SetVariable "state", 3
else
' otherwise keep steering towards the ball's COG
' get the screen with and height (will always
' be 320 in our case)
xw = (GetVariable("IMAGE_WIDTH")/2)
' how far off center is the blob?
xMove=GetVariable("COG_X")-xw
xoff = xw - 5
' if the blob is off to the right then increase
' the right motor a little depending on how far
' off right we are
if xMove > 0 then
rightMove = 215-SPEED+(((xoff-xMove-k)/xoff)*SPEED)
leftMove = 215
else
' otherwise up the left motor in a similar manner
leftMove = 215-SPEED+(((xoff-(-xMove)-k)/xoff)*SPEED)
rightMove = 215
end if
' set the variables so that the NXT module can use them
SetVariable "LEFT_MOTOR", leftMove
SetVariable "RIGHT_MOTOR", rightMove
end if
case 3:
' we've got a ball now head towards the red cone!!
SetVariable "Status: ", "Searching for cone"
' the processing pipeline has already switched the blob
' tracking to a red object since state >= 3. We just
' need to find it and head towards it.
size = GetVariable("COG_BOX_SIZE")
if size > 30 then
SetVariable "state", 4
else
' turn left until we see something big enough to track
SetVariable "LEFT_MOTOR", 128
SetVariable "RIGHT_MOTOR", 215
end if
case 4:
SetVariable "Status: ", "Approaching cone"
' this routine is exactly like the one above
' except for the criteria that the blob cog
' size is 200
size = GetVariable("COG_BOX_SIZE")
' if we are near enough to a cone drop the ball
if size > 200 then
' stop the robot
SetVariable "LEFT_MOTOR", 128
SetVariable "RIGHT_MOTOR", 128
SetVariable "state", 5
else
' otherwise keep steering towards the cone's COG
xw = (GetVariable("IMAGE_WIDTH")/2)
xMove=GetVariable("COG_X")-xw
xoff = xw - 5
if xMove > 0 then
rightMove = 215-SPEED+(((xoff-xMove-k)/xoff)*SPEED)
leftMove = 215
else
leftMove = 215-SPEED+(((xoff-(-xMove)-k)/xoff)*SPEED)
rightMove = 215
end if
SetVariable "LEFT_MOTOR", leftMove
SetVariable "RIGHT_MOTOR", rightMove
end if
case 5:
SetVariable "Status: ", "Opening grippers"
' initialize timer
if GetVariable("GRABBER_OPEN") = "0" then
SetVariable "GRABBER_OPEN", Timer()
end if
' open grabber .. but only execute this step
' for < 3 seconds
if Timer() - GetVariable("GRABBER_OPEN") < 3 then
SetVariable "GRABBER", 180
else
SetVariable "GRABBER", 128
SetVariable "GRABBER_OPEN", "0"
SetVariable "state", 6
end if
case 6:
SetVariable "Status: ", "Misson Complete"
' clean up for next run and stop all robot motors
SetVariable "GRABBER", 128
SetVariable "GRABBER_OPEN", "0"
SetVariable "GRABBER_CLOSE", "0"
SetVariable "LEFT_MOTOR", 128
SetVariable "RIGHT_MOTOR", 128
end select
And lets have a look at the specific image processing pipeline ...
Ball Grabber Pipeline
The vision processing pipeline also has some basic logic in it to switch from looking for blue blobs to red blobs. The conditional in the pipeline uses the same state variable that is specified in the VBScript program. You can also see the ordering of the modules which is important since all the processing modules need to run before the VBScript module in order to provide the most current numbers. The Lego NXT control module needs to be after the VBScript program since the VBScript program is where the LEFT_MOTOR and RIGHT_MOTOR values are set. Note that the # comments are not displayed in RoboRealm.# blur the image so we get better color detection Mean filter 7 # detect blue blobs if we're looking for the blue ball if state < 3 then --RGBFilter Blue # reduce image flickering esp in darker shadows --Flicker 3, 50% # filter the current blobs to yield the most ball like --Blob Filter end if # check if we should be detecting the red cone if state >= 3 then --RGBFilter Red # and filter on something large --Blob Filter end if # analyze the resulting single blob for location and size Center of Gravity # use the blob statistics to set motor variables VBScript Program # communicate those motor values to the NXT Lego_NXT
Note that you can change the filters to detect other colored objects or insert new modules to detect other aspects of objects.
Now lets see it in action!
Lego NXT Vision Ball Grabber
 (1.2 MB) Video of the Lego NXT from our perspective as it performs its task.
 (1.1 MB) Video from the point of view of the Lego NXT as it sees the ball and cone. This is the original
unprocessed video.
(1.1 MB) Video from the point of view of the Lego NXT as it sees the ball and cone. This is the original
unprocessed video.
 (1.4 MB)
The processed video as seen from the Tribot's perspective. Notice the switch from blue ball
to red cone tracking!
(1.4 MB)
The processed video as seen from the Tribot's perspective. Notice the switch from blue ball
to red cone tracking!
Problems
It is worth pointing out some of the failures that we experienced during the creating of this tutorial. As one can learn much from mistakes we chose to share some of the issues this current robot configuration has.
1. Perhaps the most difficult issue is keeping the robot together. Grabbing, bumping, and jerking can reduce the solidity of the Lego robot and it tends to start becoming lose which causes the camera mount to drop or raise slightly. This changes the field of view of the camera. Giving a quick squeeze to the camera mount once in a while ensured that the mounting of the gripper claw was stable and that the camera could receive the best field of view.
2. The wireless camera+receiver can be very noisy. In fact many trials were terminated due to the camera image suddenly becoming violently colorized with jagged lines everyone (the kind of screen one sees in a highly noisy electrical environment). We will even go as far as creating a module around this issue to stop the robot when it detects this scenario. It only effects a couple frames at a time but often the ball is only seen for a couple frames and thus the robot can easily miss the detection.
3. Camera battery life is an issue. Once the battery becomes less powerful the image tends to become darker and darker. It is bad enough to have to deal with the specula lighting that is produced on shiny surfaces but we also had to deal with the camera light being reduced. Luckily using the flicker reduction and tweaking the threshold values the robot could still see the ball in an image where a human would have great difficulty in seeing it. In this case software was able to compensate.
4. The Lego NXT bluetooth is great for going wireless but we found that the delay in motor control can become too great for near real-time control. From the video you can see how the ball is almost overshot but then corrects itself. This is in part due to the induced delays inherent in the system of which Bluetooth is a factor. Regardless, reducing speed is the best way to solve this issue.
Your turn ...
Want to try this yourself?
![]() Download the Ball Grabber .robo file to run an example yourself. Note that you need RoboRealm installed to run this file.
Clicking on any of the modules will bring up that interface and allow you to customize it for yourself. Try
getting the robot to track a green ball instead of a blue one ...
Download the Ball Grabber .robo file to run an example yourself. Note that you need RoboRealm installed to run this file.
Clicking on any of the modules will bring up that interface and allow you to customize it for yourself. Try
getting the robot to track a green ball instead of a blue one ...
The End
That's all folks. We hope you've enjoyed this little adventure into an application of machine vision processing. If you have any questions or comments about this tutorial please feel free to contact us.
Have a nice day!
| New Post |
| Ball Grabber Related Forum Posts | Last post | Posts | Views |
| None |