
Sample Curve
The Sample Curve module expects a binary (black and white image) with an object whose outline has curves that need to be quantified in some way. This module is similar to the Sample Line module but instead of sampling a line based on distance the Sample Curve module does so based on the amount of curvature and edge exhibits at a specific pixel. In this way you can extract out those points in the outline of the object that are high curvature points.For example, the points at the tips of a hand are very high in curvature and can be readily extracted using this module.
Extracted points are placed into a SAMPLE_CURVE_POINTS array.
Interface
Instructions
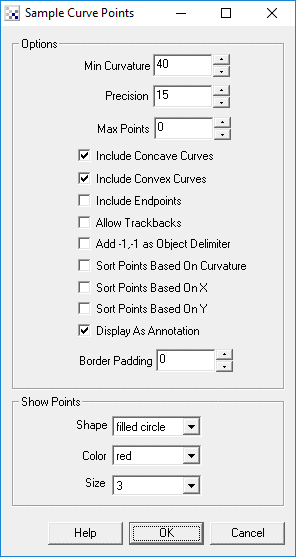
1. Min Curvature - Specifies the minimum curvature that will be sampled. Straight lines will have 0 curvature while a sharp wedge will have close to 180. Note that the curvature values are specified as degrees.
2. Precision - To define the curvature of each point on a edge some pixels before and after the point need to be analyzed to determine the point's curvature. The Precision value defines how many neighboring pixels are used to define the points curvature. Smaller values will detect smaller more finer curves, whereas larger values will detect larger curves.
3. Max Points - Specify how many points you want to sample. If the maximum points to be sampled is smaller than the actual sampled points the points with the highest curvatures will be selected.
4. Include Concave Curves - Select if you only want to sample concave points.
5. Include Convex Curves - Select if you only want to sample convex points.
6. Include Endpoints - When working with single pixel lines it is often required to also have the line endpoints included in the sample regardless of their actual curvature.
7. Allow Trackbacks - Single pixel lines will track back on themselves (think of the outline of a line with 3 endpoints). Selecting "Allow Trackbacks" will include the trackback points that were traversed to get to the next endpoint regardless of if the outline points have already been checked.
8. Add -1,-1 as Object Delimiter - if you have more than one object in the current image a -1,-1 will be added into the sample point array to indicate that a new object is about to be specified. If you are just using the points in other modules you may want this unchecked to remove the -1,-1 coordinates from being specified in the SAMPLE_CURVE_POINTS array.
9. Sort Points Based on Curvature - The sampled points are order as they are encountered. Select this checkbox if you would prefer to have the points order from smallest to largest curvature.
10. Border Padding - Specify the border amount that will NOT be included in the sample curve points array. This can be used to prevent sampling along image borders that may create invalid curvature due to image clipping. Any point that within X pixels close to the border will not be considered.
11. Shape - The shape of the marker that indicates a point has been sampled.
12. Color - To see what points are being sampled you can select the color of the marker that indicates a point has been sampled.
13. Size - The size of the marker.
Example
| Source | Sample Line |
 |  |
 | 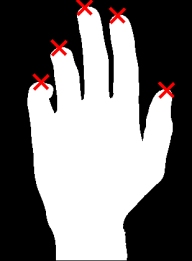 |
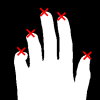
![]() Click Here to load a robofile configuration that will generate the above image. The included
image shows a hand against a white background. In this case we just use intensity thresholding
to segment the hand from the background. For color images using the RGB Filter
may be of better use. After some processing to remove smaller unwanted pixels the Sample Curve module is used
to identify the fingertips of the hand as they are typically high curvature points when compared to the
rest of the hand. Note that only convex points are sampled to eliminate those points that would be detected
in between the finders which are also of high curvature.
Click Here to load a robofile configuration that will generate the above image. The included
image shows a hand against a white background. In this case we just use intensity thresholding
to segment the hand from the background. For color images using the RGB Filter
may be of better use. After some processing to remove smaller unwanted pixels the Sample Curve module is used
to identify the fingertips of the hand as they are typically high curvature points when compared to the
rest of the hand. Note that only convex points are sampled to eliminate those points that would be detected
in between the finders which are also of high curvature.
Variables
SAMPLE_CURVE_POINTS - the array that is created based on the points being
sampled. The array format is x,y,curvature (3 numbers repeating for each
point) that indicate the points x and y coordinates and the amount of
curvature detected at that point. Curvature units are degrees*100. So a
curvature value of 12456 is actually 124.56 degrees. Note that the end
of a line is marked with a triple -1,-1,-1. This indicates that one object
has completed and another is about to start and depends on the -1,-1 checkbox
(see above) if these will be included.
See Also
Point Location
Sample Line
| New Post |
| Sample_Curve Related Forum Posts | Last post | Posts | Views |

Hi, Can you please advise some idea to capturing probe pins tips positions from image of... |
12 year | 2 | 3496 |
|
Newbie...
Hi Gang, Just looking for some newbie help... is it possible with Roborealm to: 15 year |
3 |
4054 |
|