
OpenNI
The OpenNI module provides an interface to the Microsoft Kinect and Asus Xtion sensors. These sensors are remarkably useful for robotics and are great depth sensors at a reasonable price.The main feature of both sensors are that they provides a 640x480 depth map in realtime (30 fps) that indicates which objects are near versus far in the given scene. While the Asus does not provide an RGB image is does permit for a smaller 320x240 depth map that helps not to overload your USB bus. It is also much smaller than the Kinect and does not require an external power supply. In addition to the depth sensor the Kinect also provides a traditional 640x480 RGB image, a 3 axis accelerometer, the ability to tilt its head and a nifty LED that you can change the colors on!
The OpenNI RoboRealm module provides access to the depth map on either device. Note that once the depth image is within RoboRealm all the other traditional filters can now be applied to process the depthmap in new ways. If you would prefer to just have the image as a webcam you can use the RoboRealm virtual camera to pipe the image into other webcam compatible application. Or if you just want to work on the image yourself you can use the various ways to interface with RoboRealm including our popular and flexible API.
While these devices are a great addition to robotics there are some limitations. First, the depth map is only valid for objects more than 2.5 feet away from the sensing device. If an object is closer than 2 feet to the sensor its depth will NOT be detected correctly and be presented as a zero depth. If you have a large robot you can place the sensor at the back such that the depth is generated at the border of the robot. For smaller bots you'll just have to avoid getting too close to objects otherwise they will fall too close to the sensor and come up as unknown (black) areas.
Second, these devices perform their magic by using an IR projector with an IR camera (a form of stereo vision) which means that our favorite bright yellow friend, the sun, will cause issues with its functionality on a sunny day outside. If you use the sensors outside it will NOT work in direct sunlight but will in shady areas. However, a nice aspect of having IR being projected is that it provides high resolution images in total darkness. In this case your robot can navigate around without needing any daylight!
Third, the Kinect device draws about 2 Amps of power in order to run. This may not be an issue on a large robot that has large batteries but may be an issue on mid sized robots that are power conservative. Note that the Xtion does has much lower power needs.
Kinect or Xtion Installation
The installation of the devices on a PC is not as straightforward as connecting other plug and play USB devices. Follow these steps BEFORE plugging it in.
1. Uninstall - If you do not have the OpenNI drivers already installed please remove any Microsoft, OpenKinect or Libusb drivers before proceeding. Failure to do so will cause your device not to function correctly.
2. Download and Install - OpenNI Package and run the installer. Please note that even if you have a 64bit machine you MUST install the 32bit drivers.
Kinect Cont Installation
3. Download and Install - Download the SensorKinect file and install. These files provide the connection from the Kinect to the OpenNI system.
Kinect or Xtion Cont Installation
4. Plug the Kinect or Xtion into the PC. The PC should respond by installing the needed drivers.
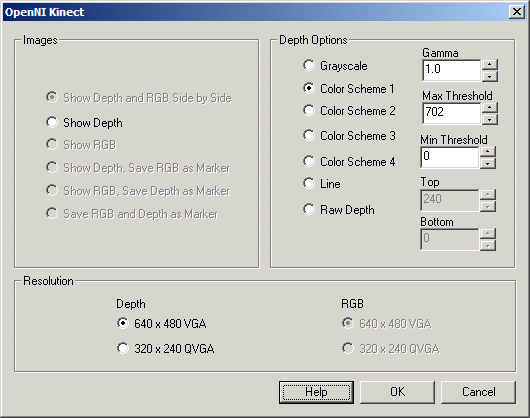
5. RoboRealm - Once this is complete you can now fire up RoboRealm and insert the OpenNI module (easiest way is to select the Search tab and type in OpenNI). Once this module has been inserted the default configuration should show you the depth map and the RGB color image as a single large image within the main RoboRealm GUI.
Interface
Instructions
1. Images - select which image you'd like to focus on. This will display that image within the main RoboRealm GUI window. By selecting the different radio buttons you can chose between the depth image (the image that shows the distance to an object based on pixel intensity/color) and/or the RGB image (the typical colored image you see from webcams). Because you may be using the images in different ways you can chose to have images saved in memory as marker images or be show in the main RoboRealm interface. Note that if you are not using both images you can chose the Show Depth or Show RGB only as they help to reduce USB traffic in case you are working with a slower USB bus.
2. Depth Options - The depth image that the devices produce is a 11 bit (0 - 2047 value) number that can be displayed in several ways. The most common depth map display uses intensity (black to white) to indicate the distance to any particular pixel within the image. This can be useful for successive processing (for example threshold) but may not best indicate the different depth levels. Thus you can use the different color schemes to provide more insight into what depth levels are present in the image.
Grayscale - reduces the depth information from 12 bits to 8 for each RGB pixel
Color Scheme X - uses the depth value as an index into a color palette. Each palette uses a different color transition.
Line - produces a line that indicates the closest depth to an object. This is similar to what a SICK or LIDAR laser would produce. Note this option enables the Top and Bottom settings which allow you to crop the depth map to a specific height. Reducing the height allows objects that are above or below the needed detection level to be ignored when creating the distance line.
Raw Depth - the 12 bit number is encoded with 8 bits in the red channel and the remaining 4 in the green channel. This allows you to access the full depth resolution in external applications by decoding the R and G channel. (Note the B channel is set to 0).
4. Gamma - While the devices can produce up to 2048 depth levels we've not found it to go much beyond 1600. Because of this not all the colors will be displayed or used. You may also want to focus more on closer depths and lose some resolution at more distant depths (since gray images are 0-255 you lose 3 bits). Using the gamma correction can help to bunch up values to better highlight the different depth values.
5. Threshold - You may not want objects that are far away from the devices to appear in the depth map. Using the threshold value you can remove far away objects and also compress the color space of the resulting image to better show depth differences. Using the threshold you can eliminate all but nearby objects that can then be further processed by other modules.
Example
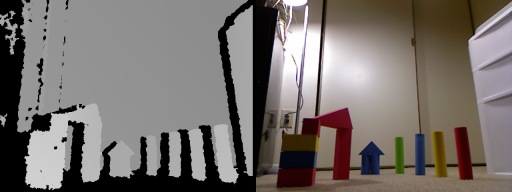
| OpenNI Depth Map from Xtion |
 |
Variables
OPENNI_DEPTH - when saved as a marker this variable contains the depth image
OPENNI_RGB - when saved as a marker this variable contains the RGB image
See Also
Stereo Depth
Creative Senz3D
Microsoft Kinect
LeapMotion Controller
Hokuyo Laser
Visible Laser Line
For more information
Hector Martin - Open source Kinect driver
Kinect driver for Windows prototype!
Kinect drivers on YouTube
| New Post |
| OpenNI_Kinect Related Forum Posts | Last post | Posts | Views |
|
Kinect
Hi all, I'm working the kinect for my FRC team this year. The tutorial at ... |
11 year | 2 | 4039 |
|
Hello, 1. I'm looking to solution how to write 2 video at the same time. I has to try like robo f... |
12 year | 4 | 3850 |
 Xtion shows artifact in line mode
I have an Xtion Pro Live running in roborealm 320x240, line mode with the max min set at 61, 59. No matter where t... |
13 year | 5 | 4568 |

I am trying to track a simple pendulum using the AVM navigator module. However, when I use the Learn from motion option, the pen... |
14 year | 25 | 7901 |
|
FPS
I am using an Xtion Pro Live with RR but when I run RR, the maximum FPS that I manage to get is 15. I want atleast 30 FPS. Any w... |
14 year | 8 | 4991 |
|
Openni_Kinect Module
Hello All, We recently purchased robo re... |
14 year | 7 | 4762 |