
Floor Finder
The Floor Finder module is used to identify the floor area within an image. The assumptions that make this possible are that the robot or camera is on a planar floor that extends from the bottom of the camera image outwards away from the camera. This assumption is required since the Floor Finder module will sample the pixels in the bottom of the image area (the sample space) and use those pixels to identify similar pixels in the rest of the image. Thus it is assumed that the floor space right in front of the robot is relatively free from obstacles and represents a portion of the floor. Keep in mind that different colored lighting or intensity levels on the floor can change the color and cause a break in the resulting extracted floor.
Interface

Instructions
1. Sample Shape - select the sample shape that you would like to use. The default is the square shape that will sample more pixels than the triangle shape but may be affected by darker pixels or non-floor pixels at the image borders. To reduce image border issues (depending on the style of camera you are using) you can switch to the triangle sample area that includes more pixels in the middle of the image.
You can change the width and height of the shape to include more or less pixels. The more representative pixels that are used in the sample space the better. Increasing the sample space will also include more pixels that are not floor space so a compromise needs to be reached between floor and object pixels.
2. RGB - Select this checkbox to enable RGB (red, green, blue) processing of the sample area. This is useful when the obstacles are better identified using a combination of color and intensity. Note that this works well on evenly lit areas but will fail in areas of shadows.
3. Color - Select this checkbox to enable color processing of the sample area. This works very well if your floor is a different color (hue) than the obstacles to be avoided. This works even when areas are somewhat shaded from direct light. The more colorful your carpet the better the color processing will work. The less color, the more you will need to rely on intensity or the combination of both in RGB.
4. Intensity - Select this checkbox to enable intensity (brightness) processing of the sample area. This works well if your floor is much lighter or darker than the obstacles to be avoided. But be careful that shadows may cause problems.
5. Texture - Select this checkbox to enable texture processing of the sample area. This works well if your floor has a very different texture (rough versus smooth) than the obstacles to be avoided.
6. Color/Intensity/Texture Threshold - Select the threshold level that specifies how many instances of a certain attribute need to exist in the sample area before they are considered 'representative' of the floor. If your immediate floor space includes obstacles setting the threshold higher will help remove those obstacle pixels from consideration. This, however, can also remove floor pixels that are slightly distance from the selected feature from the rest.
For a more adaptive way of setting the threshold chose a value from the dropdown (besides manual) to select only the top X percent of features seen in the sample area as a guide for the rest of the image. Setting this value will find which feature occurs the most frequently (its count) in the sample area and then set the threshold to be X percentage of that count. This allows the threshold to change based on how consistent the sample area is and change based on the image properties within the sample space.
7. Color/Intensity/Texture Smoothing - As the sample space is smaller than the rest of the image it often does not include features that are very close to features within the image space. Increasing the smoothing will widen the influence that features in the sample space have in the rest of the image. In this way a feature in the sample space can also affect other pixels that are near in color/intensity/texture to it and help fill out more valid pixels in the rest of the image. If you increase this too much it will encompass all features and not result in any image segmentation.
8. Pixel Smooth - Its best to smooth the image prior to actually checking pixel colors. Using the pixel smooth value you can smooth the image to help prevent small holes within non-obstacle areas.
9. Allowed Break - The final object free path is determined as non-obstacle pixels starting from the bottom of the image moving towards the top without hitting any obstacle pixels. As soon as it does it will remove all pixels higher than that point to indicate they are not part of the floor. Small groups of pixels can cause this to happen prematurely so the allowed break value ensures that there are many obstacle pixels grouped together before an obstacle is determined and higher pixels removed. If you set this value to zero you will see pixels similar in color to the sample area appear which would not be possible to traverse too.
10. Momentum - While the robot is moving it may accidentally look off the desired path which would immediate affect the module to look for the features within the sample area. To prevent accidental attachment to the wrong surface you can increase the momentum from 0 to a larger number like 200. This means that the module will remember the statistics from the previous 200 frames (a couple seconds at 30fps) and use that to look for the floor surface. Even if the robot accidentally moves over a different area that immediate frame will only marginally affect what the module is attracted to. Using this feature memory will help to stabilize the robot movement on the desired path.
11. Continuous - If you know that the first couple frames will contain exactly the model to use you can uncheck the continuous checkbox which will freeze the model after that number of frames.
12. Highlights - Often floor space (especially reflective floors) will tend to have white highlights in them due to overhead lights. These highlights have very specific properties that can be used to partially include them back into the floor space. As highlights are normally bright intense spots they are normally not included within the sample space beyond very low threshold values. Selecting the "Fill Highlights" checkbox will analyze the current image for highlights and fill them in with white pixels. This helps to complete a full floor space and eliminate the appearance of obstacles in the middle of the floor.
13. Result - select how the results should be presented. "Colored" refers to the original pixel values (excluding the highlights which are always in white). "White" or "Black" mask will set pixels to white or black depending on if they are represented in the sample space or not.
The Relevance Result will indicate from black to white how relevant a particular pixel is to the sample space given the smoothing and threshold values. Note that when more than one feature is enabled the relevance is the addition of all those features.
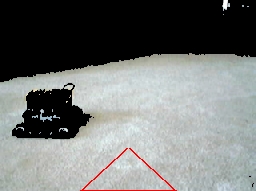
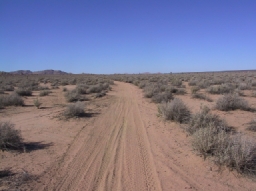
Examples
| Source | Floor Found |
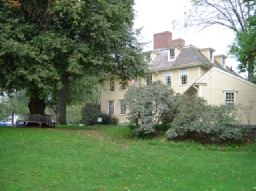 | 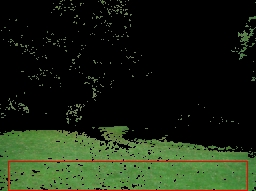 |
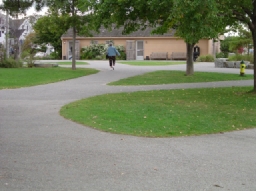 | 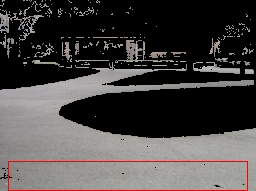 |
 |  |
 |  |
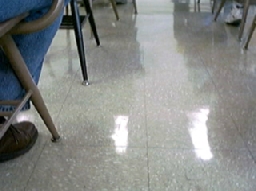 | 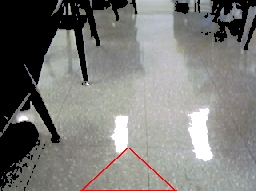 |
Note that last image is the floor of a tiled reflective floor. The two large highlights are filled in using the "Fill Highlight" option.
See Also
Wall Finder
| New Post |
| Floor_Finder Related Forum Posts | Last post | Posts | Views |

Hi STeven, I have attached a .robo file that includes a picture of a grassy lawn with two objects s... |
11 year | 5 | 4152 |
|
Take \"Floor Finder\" just one time and save the value!!
I want To take floor properties using Floor_Finder just one time when the program run, then I want the program to save this valu... |
12 year | 2 | 3352 |

Hi. Sorry for my English.. I have a problem. I want to detect the path... |
13 year | 2 | 3594 |
|
Object Avoidance
Hello STeven, In one of my project,I use SRV-1 robot to avoid the obstacles. I want robot to compl... |
13 year | 2 | 3798 |
|
Road or path detection
My robot will use gps to drive to a certain location. Now i want it to recognize roads and paths/sidewalks. So that he doesn't... |
15 year | 2 | 4477 |
|
Glare... Hardwood floors
I have just recently purchased Roborealm and began using it.. I am trying to use it for robot navigation.. So here... |
15 year | 2 | 4151 |
 Floor Finder tweaking
I've been working on several techniques to enable my Rovio to wander around my cluttered basement. I am having troub... |
16 year | 5 | 5386 |

Hi STeven, I'm having some difficulty getting the new Floor Finder module to work as nicely as the... |
16 year | 6 | 5494 |
 OBSTACLE AVOIDANCE
I am trying to implement Obstacle Avoidance module of robo realm in Matlab.I successfully completed &... |
16 year | 4 | 4798 |
|
Flood Fill and Floor Finder algorithm?
Based on obstacle avoidance tutorial, I'm trying to simulate two modules Floodfill and Floor Finder in Matlab, but I can't fin... |
17 year | 8 | 7743 |