
Camera Properties
The Camera Properties module provides a way to alter the exposed DirectX camera properties built into the camera driver. This differs from camera to camera but can include exposure, brightness, gamma, etc. Changing these properties is different from other modules (such as the brightness/intensity module) in that the attribute change may be sent directly to the camera which can alter the physical capture of the image rather than just manipulating the image bytes which the other RoboRealm modules do. This has advantages since changing the capture method will always give more range to the incoming pixels than just byte mapping alone. For example, an over-exposed image cannot be digitially corrected since all the bytes might be condensed into a small numeric range whereas adjusting the exposure on the camera will allow that range to cover the full intensity range (normally 0-255) of a pixel.Some cameras also provide the Pan/Tilt/Zoom directX commands. For example the Creative Live Motion exposes the pan and tilt commands in DirectX to correlate with the motorized pan/tilt built into that camera. However, the Logitech Orbit translates the DirectX pan and tilt commands to a digital pan and tilt and NOT the motorized pan/tilt built into the camera. Thus you will have to experiment with your own camera to see what DirectX commands are supported and what they actually do.
Grayed out dialog interfaces mean they are not supported by your camera/driver. Sometimes updating to the latest camera driver will help to introduce more controls for you to use. Often commands that do appear in the Options->Video->Capture button are not exposed to DirectX and are therefore not programmatically accessible. Contact your camera manufacturer and request better DirectX support if you are unable to use the desired command within this interface.
Interface
Instructions
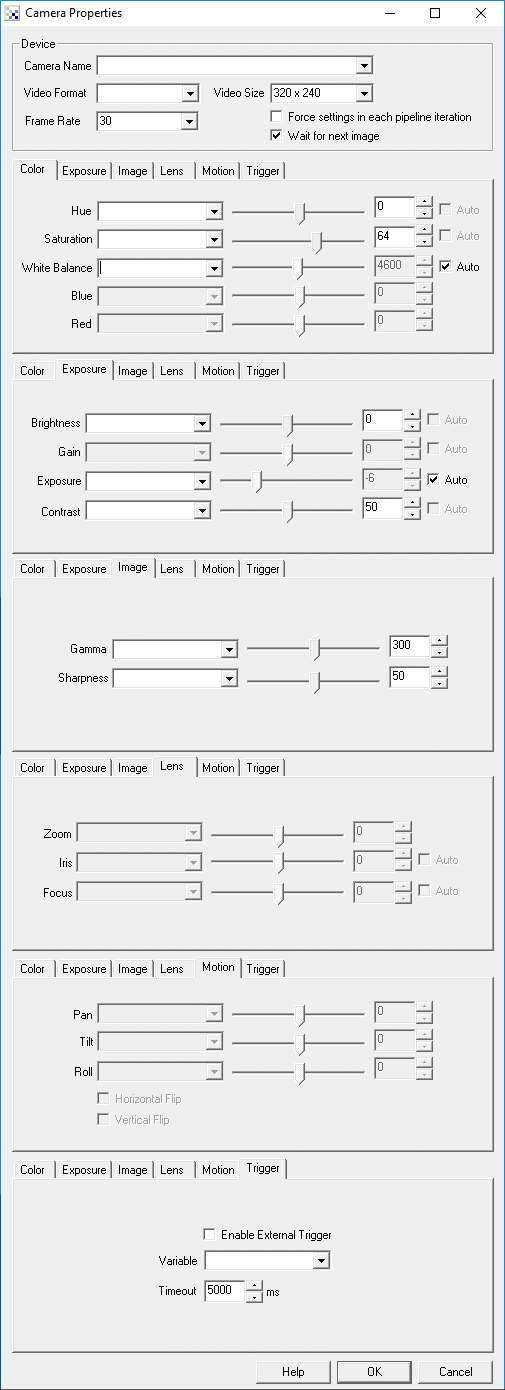
1. Camera Name - Select the camera whose properties you wish to change. Note that only DirectX camera drivers are shown.
2. Video Format - Select which video format to use. RGB is always preferred as the most amount of color is transmitted using that mode.
3. Video Size - Select the appropriate video size to use. 320 x 240 should be sufficient for most applications.
4. Force Settings - As most webcams do not like receiving adjustments in realtime the module will ONLY send changes to the webcam when changes are detected after the initial configuration is set to the webcam. This ensure that the webcam settles on its current settings rather than trying to keep up with the new information on each pipeline cycle. This 'caching' of information can cause issue if some other module or device changes the default settings of the webcam unknown to this module. In this case you can select the 'force' checkbox which will send the camera configuration to the webcam on each pipeline cycle.
5. Wait for next Image - In most cases the next image is not desired due to time contraints. If using the current (or a new image slightly in the past) image will suffice then unselect the "wait for next image" checkbox. This can often decrease the overall pipeline speed if the pipeline speed is slower than the image acquisition speed.
6. Edit the attributes by either selecting the appropriate value using the slider, typing in the number in the available edit area, increasing/decreasing the number using the spin/up.down arrows, or select a variable that contains the desired number to be used as configuration in this module. If you select "auto" the internal camera statistics will determine an appropriate value to use and disable the scroll and variable selection. If you instead chose a variable that contains the value to use the manual interface is then disabled.
7. Hue - refers to the overall adjustment of image colors along the color spectrum. You can use it to warm-up (add red) or cool-down (add blue) to an image.
8. Saturation - refers to the intensity of the colors, i.e. how red a red color is. By decreasing the saturation of an image you remove color and produce a monochrome grayscale picture that represents only darkness and brightness, or luminance. Increasing saturation in an image produces artificially intense colors.
9. Whitebalance - refers to the adjustment of the relative amounts of red, and blue primary colors in an image such that neutral colors are reproduced correctly.
10. Brightness - refers to an intensity or luminosity scale that ranges from totally black to totally white and has no effect on color values.
11. Gain - refers to the amplitude or magnification of the incoming video. Higher gain levels result in greater levels of brightness and contrast. Lower levels of gain will darken the image, and reduce the contrast. Essentially, gain modification affects the sensitivity to light of the CCD sensors. This concept is analogous to the ISO or ASA ratings of silver halide films in digital cameras.
12. Exposure - refers to how long your camera takes to record an image. In a well-lit scene, exposure times can be very short because plenty of light is available stimulate the CCD pixels with enough energy to record an image. At nighttime, exposure time will increase dramatically due to the near absence of light. A quick exposure time will also reduce motion blur, whereas a slow will introduce more blur if the object is moving.
13. Contrast - refers to how far pixel values can deviate from gray. The higher the contrast the more black and white and image appears. The lower the contrast the more gray an image appears.
14. Gamma - refers to the adjustment of red, green, or blue values of a pixel to affect how bright the image appears.
15. Sharpness - refers to the amount of edge definition or crispness in an image. The sharpness control can be used to smooth out rough edges.
16. Zoom - refers to the cameras ability to adjust focal length (Optical Zoom) or digitally increase the image size (Digital Zoom). Some cameras have built in optical or mechanical zoom which physically changes the focal length of a camera. This is unlike most digital cameras that just increase the image size using mathematical interpolation and return a clipped portion of that image.
17. Iris - refers to the control the aperture, or iris, of the camera lens.
18. Focus - refers to the amount of edge definition or crispness in an image.
19. Pan - refers to the ability for a camera to move the image viewed in the horizontal direction or X axis. This can be done mechanically or digitally. Mechanical movement is when the camera has the ability to physically move using a mechanical pan mechanism. Digital panning refers to the ability for a camera to shift the image focus to a different part of the imaged CCD. This is possible when your image is smaller than the full resolution capable of the camera or when a digital zoom is active. If you are viewing the highest camera resolution then digital panning will not be available.
20. Tilt - similar to panning but meant for movement of the image in the vertical direction or Y axis.
21. Roll - similar to panning but meant for movement of the image in the forward direction or Z axis.
Example
The following robofile shows a configuration that allows you to press the "Sample" button in the popup button interface to sample the absolute mean intensity value of an image. This is accomplished by disabling the auto-exposure that is normally used in most cameras to sample an image at a particular exposure setting (in this case 50). The script then samples the mean green value of the image and then sets the auto-exposure back on. This technique will allow for an intensity value to determine the overall lighting level in the current image without the auto-exposure. If you sample the image with the auto-exposure setting ON you will notice that the average intensity value will normally be around 128 regardless of the lighting level of the actual room/scene. This is what the auto-exposure setting is meant to do but will obviously cause absolute lighting measurements to be incorrect. You can use the script below to determine when a good time to switch on the room lights would be!
In order to run the following script you will need to edit BOTH camera properties modules and select your appropriate camera as it will most likely differ from what we have selected. To do this first disable (using the disable button) the IF statement in the pipeline as this will allow the contained modules to be executed. Then double click on the first Camera Properties module and edit the brightness, contrast, etc. until you get a good image. Repeat these settings for the next Camera Properties module and then enable the IF statement once again. On pressing the Green Sample button and clicking on the last module (Display Variables) you will see the value overlaid on the image. Now switch off/on some lights. You will notice the image change but overall remain similar but the value displayed will decrease/increase based on if you switched lights on or off.
![]() Click here
to download the lighting sample script.
Click here
to download the lighting sample script.
Variables
CAMERA_PROPERTIES_NAME - the name of the currently selected camera
See Also
Intensity
Contrast
Color Balance
| New Post |
| Camera_Properties Related Forum Posts | Last post | Posts | Views |
|
controlling multiple cameras
Hi I am experimenting with 2 Logitech c920 cameras. In my main tab I have a button module and two call statements ... |
9 year | 2 | 3255 |
|
Remembering USB Camera
I have a USB Camera working with Roborealm. When I restart Roborealm the USB camera is sometimes remembered but not a... |
10 year | 2 | 2985 |

This software is fantastic! Attached are two images. One is the raw front image, and the... |
11 year | 6 | 3824 |
|
roborealm loses configuration
I've noticed that roborealm does not always startup with the same configuration settings. In particular the Video... |
12 year | 4 | 3336 |
|
Camera Properties Adjusting/Saving
I'm using USB microscope cameras for a few applications but I'm having trouble with some of the camera settings. Specifically,... |
12 year | 4 | 3297 |