
Socket Communication Interface
The Socket Communication module provides a generic interface to Socket based (network) servers. The Socket Communication module should allow you to send and receive text to any network accessible server. Note that this is a generic module in that you will need to adhere to the protocol of the external server.More specialized communications (like HTTP) have their own modules but cannot be used in servers that are not known to RoboRealm or created as custom products. This module provides the underlying basic networking connection to remote servers but requires that you specify what and how data is transmitted and received.
Note that this module provides yet another way of integrating RoboRealm with external applications. For a more comprehensive overview please have a look at our Integration documentation.
Interface
Instructions
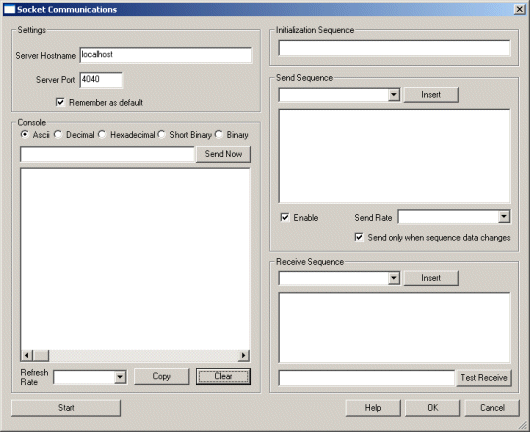
1. Settings - Specify the name/IP address and port number of the server you would like to communicate to.
2. Method - Specify what protocol you would like to use when sending information. Note that TCP/IP should work in most cases across the Internet as it is a standard protocol with built in error checking. UPD and Broadcast modes are quicker than TCP but do not guarantee delivery of the information and should only be used on local networks as most routers will block UDP traffic.
3. Console - If the server responds with any data you will start to see a large amount of numbers scrolling by in the console. This
shows the current values being read from the server
and provides a log of the ongoing communication activities. The red text are characters received from
the server while the green text are characters sent by RoboRealm to the server.
To copy the log click on the Copy button, likewise to clear it click on the Clear button. Note that the
console log only shows several lines at a time with older information being discarded.
You can switch the output to various formats for better viewing:
4. Send Now - often you need to quickly test the server by sending a certain sequence of characters. To
do so just type in the character sequence (using
5. Refresh Rate - to slow the scrolling of the numbers select a different refresh rate for the console. This will just slow down
how quickly RoboRealm reads information from the server.
6. Initialization Sequence - The initialization data sequence sends the provided string to the server
on initialization of communication. You may want to use
this to command the receiving server into a specific mode ready for communication with RoboRealm. This initialization
sequence is sent each time the communication is reset. This happens when you click on the "Stop" button in
this interface or when the RoboRealm starts running for the
first time. It is NOT sent when the Run button in the main RoboRealm interface is toggled.
7. Send sequence - Used to enter commands sent per pipeline loop (i.e. image processed) by RoboRealm. You can
use this sequence to transmit variables created by other RoboRealm modules to the
server. Each time an image is captured and processed the Socket Communication module will
interpret the Send Sequence text and send the result to the server. This interface supports
the Expressions usage of []'s to contain variables and simple calculations.
8. Enable - Allows you to temporarily disable sending text to the server while performing
edits. Note that the Send Sequence textarea will turn red to indicate this setting.
9. Send Rate - Some servers cannot handle rapid data streams. Use this
dropdown to select how quickly you want the data to be sent. At AFAP (As Fast As Possible) the data
will be sent out about 30 times a second (this assumes a camera running at 30 fps).
10. Send only on change - If your data does need to be sent out to your server every iteration
through the processing pipeline loop this selection will prevent the same data from being sent to the
server that was last sent. This is also an elegant way to reduce the data bandwidth to the
server if your sequence does not change rapidly.
11. Receive sequence - used to receive and parse text send from the server. The
text string is matched against the incoming bytes. When a match is found
variables are added into RoboRealm for use in other modules. Reading into variables just
requires adding in a variable at the appropriate spot within the receive string similar to the
scanf routine in C/C++. The Receive sequence works similar to an expect string, i.e. you need to
specify patterns that match the incoming text and substitute the areas that need to be
fed into variables with the [ variable_nane ] format. Note that even if you are missing
one space or newline the patter will not match and the variable will be zero or blank. See the Serial
module for more examples on what can be specified in the Receive sequence.
1. Download this Socket Server program that can be run by unzipping and executing the Release\Socket.exe application. Note the source
is included for this small application which effectively shows how to listen on a socket port in C/C++. Once
run, this application attaches to port 4040 and waits for any incoming messages.
2. Launch RoboRealm, click on the Search tab, and enter in Socket. Double Click on Socket_Communications
that will add this module to the pipeline. Immediately the module will connect to the running socket server.
3. Type in characters into the Send Now text area and press the send button. You should see the text
reflected in the Socket server's window. If you type in \128 which means send the byte 128 the Socket Server
program will respond with "Hello!".
4. This example shows how RoboRealm can communication with an external application listening on a socket port. As
is seen from this example the protocol is not defined and you can make it as simple or as complex as needed.
Note that for very complex interactions you may instead want to create a Plugin or use the API as they
provide similar means of communication but in a more defined way.
Example
See Also
Serial
USB HID
New Post
Socket_Comm Related Forum Posts Last post Posts Views None