
USB HID Interface
The USB HID module provides a generic interface to HID (Human Interface Devices) USB products. The USB HID module should allow you to control many devices that utilize this kind of USB driver that require simple exchanging of information otherwise not possible within RoboRealm.Note that only HID devices will appear in the dropdown and that not all USB devices use the HID class.
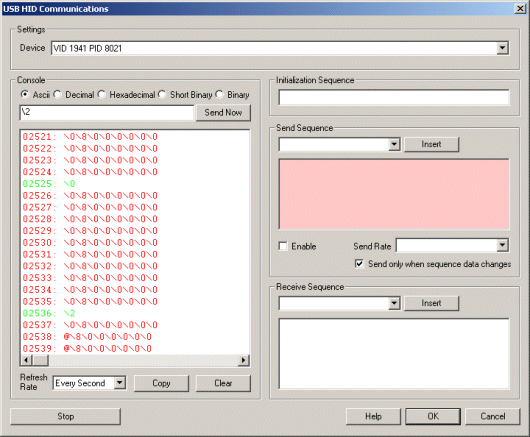
Interface
Instructions
1. Settings - Select the device you wish to control from the device dropdown. The name of the device may have human readable words but often may only contain the VID (vendor ID) and PID (product ID) of the device. If you are not sure which entry is the appropriate device check with the manufacturer to find out the appropriate VID and PID to use.
2. Console - if the device supports reading you will start to see a large amount of numbers scrolling by in the console. This
shows the current values being read from the device
and provides a log of the ongoing communication activities. The red text are characters received from
the device while the green text are characters sent by RoboRealm to the device.
To copy the log click on the Copy button, likewise to clear it click on the Clear button. Note that the
console log only shows several lines at a time with older information being discarded.
You can switch the output to various formats for better viewing:
3. Send Now - often you need to quickly test the device by sending a certain sequence of characters. To
do so just type in the character sequence (using
4. Refresh Rate - to slow the scrolling of the numbers select a different refresh rate for the console. This will just slow down
how quickly RoboRealm reads information from the device.
5. Initialization Sequence - The initialization data sequence sends the provided string to the device
on initialization of communication. You may want to use
this to command the receiving device into a specific mode ready for communication with RoboRealm. This initialization
sequence is sent each time the communication is reset. This happens when you click on the "Stop" button in
this interface, change one of the above parameters (Baud, Port, etc) or when the RoboRealm starts running for the
first time. It is NOT sent when the Run button in the main RoboRealm interface is toggled.
See the Text Formats page for additional information about the text string format.
6. Send sequence - Used to enter commands sent per pipeline loop (i.e. image processed) by RoboRealm. You can
use this sequence to transmit variables created by other RoboRealm modules to the
USB device. Each time an image is captured and processed the USB HID module will
interpret the Send Sequence text and send the result to the device.
See the Text Formats page for additional information about the text string format.
7. Enable - Allows you to temporarily disable sending text to the device while performing
edits. Note that the Send Sequence textarea will turn red to indicate this setting.
8. Send Rate - Some devices cannot handle rapid data streams. Use this
dropdown to select how quickly you want the data to be sent. At AFAP (As Fast As Possible) the data
will be sent out about 30 times a second (this assumes a camera running at 30 fps).
9. Send only on change - If your data does need to be sent out to your device every iteration
through the processing pipeline loop this selection will prevent the same data from being sent to the
device that was last sent. This is also an elegant way to reduce the data bandwidth to the
device if your sequence does not change rapidly.
10. Receive sequence - used to receive and parse text send from the device. The
text string is matched against the incoming bytes. When a match is found
variables are added into RoboRealm for use in other modules. Reading into variables just
requires adding in a variable at the appropriate spot within the receive string similar to the
scanf routine in C/C++. The Receive sequence works similar to an expect string, i.e. you need to
specify patterns that match the incoming text and substitute the areas that need to be
fed into variables with the [ variable_nane ] format. Note that even if you are missing
one space or newline the patter will not match and the variable will be zero or blank.
See the Text Formats page for additional information about the text string format.
The above interface screenshot shows controlling the Dream Cheeky USB Missile launcher. The launcher normally responds
with 8 zeros that indicate that an extreme position has been met. Try connecting the device to your computer and send a \2
using the Send Now text box. Be sure to have the \0 typed in quickly afterwards to stop the motion. Likewise try \1 or \4 or \8
to move the launcher around. See how the commands you type in appear as green in the console?
Example
![]() Here is a robofile that shows how to use the USB HID module to prevent the launcher from moving past its limits and
how to use the read sequence to read the information coming back from the launcher.
Here is a robofile that shows how to use the USB HID module to prevent the launcher from moving past its limits and
how to use the read sequence to read the information coming back from the launcher.
See Also
Dream Cheeky Missile Launcher
Serial
New Post
USB_HID Related Forum Posts Last post Posts Views

![]() Socket Server
Socket Server
Hi Steven.
I tried to connect my PIC32 (Via Ethernet Controller) with RR using socket server. I managed to get the...10 year
15
4614
 USB HID Receive Data Error
Hi Steven.
I had try to implement USB HID on my RR application. However, I got an error on received data. I made a...11 year
8
6074