
Path Planning
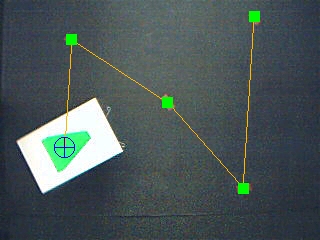
The Path Planning module is used to determine a route from one coordinate location to another along a set of waypoints. For example, if you had an image of a maze and you needed to determine the best path from where the robot is currently located to where it needs to be you would use the Path Planning module to determine the shortest or best path to the desired location.Note that the robot's location is labeled as a circle with an X in it.
Interface
Instructions
1. Robot Location - Specify the start location (X,Y) coordinate of where the robot is currently located. Note that you can type in variables using [variable_name_x] into these dialog entry boxes. This allows you to use the RoboRealm application to determine where the robot is visually located and where the robot needs to go and feed that information into the path planner.
2. Destination - Specify the end location (X,Y) that specify the robots destination.
3. Waypoints - Add in waypoint coordinates that the robot is suggested to go through. Note that if the waypoints are NOT in a traversable path they will be ignored. The waypoints can either be manually entered using the provided interface or configured to read the points from a specified variable.
4. Removal Distance - Specify how close the robot need to be to a waypoint (in pixels) before it is considered traversed and removed from the waypoint target list.
5. Reset - Once all waypoints have been visited you can press the Reset button to reset all waypoints to a non-visited state.
6. Reset Trigger - You can also select a variable when non-empty will also cause the reset to trigger. This is handy if you want programmatic control over clearing all visited waypoints.
7. Path - select "Plot along non-zero pixels" if the current image contains the path boundaries as non-black pixels. This allows you to restrict the robot movement to a selected path or line instead of considering all parts of the image traversable. With this checkbox selected the path planning module operates within the 'white' or on pixels within an image. Any pixel that is non-black is considered part of the potential path. Any pixels that are black are considered non- traversable.
8. Optimal Shortest Path - select this checkbox if you want the system to automatically determine the optimal shortest path to all waypoints. If this is not selected then waypoints are visited in the order they appear in the manual waypoints list or in the waypoint variable. Note that due to the complexity of finding the shortest path only 17 waypoints can be used in this algorithm.
9. Greedy Shortest Path - select to automatically determine a non-optimal but fast shortest path for more than 17 points. This algorithm selects the next nearest waypoint as the direction of travel. While not optimal it does work well for most cases.
10. Robot Color - the color marker used to identify the robot (circle with a X)
11. Route Color - the planned route between waypoints
12. Waypoints color - the color of the square that identifies the targeted waypoints
13. Visited color - the color of the waypoints that have already been visited
Example
| Source |
 |
See the Path Planning tutorial for more information.
Variables
PLAN_ORIENTATION - the suggested direction the robot should move to stay on the current path. If the robot is NOT currently on the path the path_direction will be the direction to the nearest point that is on the path in an attempt to get the robot back on track.PLAN_POSSIBLE - 1 when a path between the robot and destination exists and 0 otherwise.
PLAN_COORDINATES - An array that includes all the path points as displayed by this module.
WAYPOINT_DISTANCE - the distance between the robot and the next waypoint. Note that this distance is calculated based on a straight line and does NOT respect any path confinements.
WAYPOINT_NUMBER - the current waypoint number being traversed to.
WAYPOINT_X - the X coordinate of the current waypoint number being traversed to.
WAYPOINT_Y - the Y coordinate of the current waypoint number being traversed to.
For more information
ACRI: Robot path planning
| New Post |
| Path_Planning Related Forum Posts | Last post | Posts | Views |
|
Path planing tutorial
I see people referring to it for use in the Path_Planning module but I can't locate it in the tutorials section <... |
9 year | 2 | 2956 |
 cScript
write cScript program to control motor to run on selected path planning.... |
10 year | 2 | 3119 |

Hi I have three types color of cars which are green, red, and blue. I want to recognize them with only color. Came... |
14 year | 7 | 5344 |
 Path Planner
Hello! I have a question about the path planner. The path that is calculated (green line, avoiding non zero pixels... |
14 year | 7 | 4710 |
|
Hello, I am using the SetTimedVariable to turn a motor for certain period of time. THe scenario is... |
15 year | 9 | 8733 |
|
Path planning next waypoint distance
Hello STeven, I have replicated the path planning tutorial and works perfectly, but i desire to imp... |
16 year | 3 | 4720 |

Hello First of all I would like to thank you for developing this awesome software. I... |
17 year | 11 | 6325 |
|
Feature Request - Path Planning Variable
Hi, I am using path planning for my robot. And i wanted to request a feature that will be of tremon... |
17 year | 4 | 4456 |

Hi Steven, There seems to be a bug in the path planning module. If I use the path planning tutorial... |
17 year | 7 | 4740 |

Hello, Please find the robo file, for which i have two questions: 1) w... |
17 year | 6 | 4874 |
|
Path_Orientation issue
Hello, One simple question. In the Path Planing tutorial I am bit confused with the Plan_Orientatio... |
17 year | 6 | 4636 |
 Adding Waypoints From Blob
I Have basicly Copied the Path finding tutorial, making a few small changes like cropping the image and filtering different colo... |
17 year | 2 | 4457 |