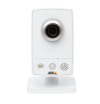
Axis Internet Camera
The Axis Internet Camera module provides an interface to the Axis camera series. This module is similar to the HTTP Read in that it reads images over the Internet but also provides an easier interface to the camera adjustment capabilities of the Axis cameras. Note that when accessing cameras over the Internet there can be significant delays between the image capture time and viewing time.
Interface

Instructions
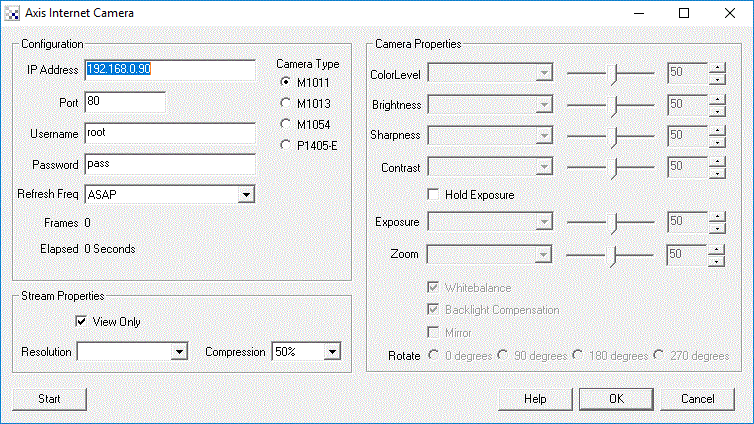
1. IP Address - specify the IP address of the camera that you would like to connect to. (Default is 192.168.0.90)
2. Port - If you are using a different port number than port 80 specify that port number here.
3. Username - the username needed to access the camera. (Default is root)
4. Password - the password needed to access the camera. (Default is pass)
5. Refresh Freq - how quickly the system should request new images. This will allow you to reduce the Internet traffic of the streaming video if you don't need rapid updates. Default is "As Fast As Possible"
6. Resolution - The image size dimension to request from the camera.
7. Compression - The amount of compression to apply to the image prior to transmission from the camera.
8. ColorLevel - refers to how much color/saturation to apply to the image.
9. Brightness - refers to an intensity or luminosity scale that ranges from totally black to totally white and has no effect on color values.
10. Sharpness - refers to the amount of sharpening to apply to the image.
11 Contrast - refers to how far pixel values can deviate from gray. The higher the contrast the more black and white and image appears. The lower the contrast the more gray an image appears.
12. Hold Exposure - Holds the current exposure level
13. Exposure - Specifies the relative amount of exposure time to apply to the image. This will also cause the camera to adjust the exposure to keep the same level.
14. White balance - Specifies that automatic white balance be applied to the image
15. Back light Compensation - Specifies that back light compensation be applied to the image.
16. Mirror - Mirrors (flips horizontall) the image coming from the camera.
17. Rotate - Rotates the image by the specified degrees.
Edit the camera properties by either selecting the appropriate value using the slider, typing in the number in the available edit area, increasing/decreasing the number using the spin/up.down arrows, or select a variable that contains the desired number to be used as configuration in this module. Note that once a variable is selected the manual controls will be disabled to indicate that the property is under variable control.
Tips
1. Finding the IP address of the camera can be tricky. If you have not used the camera in a while it may not be setup to automatically request a DHCP IP address and thus may still be using an IP address that is no longer accessible on your network. In this case Axis recommends to reset the device (instructions below) and use a cross-over Ethernet cable to connect the camera directly to your computer. You will then have to change your computers local LAN connection to a 192.168.0.X number (where X is any number but 90, for example 10). This requires you to access the Network setup in your control panel.
Note that all modern computers are able to self correct even if a non-cross-over Ethernet cable is used, so if you do not have a cross-over cable just plug in any that you have around (we've verified this works with the Axis camera).
2. If you had set the camera to automatically acquire an IP address (just like when your laptop joins a wifi network) and you don't know what IP address is provided, you will have to check your router interface which would supply you a network list of connected devices. If you don't have access to this you can try using a network scan application like netscan.exe to scan your network for active devices. The camera should then appear, if it does not, you will have to reset it. Again, when you reset it and your network is not 192.168.0.X then you will still not see the IP address even using the scanner. If you and the camera are on different network numbers you will just not see each other.
3. If you do NOT enter a username and password you will not be able to change the camera parameters. You will also NOT be able to view the camera image UNLESS you have the "Basic Setup->Users->Enable anonymous viewer login" checkbox set within the Axis Administration configuration. To avoid these complications, be sure to enter in the supplied username and password.
4. The default username and password is normally root:pass but this may have been changed on first login into the interface. If you have forgotten the password you will have to reset the device. You can do so by switching off the camera, hold the white button on the back of the camera while turning it back on. Hold that button until the light around the camera lens turns amber (as apposed to the normal green) which indicates that you have reset the camera. Now when you access the administration interface via a browser on IP address 192.168.0.90 it will ask you for the username/password combination to use.
See Also
HTTP Read
DLink Internet Camera
Linksys Internet Camera
TRENDnet Internet Camera
| New Post |
| Axis_Internet_Camera Related Forum Posts | Last post | Posts | Views |
|
AXIS Camera Select
I am a RR newbie trying to get off the ground and gain some experience for the next FRC season. I am trying to use RR 2.61.17 wi... |
10 year | 3 | 3157 |
|
RoboRio Port Info
Hi STeven, Here is information on the ports used by the roboRio, using the HTTP_read with a USB cam... |
11 year | 26 | 16902 |
|
RTSP video image in RoboRealm
Hello, I am developing an autonomous mode for the FRC off-season that would have vision targeting u... |
12 year | 5 | 4397 |
|
Axis m1013 Compadibility
Our axis m206 camera recently broke and we are looking for a new camera replacement. Unfortunately, the axis 206 and... |
12 year | 7 | 3526 |
|
Axis Camera FPS
This year, we have been successfully using RoboRealm to locate and aim our robot while practicing. However when we ar... |
12 year | 2 | 3434 |
