
Chasing Movement
![]() Download the Chase Movement robofile.
Download the Chase Movement robofile.
- This demo shows how a robot can track movement and move towards it in a chasing manner. This works best when lots of light is
present (to ensure images are sharp and not blurry) and when one object only is moving in the scene. You should also ensure that your
camera has auto-focus turned off otherwise the camera will tend to refocus when moving and cause the scene to change when it
shouldn't.
The main issue with tracking movement is to eliminte the global movement caused by the robot itself moving and isolate the single moving object. This is done in the movement tracking module as see below.
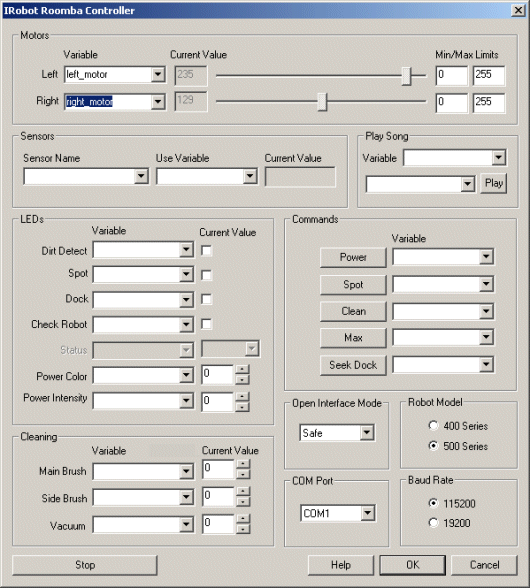 First double click on the
Roomba module in the processing pipeline and change the serial COM port
to the one you are using. Note that if you happen to have a serial port on your Netbook then the COM port will most likely be from COM1 to COM4. If you are using
a USB to serial converter then it can be a much higher number. RoboRealm will only display those COM ports that are active within the system
so the COM port selection should be limited to only a few selections. If you are not sure on which COM port is being used start with the highest one and
test while moving to lower ones.
First double click on the
Roomba module in the processing pipeline and change the serial COM port
to the one you are using. Note that if you happen to have a serial port on your Netbook then the COM port will most likely be from COM1 to COM4. If you are using
a USB to serial converter then it can be a much higher number. RoboRealm will only display those COM ports that are active within the system
so the COM port selection should be limited to only a few selections. If you are not sure on which COM port is being used start with the highest one and
test while moving to lower ones.
If you have already configured the Roomba in a previous robofile then the COM port should already be configured for your robot assuming the "Remember as default" checkbox in the Roomba GUI interface is set.
- If the camera view is not already present press the Camera button in the main RoboRealm interface to show you the USB webcam image.
If you have multiple cameras installed or other imaging devices you may need to press the Options button->Video Tab and select the
camera from the dropdown list that shows all the imaging devices installed in the system.
- Once you get the COM port set you should see the Roomba camera image in the main RoboRealm interface. Try placing the
robot down on the floor away from any movement. It should remain still. Then try to move something in the right
or left view of the Roomba and see if it moves towards that movement.
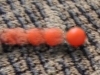
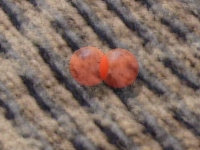 To detect movement we need two images; the current image and a previous image.
Seen here are the two images merged together to give you an idea of what the actual object movement is between the
two sample images.
To detect movement we need two images; the current image and a previous image.
Seen here are the two images merged together to give you an idea of what the actual object movement is between the
two sample images.
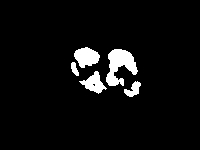 We can refer to those two images using the Movement module which will determine the
difference between the current image and the previous image in order to determine those pixels that
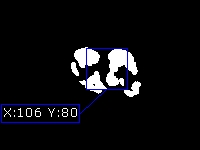
have changed. For example, given two images the movement detected appears as white blobs.
We can refer to those two images using the Movement module which will determine the
difference between the current image and the previous image in order to determine those pixels that
have changed. For example, given two images the movement detected appears as white blobs.
This works well, however, an issue happens when the robot is also moving as the entire scene will change from one image to another. This will incorrectly indicate that the entire image has moved instead of just identifying the independent movement within the image. To compensate for this issue we ensure that the "Reduce global movement" checkbox in the Movement module is selected. When selected this will attempt to globally align the current image with the past image such that the overall image movement is eliminated or reduced while the independent movement remains pronounced. Note that some texture in the image needs to be visible in order for this alignment process to work.
 Once the pixels that have changed between the
current image and a previous one have been detected we need to chose a point to target for the robot. An easy point is to
choose is the Center of Gravity or middle point of the blob. We
do this using the Center of Gravity module.
Once the pixels that have changed between the
current image and a previous one have been detected we need to chose a point to target for the robot. An easy point is to
choose is the Center of Gravity or middle point of the blob. We
do this using the Center of Gravity module.
-
 Finally we now need to tell the Roomba how to move in order to get to the identified light. We do this by
understanding on what side of the image the identified target is. In our case it is on the right side.
If the desired target point is right of the center of the
image we need to move the robot right, whilst if it is on the left we need to move left. If we create this
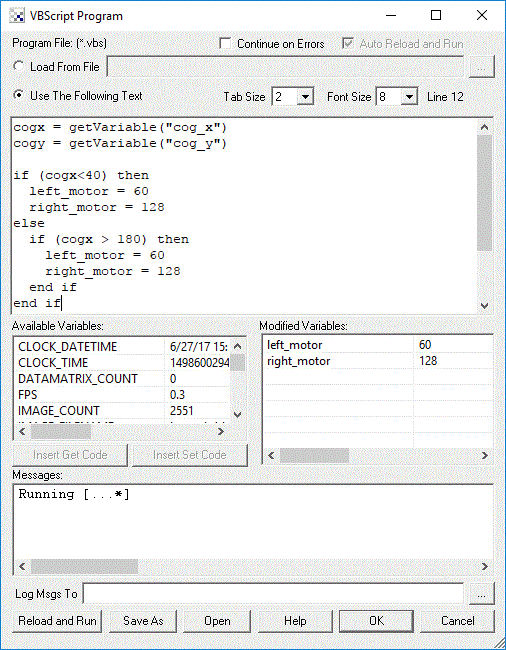
behavior the robot will move in the direction of the light. The VBscript
module allows us to write some VBScript to set the motor values of the Roomba based on the X coordinate of the target
point. The more the X location is to the right the harder we should turn LEFT and vice versa for the other side. The VBScript module produces
a left and right motor variables that contains the suggested direction that the Roomba should perform. The Roomba module then grabs this value
and passes it to the Roomba robot to complete the cycle.
Finally we now need to tell the Roomba how to move in order to get to the identified light. We do this by
understanding on what side of the image the identified target is. In our case it is on the right side.
If the desired target point is right of the center of the
image we need to move the robot right, whilst if it is on the left we need to move left. If we create this
behavior the robot will move in the direction of the light. The VBscript
module allows us to write some VBScript to set the motor values of the Roomba based on the X coordinate of the target
point. The more the X location is to the right the harder we should turn LEFT and vice versa for the other side. The VBScript module produces
a left and right motor variables that contains the suggested direction that the Roomba should perform. The Roomba module then grabs this value
and passes it to the Roomba robot to complete the cycle.