
Roomba Internet Control
 a.
a. ![]() Download the Internet Control robofile.
Download the Internet Control robofile.
b. Download the Roomba Web Interface that needs to be unzipped into the webroot folder
where you installed RoboRealm. This is typically c:\program files\RoboRealm\webroot\. Without these
files the url below will not return anything.
- This demo shows how to control a Roomba over the web. RoboRealm has a built in webserver that
you can use to send signals to from the a web browser in order to control your robot. This is a great
example of the flexibility of getting information into and out of RoboRealm. The setup assumes
that you a have PC onboard the robot connected to a wireless network with a port open that you can use
to access your network from outside. Note that the default port is 8080 for the RoboRealm webserver
but this can be changed (see below).
The system is broken into two parts. The first part is the robofile (see download link above) that supports the requests send from the webbrowser. This module is required in order to understand how to move the Roomba and turn on/off certain aspects of the robot. Thus when the browser sends a variable such as left_motor = 128 the robofile needs to have the Roomba module included that specifies that variable as the left motor speed. In addition, other features such as changing the screen size, speaking, etc. are performed with other modules within RoboRealm.
The second part is the html/images/javascript that is needed in order to get the browser to show an appropriate interface. This interface consists of the main image as seen in RoboRealm (even when modules that alter the image are used) and a bunch of buttons that perform certain tasks/configuration during operation. A larger view of the interface as it appears within the browser can be seen here.
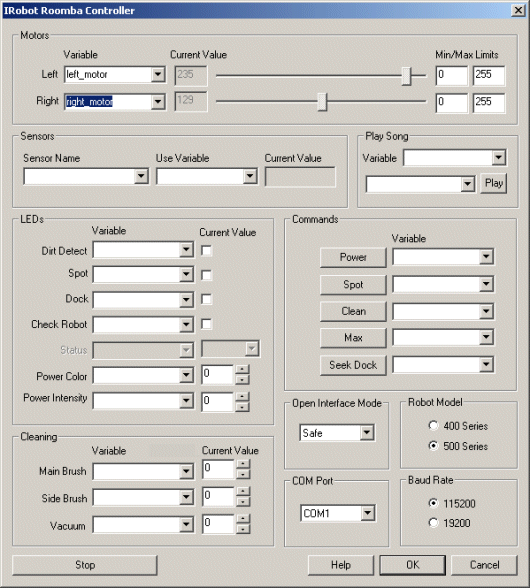 First double click on the
Roomba module in the processing pipeline and change the serial COM port
to the one you are using. Note that if you happen to have a serial port on your Netbook then the COM port will most likely be from COM1 to COM4. If you are using
a USB to serial converter then it can be a much higher number. RoboRealm will only display those COM ports that are active within the system
so the COM port selection should be limited to only a few selections. If you are not sure on which COM port is being used start with the highest one and
test while moving to lower ones.
First double click on the
Roomba module in the processing pipeline and change the serial COM port
to the one you are using. Note that if you happen to have a serial port on your Netbook then the COM port will most likely be from COM1 to COM4. If you are using
a USB to serial converter then it can be a much higher number. RoboRealm will only display those COM ports that are active within the system
so the COM port selection should be limited to only a few selections. If you are not sure on which COM port is being used start with the highest one and
test while moving to lower ones.
If you have already configured the Roomba in a previous robofile then the COM port should already be configured for your robot assuming the "Remember as default" checkbox in the Roomba GUI interface is set.
- If the camera view is not already present press the Camera button in the main RoboRealm interface to show you the USB webcam image.
If you have multiple cameras installed or other imaging devices you may need to press the Options button->Video Tab and select the
camera from the dropdown list that shows all the imaging devices installed in the system.
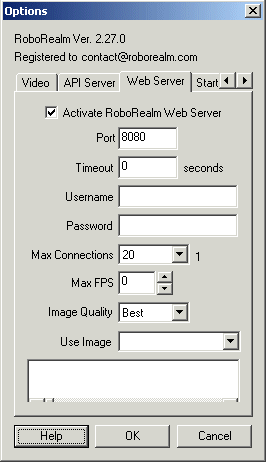 Now we need to turn on the Webserver in RoboRealm. You do this by clicking
on the options button in the main RoboRealm dialog and selecting the Web Server tab. You should see the same
interface as that shown on the right. Click the "Activate RoboRealm Web Server" to start the webserver and be sure
that the Max Connections is set to 20. The Max Connections specifies how many connections can be made to the webserver
before a connection refused is returned. Having 20 or more will ensure that this number is high enough to allow speedy
service for all requests.
Now we need to turn on the Webserver in RoboRealm. You do this by clicking
on the options button in the main RoboRealm dialog and selecting the Web Server tab. You should see the same
interface as that shown on the right. Click the "Activate RoboRealm Web Server" to start the webserver and be sure
that the Max Connections is set to 20. The Max Connections specifies how many connections can be made to the webserver
before a connection refused is returned. Having 20 or more will ensure that this number is high enough to allow speedy
service for all requests.
Once you have clicked on that checkbox and pressed OK you can now start streaming video over the Internet. To test your current setup access the following URL in your browser on the machine running RoboRealm.
http://localhost:8080/roomba.html
And you should see the same image in your browser that you see within the RoboRealm interface. Note that you will need Java enabled to see the image. If your IE browser does not support Java try FireFox or Chrome.
Be SURE that the Max Connections in the interface is larger than 1 otherwise only one person will be able to connect to the webserver at a time. When using the Roomba interface you will need at least 3 connections. One for the video, one for the move commands and one for status updates (battery level, bump sensors, etc). So be sure at least 3 connections are allowed.
- You can now start clicking on the
various buttons and if your Roomba is activated and connected to the PC running RoboRealm it should start to respond
to the button clicks. While this scenario is not yet being used over the Internet it does show the operation of the
system over a local connection.
Clicking any of the move arrow buttons at the bottom of the interface will perform that action for about 1 second and stop. If you click before that second is over it will extend the time it moves to one second from the time you clicked. Thus you can keep the robot moving by clicking twice a second.
The numbered buttons on the right specify the speed that the Roomba will move at when the motion buttons are pressed. 1 is the slowest with 3 being full speed. The current speed is highlighted in green.
The arrow buttons to the left specify controlled moves that are checked using the Roomba's encoders or tachometer. These turns will be more precise than using the move arrow buttons at the bottom of the page. Note that the second to last button specifies that the robot move in a straight line until it hits something. This is a handy way to move quickly to a known spot and then stop. Keep in mind that when the Roomba is very close to something the camera image may be completely obscured by that object and thus not appear correct. You can always back up a bit in order to get a better image as to where you are.
The final left side button is the Dock button. This will activate Roomba dock seeking procedure which will cause the Roomba to activate a search pattern for home. It is recommended that you help it a bit and only press this button when the docking station is within sight to provide a better change for the Roomba's IR signals to localize where the docking station is. The battery indicator is located below the main image. Keep an eye on that in order to not run out of battery before you can get back to the docking station!
The normally red button next to the move arrow buttons is the Vacuum button. Pressing this will turn on the vacuum and main brush motors. This allows you to do some spot vacuuming from the Internet !
The button at the top of the interface is used to speak text on the Netbook connected to the Roomba. Type in some text into the provided text area and press the Speak button. If you have Microsoft Speech installed that text will be converted to voice and played through the PC speakers.
- The next step is to determine what IP address you would use when outside of your home. You can do this by
accessing a service from DynDNS.com called
Open Port Tool which allows you to check if you could
access your network from the outside while still being in your network. As you often don't know if a change to your
network configuration works this is a very helpful tool to test that things work from the outside. When
you access the Open Port Tool you will need to change the port number from 80 to 8080 and then test. If this
does not work, try changing the port number in the above Webserver Tab interface from 8080 to 80 and press OK. Then
retest using the Open Port Tool but just leave the port 80. As port 80 is often used for web access this port is
more likely to be open than 8080 but may conflict with other webservers that you may be running.
- If tool works then you can copy that IP address and port number and use it when you are outside your network to
drive the Roomba around. If it does not work you probably will need to open access into your network to allow for
outside access. You can check Port Forward to see if your
router is listed but you should also seek advice from someone familiar with Router/Firewall configuration to ensure
that you don't open your entire network to outside access. WARNING - reconfiguring your Router/Firewall can remove
network security and expose your home network to outside attach. We highly recommend not to perform these actions
unless you are familiar with this technology.