
Surveyor SRV-1
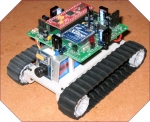 The Surveyor SRV-1 module provides an interface to the Surveyor SRV-1 robot.
The module will request images from the Robot via the specified COM port and allow you to view and
process the images using RoboRealm. Motor commands based on the captured images can then be sent back to
the SRV-1 robot to change its direction/speed.
The Surveyor SRV-1 module provides an interface to the Surveyor SRV-1 robot.
The module will request images from the Robot via the specified COM port and allow you to view and
process the images using RoboRealm. Motor commands based on the captured images can then be sent back to
the SRV-1 robot to change its direction/speed.
Interface
Instructions
1. COM Port - select the appropriate COM port that the SRV-1 is currently communicating on. If you have connected the robot directly to your computer the lower port numbers (1-4) are most likely the correct ports. If you are using the Zigbee wireless connection the port numbers will most likely be higher than 4. You should only see COM ports that are active in your system in the dropdown.
2. Manual Move - there are three ways to move the robot. The manual move allows you to press the appropriate buttons and move the robot in a direction for a period of 500 ms.
3. Motors - the second way to move the robot is to move the Motor sliders that control each of the individual motors. Note that this interface is provided to map RoboRealm variables to each of the motors to enable differential steering control from your RoboRealm control program. You can use the Min and Max editable areas to limit the range of movement that the robot will be commanded to execute. Often variables may contain irregular values due to scripting error so ensuring a limit on the motor values will ensure that your robot does not suddenly dart off in an unknown direction. A slow suggested range is 90 - 160.
The motor values range from 0 to 255 with 128 being neutral or off. Higher numbers move the robot forward while lower numbers will move the robot backwards.
See Variable Control for more information on how to programatically move the robot.
4. Movement Variable - the final and third way to move the robot is to select
a movement variable. This variable should contain the following values which
mimic the manual move buttons. This style of automated movement control is
not are refined as the individual motor command but can be useful for
interfacing to interface devices like the keyboard or joystick.
5. Video - to view the video stream ensure that the checkbox next to the Video group is checked. This will start video streaming from the SRV-1. Select the appropriate size while keeping in mind that smaller sizes allow for more rapid updates. At an image size of 80x64 you should get around 4 fps. Once the video is enabled you should start to see the image within the main RoboRealm interface. You can now proceed with machine vision based filters to process what the robot is seeing.
The "Pause for video" checkbox will ensure that while an image is being downloaded from the SRV-1 that its motors are off. This ensures that the robot does not move while it is blind. If you find your SRV-1 does not appear to be responding to visual stimuli or overshooting the target, select this button to reduce the motor speed and gain better control over the image processing and motor reaction loop.
6. IR Sensors - to use the IR sensors make sure the checkbox next to the IR sensor group is checked. This will enable IR readings from the robot to be sent back to RoboRealm. To utilize these values type in a variable above the IR reading bar that will contain the value of the IR sensor. This variable can then be used to alter the robots movement. See below for a quick script that displays this functionality.
As IR values can be very noisy an averaging filter can be required prior to the value being placed into the selected variables. Selecting a number in the Average box will average the past X IR samples and then place the value in the variable. This allows a more stable sampling of the IR values.
IR range values range from 0 to 160.
7. I/O Pins - to extend your Surveyor Robot you can use the IO Pins located on the robot to interface with other sensors or signal additional lights/LEDs/etc. To enable pin setting check the checkbox next to the I/O Pin group. The interface will then be enabled.
The GUI interface allows you to manually turn the pins off and on using the checkbox. Note that the checkbox is only enabled when the pins are set to output. The checkbox is invalid when the pin is set to input values. To automate the setting or getting of pin values assign a variable to the appropriate pin. If the pin is configured as an input then this variable will be a 1 or 0 if the input is high or low. If the pin is configured as an output then variable values of "0", "", "off", or "low" will set the pin low otherwise any other value will set it high.
8. Failsafe - to protect the robot when a loss of communication occurs the failsafe mode will ensure that the robot turns off motor commands if the wireless communication is no longer present. This can occur for a number of reasons but is normally related to the distance between the robot and PC Zigbee receiver.
9. Speed - a manual selection for the speed of the robot when using the Manual Move buttons.
10. Stop - sometime the most important button in the interface is the stop button. This button will terminate the robot's movement and allow you to regain control of the robot regardless of the variables specified in the motor interfaces.
Example
![]() Click here
to load a configuration to move the SRV-1 using your cursor keys. Note that you will need to change
the COM port before this will work. We used COM18. Also note that the video and IR has been disabled
to increase the response time over wireless communication.
Click here
to load a configuration to move the SRV-1 using your cursor keys. Note that you will need to change
the COM port before this will work. We used COM18. Also note that the video and IR has been disabled
to increase the response time over wireless communication.
![]() Click here
to load a configuration to move the SRV-1 forward until it comes into proximity of an obstacle
in front of the robot. This is a good test of the IR capabilities. Note that really dark/black objects
will not be detected as readily as light/white objects due to reflectance properties of the IR beam.
Click here
to load a configuration to move the SRV-1 forward until it comes into proximity of an obstacle
in front of the robot. This is a good test of the IR capabilities. Note that really dark/black objects
will not be detected as readily as light/white objects due to reflectance properties of the IR beam.
Click here to check out our brief tutorial on moving the SRV-1 within a constrained maze while avoiding walls.
For more information
Surveyor SRV-1 Website
| New Post |
| Surveyor_SRV1 Related Forum Posts | Last post | Posts | Views |
|
SRV-1
Hi, I can get camera images from the old Zigbee on Com Port5 but when I try the interface to drive the motors, I get the message... |
16 year | 2 | 5897 |