
Note that this module is for viewing ONLY and does not create stereoscopic depth maps.
Also note that the images created by this module can be exported as normal by other modules or distributed by other built in mechanisms such as the webserver.
Interface
Instructions
1. Left Image - Specify the left camera source
2. Right Image - Specify the right camera source
3. Type - Specify the 3D image type you would like to create from the two images.
-
Color Anaglyph - produces an with the left or right channels combined into the color
channel of a single image. You will need the red/green, red/blue, etc. colored lens
glasses to see the actual 3D image.
Half Color Anaglyph - produces an image similar to the color anaglyph but reduces the red channel in such a way to reduce retinal rivalry. Retinal rivalry occurs when one eye sees a more dominant color than the other and causes a ghostly type of image.
Optimized Anaglyph - similar to a Half color Anaglyph the Optimized Anaglyph attempts to reduce retinal rivalry.
Gray Anaglyph - produces an anaglyph using gray scale which also reduces retinal rivalry but removes all color from the image.
True Anaglyph - Similar to the above techniques but creates a pure left and right color channel whilst removing the third unused channel. This causes the image to look visually different when not using the Anaglyph glasses.
Flicker - Causes the two images to flicker back and forth between each other. This helps the eye to understand the movement between the two images and can help to determine alignment or rotational issues. No glasses are required for this mode.
Side by Side - Produces a single image with both camera images displayed side by side. This type of image requires a cross-eyed viewing or separate eye channels to view. Often this can be achieved by placing a divider (such as a piece of cardboard) between each eye with the cardboard extending to the screen ending inbetween the two sides of the image. This trick helps to create the cross-eyed effect that one needs to create a 3D image.
Interlaced - Creates an image where one side is interlaced with the other. This format requires the use of shutter glasses that are synched with the screen refresh rate. One interlaced image is seen by one eye while the other is covered (thus the need for shutter glasses) with the shutter switching back between left and right to alternate the eyes. This causes a 3D image to be seen as the right eye sees a different image than the left.
4. Colors - For the color anaglyphs you can specify what color channels are used to contain the image. The default and most common will be Red/Cyan as this works for most colored stereoscopic glasses but other options are available in case you glasses require different channels to be used.
5. Flicker Rate - When the flicker mode is enabled this specifies the millisecond time between flickers or the visible time for each image before switching to the next. Smaller values approaching zero will cause the flicker to speed up. Larger values will slow the switching down. Note that at 0 the flicker rate will be dependent on that of the pipeline speed. Thus if the overall pipeline is processing at 10fps then the flicker rate cannot be less than 100ms per image. You can specify values lower than the pipeline fps but the flicker rate will not increase.
6. Switch Left Right - If the resulting image does not appear 3D or confuses your eyes try to switch the two images by clicking on the switch left right image. This will swap the right and left image. As we cannot see stereo when the left camera is exposed to the right eye and the right camera to the left eye this checkbox allows you to quickly test which way round the cameras are relative to how you are viewing the image.
7. Alignment - Stereo viewing is very sensitive to the alignment of the two cameras. If you move one image out of phase of the other you will lose the stereo effect or cause your eyes (and head) to become very taxed to preserve the 3D viewing. As moving the cameras manually to align the images requires very small and precise movements it is easier to move the camera's into general alignment and then left the software do the rest.
The SAMPLE button will analyze 10 frames from your current setup in order to determine the best translation (x,y movement) and rotation (degrees) that will align the two images. The resulting information is then populated in the text boxes below and entered into variables (3D_MOVE_X, 3D_MOVE_Y, 3D_ROTATE) for other modules to refer to or for export into alternate systems. The current images are then aligned according to this information.
Note that before pressing the alignment SAMPLE button you should ensure that the scene is somewhat stable AND that most of the scene is at the desired neutral depth. Neutral depth is where the left and right image are the most similar with objects in front of this depth will appear in front of the screen whereas objects behind this depth will appear behind the screen (in 3D). Thus it is best to align on a scene which best represents the average depth that you intend to be using in your stereoscopic viewing.
Tips
- Make sure your camera images are the same size. You can do this by selecting the Options Button->Video tab, selecting the appropriate camera and then clicking on the Format button. Within that dialog you should be able to change the camera size. Do this for both cameras.
- Place your camera about 6.5cm from each other and try to align them as best as possible. Note that even the slightest bump can cause them to go out of alignment unless they are secured to a shared structure.
- The best 3D experience can be seen using shutter glasses but that is also the most expensive and most may not work on LCD screens that are polarized differently than the shutter glasses (also LCD) which can cause a permanent dark image on both eyes.
Example
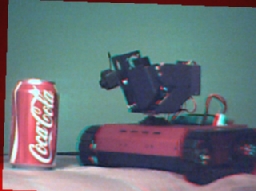
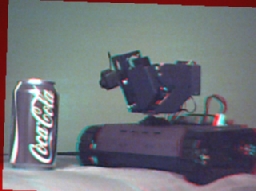
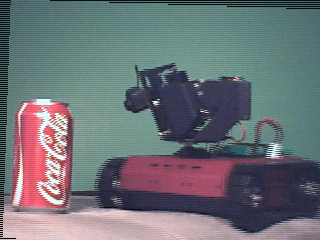
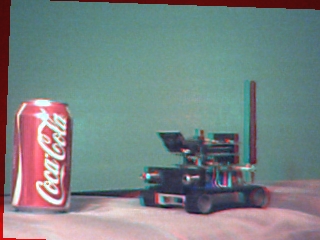
The following shows the Traxster robot spotting a coke can.
| Color Anaglyph | Optimized Color | |
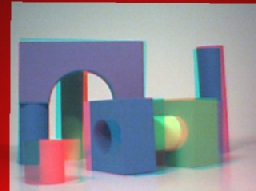 | 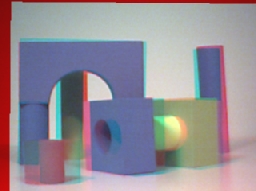 | |
| Color Anaglyph | Half Color | |
 |  | |
| Interlaced | ||
 | ||
| Color Anaglyph | Optimized Color | |
 | 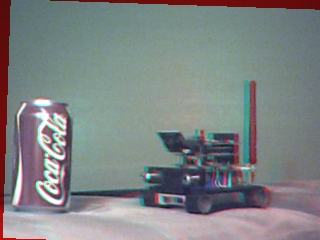 | |
To understand the flicker mode here is a 10 second video of the surveyor.
Variables
3D_MOVE_X - contains the X movement needed to align left and right images
3D_MOVE_Y - contains the Y movement needed to align left and right images
3D_ROTATE - contains the rotation in degrees needed to align left and
            right images
See Also
Mosaic
For more information
Wikipedia - Anaglyph Image
3dtv.at - Anaglyph Methods Comparison
3D Images
JPL - 3D Mars Rover Images
Google Image Search - Anaglyph
| New Post |
| 3D_Viewer Related Forum Posts | Last post | Posts | Views |
 3D Viewer
Hello. It is possible to do real-time video in RoboRealm with a 3D camera as shown in the picture? ... |
13 year | 2 | 3928 |