Lego NXT
The Lego NXT module allows you to control your Lego NXT Mindstorms Robot Kit using RoboRealm over a wireless Bluetooth link. Controlling the NXT kit from RoboRealm provides you a way to incorporate vision into your Lego robot. The module allows you to control the motors and read the sensors on board the NXT. RoboRealm uses the Bluetooth serial connection to communicate directly with the NXT platform. Note that the NXT brick needs to be within transmission proximity of you PC for communication to be successful (~10 meters).
The main difficulty in working with the Lego NXT system is to get the Bluetooth serial connection up and running. In our experience we had no luck using the provided drivers that came with our USB based Bluetooth device. Using only WindowsXP native drivers (after deleting the provided drivers) did the Bluetooth device work in such a way that the NXT brick could detect our connection. We highly recommend working with the provided Lego Mindstorms NXT program to first create a connection to your NXT brick. After the connection has been established you can quit the program and use RoboRealm to directly communicate with the robot.
Note you must NOT be running the NXT-G application when trying to connect to the Lego NXT using RoboRealm. Both applications cannot connect simultaneously to the robot. They can do so one at a time but not together.
Interface


Instructions
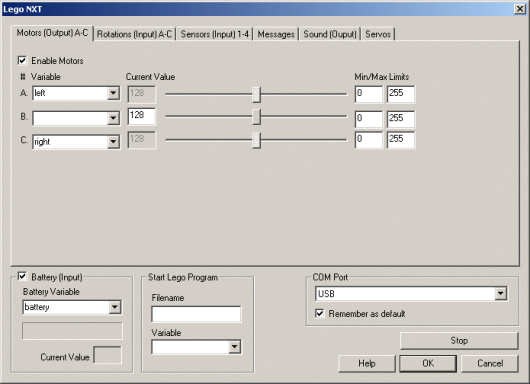
1. Click on the appropriate checkbox to enable the functionality that you wish to use in the Lego NXT. Enabling a particular section will start the correspondence between your PC and the NXT brick. This will increase the Bluetooth traffic and can slow down the reaction time that your Lego NXT will take so be sure to only enable those parts that you need.
2. Motors - The motor control variables can be specified by either using one of the existing variables provided in the dropdown list or by typing in a new variable. Once you select a variable you will not be able to manually adjust the motor bar as it will now respond to the value within the variable. Be sure to select the appropriate minimum and maximum values to ensure that the variables do not exceed the motor limits. Note that the values for the motors range from 0 to 255 with 128 being neutral. See Variable Control for more information on how to programatically move the robot.
3. Rotations - If you would like to receive information about the rotation of the motor (aka encoder values) then select the rotation checkbox and specify the variables that should contain the values sent by the encoders. If you enable this area and then move the motor by hand you will notice the value field change in accordance to the rotation of the motor.
4. Sensors - The NXT has several different kinds of sensors. You need to let RoboRealm know which kind is attached to which port. To do so simply select the appropriate dropdown to indicate the type of sensor attached to the port. Then select the variable or type in a new one that is meant to receive the value of that sensor. Be sure to click on the checkbox above the Sensor group to enable reading of sensors. Note that the current sensor value will be shown in the right hand box.
5. Sound - To control the playback on the NXT of a sound click the checkbox in the sound group. You can either specify a frequency and duration OR a sound file to play on the NXT depending on the values of the provided variables. Note that the sound files must exist on the NXT. If you wish to play other sound files be sure to first download them to the NXT and they can then be played. Note that the variables contain the values to be played as apposed to the sensors where the variables are used to store values FROM the NXT.
6. Battery - You can keep a check on the battery life of the NXT by enabling the battery checkbox. Adding in a variable will place the current battery power rating into that variable for use by other modules such as the VBScript module.
7. Messages - To communicate to a running program on the Lego NXT you use mailbox communication. To send a message to a particular mailbox on the NXT specify the variable that contains the message in the appropriate mailbox list seen in the right hand side of the above interface. Be sure to select "send" if you want to send a message to a mail box on the NXT. If you want to receive a message from a mailbox on the NXT select the "get" radio button. The value will then be placed into that RoboRealm variable and the message will be removed from the NXT. In this way you can use the Send and Receive Messages from the NXT-G Block interface to create a program that runs on the NXT and communicates back to RoboRealm running on a PC.
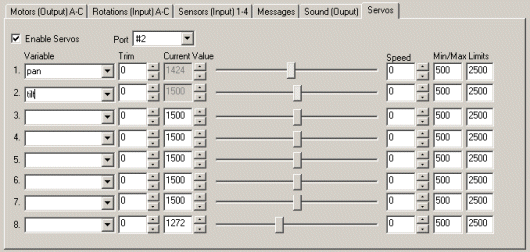
8. Servos - To extend the Lego NXT capabilities you can add extra servos using the MindSensor's NXTServo board. This board allows you to add 8 additional traditional servos to the Lego NXT for use in providing additional control over your robot. For example, the board + servos are a great way to add in a pan/tilt unit for a camera.
To enable the board click on the "Enable Servos" and select which Sensor port you will be connecting the NXTServo board to. Note that you must NOT connect the board to a motor port otherwise this may damage the board.
Note that you CANNOT run the NXTServo board while connected via USB to the PC. You must run any servo based application over bluetooth in order for the PC <-> NXT connection to work correctly using the NXTServo I2C interface.
Once the board is connected you can select a variable that will contain a value for the servo (500 to 2500 with 1500 being neutral or middle). This provides an automatic way to move the servos. Use the Trim field to center the servo if your servo when neutral is not quite in the middle. Use the Value field to manually specify a value for the servo or use the slider to accomplish this same task. This is a good way to test the servo prior to using a variable to specify the desired position. Use the Speed field to control how quickly the servo will move to the desired position. 0 means ASAP, whereas 1 means really slow with 255 being just as fast as 0. Finally use the Min and Max fields to limit how far the servo can move. This can be used as an insurance against the servo moving too far out of limits if your project requires a limited servo movement.
9. Start Lego Program - If you would like RoboRealm to automatically run a program on the Lego NXT specify the program name in the Filename text field. If you prefer to use a variable to contain the value of the program to run select or specify that variable. The module will then look at the value of that variable as the filename to run. Note that changing the filename or setting it to blank will terminate any previously running program.
10. COM - Finally specify the port number that the Bluetooth serial communication port is setup in. This port number will be reported in your Bluetooth configuration screen that depends on what Bluetooth hardware device you are using. An alternative to a Bluetooth connection you can select the USB option (first option in the dropdown) which requires that the robot be tethered via a USB cable to the PC. This mode provides a quick and reliable way to keep you robot connected to the PC if you feel that Bluetooth is not functioning correctly or you are operating in a noisy Bluetooth environment. Please note that messages will NOT be sent when connected via USB; messages are only sent when connected via Bluetooth.
11. Remember As Default - Select the "Remember as Default" checkbox if you would like the current COM setting to be remembered by RoboRealm such that whenever the Lego NXT module is loaded the com port will be auto-selected. This ability allows you to not have to constantly change the COM port when loading in successive RoboRealm NXT configurations.
12. Stop - If at any time you would like to STOP the robot press the stop button (this can save many crashes). Pressing start will enable the motors and reactivate communication with the NXT robot.
Communicating with NXT G-Programs
You can use RoboRealm to communicate specific values from the PC to a running program within the Lego NXT brick. The reason one would do this would be to communicate a specific condition that RoboRealm has picked up on (for example seeing a large red cup) so that the G-Block program can change its behavior based on this information. In this manner RoboRealm is acting like an additional sensor that can be tested for specific conditions.
Receiving
The way this communication occurs is by using the Lego NXT Mailboxes. These are akin to the "Variables" known in the Lego Mindstorms RCX system (the former Lego system). You will need to add in the G-block "Receive Message" (yellow square menu) to receive messages sent from RoboRealm. In this Block you will have to specify the type of data to be received and which mailbox the message will be received in. The mailbox number MUST correlate with the same mailbox number seen in the mailbox list on the right side of the RoboRealm Lego NXT interface. If these numbers do not match then no values will be received in the correct mailbox. In the RoboRealm interface, specify a variable name (NOT TEXT) in the dropdown/text editable box. RoboRealm will only transmit the contents of variables so be sure to specify a variable that has some content in it. If you are just testing the communication you can select the IMAGE_COUNT variable which will increment by one for each image being processed. Also be sure to select "send" radio button in the RoboRealm interface so that RoboRealm knows to send the contents of the specified variable to the Lego NXT.
Sending
To send a value from the Lego NXT back to RoboRealm you can add in the "Send Message" G-Block within the Lego programming interface. You MUST specify the 0 Connection in that G-Block's options. 0 means that when the NXT is acting in slave mode it should buffer the sent messages in outgoing mailboxes that the PC can request the contents of. You can then type in the message and the mailbox that should be used to send the message. Again, the mailbox MUST match one of the mailboxes in RoboRealm and a variable MUST be specified in the RoboRealm interface that will receive this value from the NXT. Note that your NXT must be in slave most with respect to the PC for this to work. In other words, allow your PC to first connect to the NXT rather than use the NXT to connect to the PC. Since the PC is not another NXT the connection option needs to be set to 0 which allows for master/slave communication.
Examples
Joystick Example
![]() Click Here to download a robofile that you can use a joystick connected to a PC to control the NXT.
Click Here to download a robofile that you can use a joystick connected to a PC to control the NXT.
- Check that the joystick you use moves the joystick graphic above where the joy_x and joy_y variables are specified in the Joystick interface. Double click on that in the pipeline to edit the module after loading this robofile into RoboRealm.
- Check in the NXT module that the left and right motors are in the right channels. This robofile assumes Motor A is the left motor and Motor B is the right motor.
- Finally, if you find that the robot moves right when left is expected or back when forward is expected, select the appropriate checkboxes in the Differential Drive module. Depending on the values of your joystick inverting the signal to its opposite meaning sometimes provides a more natural feel.
Keyboard Example
![]() Click Here to download a robofile that you can use a joystick connected to a PC to control the NXT.
Click Here to download a robofile that you can use a joystick connected to a PC to control the NXT.
This assumes that Motor B is the right motor and Motor C is the left motor. If not, edit the NXT module and swap those variables.
Use the keyboard right and left cursor keys to steer the robot. Use forward and backward to move forward and backwards. Use the space key to stop.
Mailbox Example
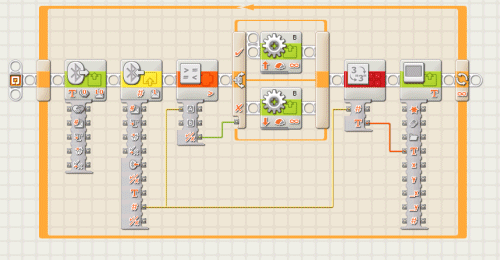
Following if the G-Block screen shot of an example of this bidirectional communication. It shows how you can use a message from the PC (COG_X) to control the movement of motors. (click image to enlarge):
And here is the corresponding RoboRealm interface:
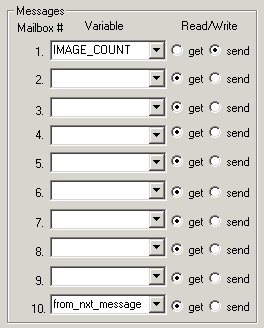
You can download the G-Block example and the RoboRealm example. Note that our NXT BT interface is configured on COM17. Yours will most likely be different.
Mailbox #2
Here is a simpler G-Block example that just displays the number from the RoboRealm robofile that the set_variable module creates. You can use this to test if your NXT is correctly receiving numbers from RoboRealm. Note that this robofile uses the USB connection which should be the same if you connect your NXT via USB. This also eliminates any Bluetooth connection issues. Also note that mail box #1 is used. You should be able to double click on the Set_Variable module, change the value to some other number and see that value on your NXT screen.
See Also
Lego RIS2.0
Example
Ball Picker Tutorial
For more information
Lego Mindstorms Website
MindSensors Website
NXT# - Mindstorms for .NET
ruby-nxt
NXT Perl Module
NXT Symbian
| New Post |
| Lego_NXT Related Forum Posts | Last post | Posts | Views |
|
NXT-G Return to Starting position
Hi all, I have an algorithm written in NXT-G for a robot competition at my school. The competition... |
10 year | 5 | 3329 |
 VB script power NXT
Hello, We are working on a robot keeper that stops a ball rolling down a hill. We are... |
11 year | 2 | 3212 |

With the new EV3 out, I now have a Lego NXT that can be repurposed. So I built a Lego robot arm with it. T... |
11 year | 32 | 4608 |
|
RobotC
My nxt brick is currently running the robotC firmware on it, this is different from the nxt firmware that comes out of the box. ... |
11 year | 2 | 4297 |
 Bluetooth Connection (w/ LegoNXT) Error
I'm having issues maintaining a connection over bluetooth with my NXT. It was working very well for a week or so, but now the b... |
11 year | 2 | 3126 |
|
object recognition
Hi , i want to move my lego robot if specified object is recognized, i am able to recognize object using O... |
11 year | 2 | 3450 |

Hi, I am trying to communicate variables to a Lego NXT from RoboRealm via Bluetooth. I am able to c... |
12 year | 5 | 3436 |
|
Problem with Lego_NXT module
Hi, I am currently unable to interface with the Lego NXT module after I uploaded the enhanced NXC firmware into my NXT. Now it w... |
12 year | 2 | 3388 |

