
Erector Spykee
The Spykee module provides an interface from RoboRealm to the Erector Spykee robot. Using the module you can command the robot to respond to images processed from the Spykee robot. The robot sends images over 802.11 (WiFi) to a PC. The PC is running RoboRealm that accesses that video stream, processes the video as per your needs and then sends the resulting motor commands back to the robot also using 802.11. Using this technique you can control your Spykee robot from your PC and use the full power and flexibility of your PC to control the Spykee robot. This allows you to extend the functionality of the Spykee robot beyond its original limitations.
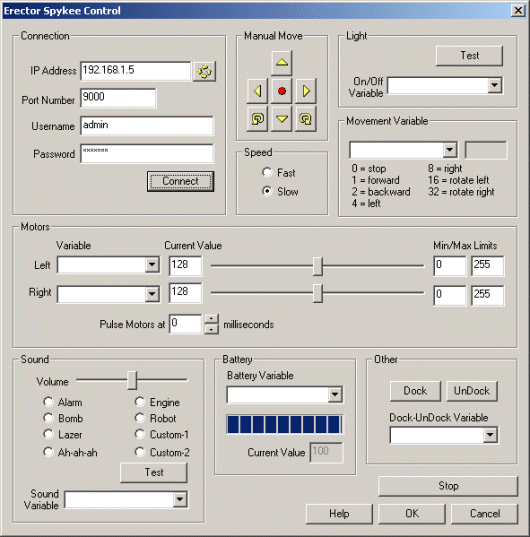
Interface
Instructions
1. IP Address - specify the ip address of the Spykee. This can be determined by using the default address or by clicking on the yellow circlular button to the right of the text box which will broadcast out to the network to see if a Spykee robot is connected. If this fails you can also check your wireless router to see what IP address has been assigned to the Spykee robot.
2. Username / Password - specify the username and password for the Spykee.
3. Connect - press the connect button to connect to the Spykee and start streaming video.
4. Manual Move - to test the motors on the Spykee you can use the Manual move buttons to move the robot in the specified direction. Note that the robot will continue to move for as long as the buttons are pressed. The middle button stops the robot.
5. Speed - to make the robot move quicker when using the manual move buttons you can select a faster speed. Note this speed adjustment are just used for the manual move buttons.
6. Motors - use the variable dropdown to select a variable that has a value that would be sent to the motors of the Spykee OR you can change the values manually by moving the provided sliders or by changing the value directly in the edit box. See Variable Control for more information on how to programatically move the robot.
7. Pulse Speed - the Spykee robot is a very fast robot. The motors even at value 129 (+1 from off) will move the robot quicker than most would want when fine control is needed. You can use the pulse time to pulse the motor value to the robot in order to slow the motors down while still retaining enough torque to move the robot. This will cause the motor value being sent to the robot to oscillate causing a jerky but slow movement. The recommended value is about 50 but you will have to experiment on your Spykee to see what value works best. 0 means no pulsation is used.
8. Light - you can test the main Spykee light by pressing the Test button. If you want to control the light via a variable (zero or non-zero value) select that variable in the provided dropdown.
9. Movement Variable - instead of using the motor separate motor variables you can select a variable that contains one of the command numbers that will cause the robot to move in the specified manner. Note that this is used in lieu of the separate motor variables.
10. Sound - To test the default sound effects click on one of the effect radio buttons and press the Test button. This should cause the Spykee to produce that sound. You can adjust the volume of the sound by adjusting the slider bar left to lower the volume and right to increase it.
11. Sound variable - If you'd like programmatic control to produce a sound specify a variable that will contain a number from 1 to 8 or contain the name of the effect (Alarm, Bomb, etc). The effect will then be played on the Spykee robot. Note that the variable is cleared once played to ensure that the sound does not repeat.
12. Battery - The battery level is indicated by the progress bar and the actual current value. To programmatically react to the battery value select a variable that will contain the battery value. 0 - 100 means the robot is in operation and feeding video. -1 to -99 indicates the battery level while on the charger. Thus you can use this value to determine when charging is required and when it is complete.
13. Other - To dock or undock the robot press on the appropriate button. To programmatically dock or undock the robot select a variable that would contain either "dock" or "undock" (without the quotes) that would indicate what action the robot should perform.
Example
![]() Click Here to load a configuration to control the Spykee robot using a joystick.
Click Here to load a configuration to control the Spykee robot using a joystick.
![]() Click Here to load a configuration to connect to the Spykee robot using the
default parameters to chase a red ball. The optimal configuration of the Spykee camera
is to move it such that it sees the floor immediately in front of the robot.
Click Here to load a configuration to connect to the Spykee robot using the
default parameters to chase a red ball. The optimal configuration of the Spykee camera
is to move it such that it sees the floor immediately in front of the robot.
Note that for the examples to work you will need to configure the IP address and the username/password within the Spykee module.
See Also
BrookStone Rover 1.0
WowWee Rovio
Xaxxon Oculus
For more information
SpyKee Dev Community
SPYKEE community
| New Post |
| Erector_Spykee Related Forum Posts | Last post | Posts | Views |
|
I must say first that Roborealm looks like a wonderful program. I'd buy it today if only I could get the trial version working... |
13 year | 5 | 3922 |
|
Hello, I was wondering if there was a script for the Spykee bot that automatic turns on the led lig... |
14 year | 2 | 3471 |

Hi, I have a problem I need help with. The idea is to read two values from the serial... |
15 year | 4 | 4299 |

Hi, I want to use the spykee module and have some very basic questions. What I want i... |
16 year | 3 | 4818 |
 Spykee Red Ball
Hi. I loaded the Spykee Red Ball program into roborealm and spykee just starts rolling forward. It doesn't track anything. Is t... |
16 year | 6 | 7669 |
 Spykee
I have been testing the spykee module and I thought I would just add a few points that might make it easier for folks. | 16 year | 8 | 13380 |
|
Username / Password Issue
Hello, I have installed the latest Roborealm v1.8.24.0. When trying to conne... |
17 year | 10 | 9323 |