
Pololu SSC
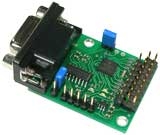
The Pololu micro serial servo controller (SSC) is a very compact solution for controlling up to eight radio control (RC) servos from a computer or microcontroller. The Pololu RoboRealm module provides a way to interface the visual processing of RoboRealm into servo movements using the Pololu SSC board.While the Pololu SSC is compatible with the Mini SSC protocol the RoboRealm module provides access to the more advanced features available in the Pololu specific protocol such as servo speed, resolution, neutral point, increased range and access to multiple servo banks.
Interface
Instructions
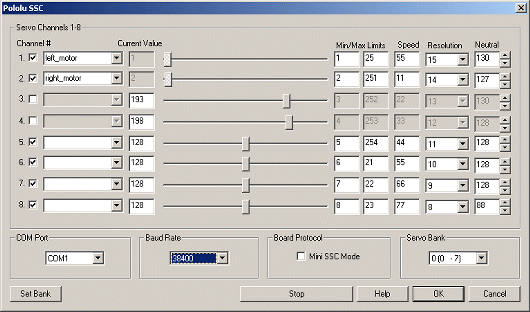
1. COM Port - Select the appropriate COM Port. You will only see COM ports that are recognized by your computer.
2. Baud Rate - Select the appropriate baud rate. 38400 is the default speed used to provide fastest response. Select a lower baud rate if you have problems communicating. Note that when in Mini SSC mode 9600 baud is the fastest rate you can use.
3. Mini SSC Mode - Select if you want to use the Mini SSC mode (checked) or the Pololu native mode (unchecked). This will need to correspond to the state of the protocol selection jumper (off for native Pololu mode, on for Mini SSC mode.) If the jumper and the selection in this user interface do not match the SSC will not work correctly.
4. Servo Bank - Select which servo bank should be accessed. The Servo bank allows more than one SSC board to be controlled from the serial port. To add a second board on bank 1 (8-15) remove all but that board from the serial connection. Select the bank 1 in the dropdown interface. By pressing the "Set Bank" button RoboRealm tell the servo board to respond to the second bank servo commands. You will have to reset the SSC board by powering off and then on again.
You can then reattach any other SSC boards. By keeping the same back selected the module will only talk with the appropriate servo. By adding more than one SSC module into the RoboRealm pipeline and selecting the correct servo bank you can control up to 128 separate servos.
5. Sliders - After specifying the COM Port you should be able to move your servos by dragging the sliders to the right or left or by specifying a number within the current value text box in the Servo Channels area. If the servos do not move check your COM Port setting and/or board connections.
6. Variables - Select the appropriate variables that contain or will contain the position value that will be sent to the servo board. This is used to automatically change the servo values based on your VBScript (using the SetVariable function) or Plugin based program.
7. Current Value - To manually set the servo position type in the appropriate number (0-255, 128 is the default neutral) into the text area or use the slider to adjust the value. The servo position will be updated as appropriate. Be sure to select the correct COM port that you are using to control the SSC.
8. Min/Max Limits - You can also use the min/max limits to ensure that even if the variables specify large or low values (due to programming errors) that the board does not actually attempt to move the servos above or below the specified limits. This can be used as an additional precaution in case your servos cannot physically move beyond certain limits.
9. Speed - You can also set the servo speed using the last text box. Using 0 will move the servo as quickly as possible. Setting it to 1 will move the servo very slowly to the destination position. Using 127 will move it quite quickly to the appropriate position.
10. Resolution - If you need finer control over a smaller turning range of the servo reduce the resolution number towards 1. At 15 you will still have about 180 degree control, as you approach 1 the range will allow for finer adjustments to the position by reducing the total range of the servo.
11. Neutral - As you increase the resolution the range reduces. Using the neutral setting will adjust the absolute middle position of the servo such that the total range will now focus around that point. This allows you to move the servo to a set position anywhere along the 180 degree turn and then control the movement within a very precise but limited range.
12. STOP - Press STOP if you need to quickly disable all the servos and return them to the middle or neutral (128) position.
13. Enable - To enable/disable using a particular servo you can click on the checkbox next to each channel. A disabled servo will not be sent any signals and will be turned off. This allows you to manually move the servo as needed.
See Also
SSC
For more information
Pololu SSC
| New Post |
| Pololu_SSC Related Forum Posts | Last post | Posts | Views |
|
pololu servo control via xbee
Hi, I have been using roborealm for controlling my pololu maestro 6 servo controller via a joystick and it works fine... |
13 year | 11 | 5221 |

Hi, I bought the licence of the last roborealm version and I have a problem with pololu micro-maestro. | 14 year | 32 | 11433 |
|
Pololu Micro Maestro
Greetings We putting together an ROV to accompany a submarine and want to drive it with RC motor an... |
16 year | 7 | 5648 |