Matrix-Vision BlueFox
The Matrix-Vision BlueFox module provides a direct interface to the Matrix-Vision BlueFox series of USB cameras. For more information about the camera please see the Matrix Vision website.While all Matrix Vision cameras are also accessible using DirectShow this module specifically exposes all the options of the BlueFox camera to allow for finer control via RoboRealm variables. As the DirectShow interface is a driver level connection RoboRealm cannot directly modify settings if dynamic control is needed (i.e. a variable within RoboRealm controls the exposure setting). This module exposes all of the camera settings in an interface that allows for variables to be used to control aspects of the camera AND will restore those settings on the camera when RoboRealm is relaunched. The DirectShow interface is a generic one, this module is much more specific.
Interface

Instructions
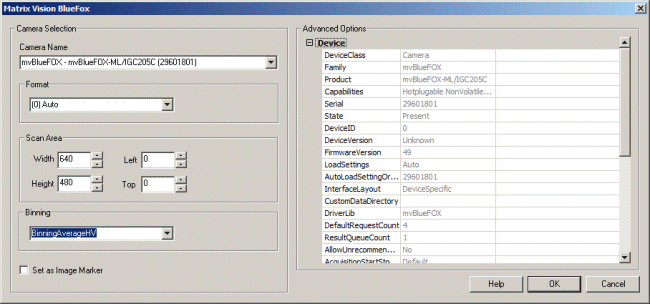
1. Camera Name - Displays a dropdown of available cameras that the PC recognizes. If your camera is not on this list, check your connection, close this Module's interface and double click on it again to reedit. The list is only repopulated when you re-edit the module.
Selecting a camera from this list should immediately start displaying that camera's image in the main RoboRealm window.
2. Format - Specifies how the camera should transmit images to the PC. In most cases '[0] Auto' should suffice but in those situations where USB bandwidth needs to be reduced once can select more compact modes.
3. AOI Area - Specifies which part of the current image is of interest. This can be used to reduce the image size which increases system performance.
4. Binning - Specifies how the current image should be reduced by binning the pixels which helps decrease sensor noise while reducing image size.
5. Advanced Options - Provides access in a tree like structure to all camera parameters. Expanding the tree can reveal addition parameters that the camera provides. Information that is grayed is read only. For information that can be edited you can click on the information to directly change that information. Once accepted this is immediately passed to the camera to change its properties. Various types of information will have different interfaces due to the type of information being edited. Once updated, the value will be saved with the current robofile (RoboRealm configuration) such that on reloading the same robofile will once again send those configuration attributes to the camera REGARDLESS of the current camera settings. This ensures that each robofile can set its own camera configuration.
It is often desirable to automate the changing of various parameters. When you click on the third column within the Advanced Options tree you can type in or select a variable that will contain the desired value to send to the camera. This variable can then be changed in other modules and sent to the camera automatically. Once you press OK and save the RoboRealm configuration (robofile) those variable relationships will also be preserved and sent to the camera again on execution. Note that for read only parameters the variable will be initialized to the associated value on connection. This allows you to display values from the camera in a more visible interface.
6. Higher Bit Images - RoboRealm operates on 24 bits RGB per pixel for performance reasons. When loading in images with higher bit depths RoboRealm needs to know how to process the image into a 24 bit image. There are many ways this can be accomplished:
- High - Uses the upper 8 bits of the image
- Low - Uses the lower 8 bits of the image
- Sqrt - Square root's the image pixel to the 8 bit range
- Inv Sqrt - The Sqrt function will favor darker pixels, the Inv Sqrt favors lighter
- Center Mean - Forces the high bit range to be centered at the image mean
- Below Mean - Shows only pixel below the image mean compressed into 24 bits
- Above Mean - Shows only pixel above the image mean compressed into 24 bits
- Around Mean - Similar to Center Mean but thresholds values on either side to improve contrast
- Normalize - Determines image low and high values and scales to 24 bit
- Pseudo X - Translates image intensity into a higher color range for improved visibility
- Logarithm - Takes the logarithm of the image pixel and then stretches to 8 bit range
11. Process Color Channels Together - Specifies that color channels will be considered a single channel such that the relative color amounts will not change. Unselected, each color channel will be processed independently which can improve or worsen an images overall appearance.
Example
![]() Click Here to download an example that will cause the AOI to change
in order to keep a 320x240 window on a bright object. This shows how to change the Advanced properties to send
property changes to the camera and simulates a pan/tilt system. Once you run this robofile within RoboRealm, move
the camera until you see a single bright object (like an overhead light) and then slowly move the camera to one
side to see the image jumps due to the change in the X and Y of the AOI properties.
Click Here to download an example that will cause the AOI to change
in order to keep a 320x240 window on a bright object. This shows how to change the Advanced properties to send
property changes to the camera and simulates a pan/tilt system. Once you run this robofile within RoboRealm, move
the camera until you see a single bright object (like an overhead light) and then slowly move the camera to one
side to see the image jumps due to the change in the X and Y of the AOI properties.
Variables
MATRIX_VISION_BLUEFOX_ERROR - Set when an error occurs within the module.
See Also
GenICam
For more information
Matrix-Vision BlueFox Website
| New Post |
| Matrix_Vision_BlueFox Related Forum Posts | Last post | Posts | Views |
| None |
