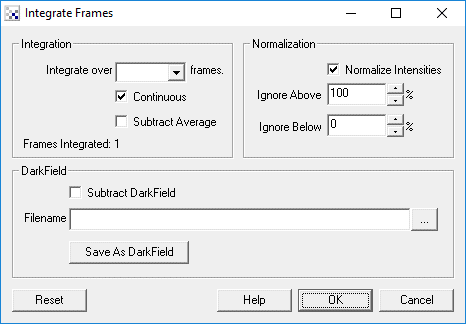
Image Integration
The Image Integration module will keep adding images to the current image in an effort to increase the light in an image. Note that the image content will need to be very still during the light integration period. The Image Integration is similar to the Image Averaging but will instead normalize the image based on the lightest pixel seen in the image. To ignore situations where hot or cold pixels exist you can adjust the "Ignore Above" and "Ignore Below" percentages to disqualify the hot or cold pixel values from the normalization process.
Interface

Instructions
1. Specify the number of frames to integrate.
2. Specify if the addition should be continuous or stop after the specified number of frames have been integrated.
3. Select the subtraction checkbox if you want to subtract the current mean intensity value from the image prior to integration. This can be used in place of normalization to ensure that the image does not become a white wash.
4. Click on "Normalize Image" if you want the resulting integrated image to be normalized with respect to the pixel intensity range (0-255). This process can be modified by the following text boxes where you can modify the analyzed range.
5. Specify what high intensity white pixels should be ignored when normalizing the image. For example, if your CCD has a bright noise pixel that creates a bright pixel spot in the resulting image it will cause the normalization to suppress any darker areas of the image. Reducing the percentage from 100% will shrink that range and bring darker areas into view.
6. Similar to the "Ignore Above" you can also ignore dark pixel values that may cause the normalization range to hide darker areas.
7. If your CCD has any 'hot spots' you can use dark field/image subtraction to remove those high pixels. These are pixels that always appear brighter than other pixels and are typically seen as white pixels in the resulting image where no light was present. These pixels are always in the same spot and are caused by noise due to heat generated within your Camera. Using the DarkField subtraction you can reduce the noise generated by these pixels.
- To generate a darkfield image put the lens cam on your camera and press the reset button in this
interface to start integration. Once the number of frames specified has been integrated press the "Save As DarkField" button. This
will save the current image as a darkfield image. The format of the darkimage is a 32 bit RGB value that
also includes the integration frame count. This inclusion allows you to use the same darkfield image
for different integration lengths during subtraction. Note that if you change the image dimensions you will
need to recreate a new darkfield image.
- To then use that image remove your camera lens cap and click on the "Subtract Darkfield" checkbox.
- Specify the darkfield image in the filename textbox or click on the "..." to browse to that file.
Set it to the file you just saved to being subtracting it from the currently seen image.
Note that the "frames integrated" value shows how many frames have currently been integrated.
See Also
Image Averaging
Movement
| New Post |
| Integrate Related Forum Posts | Last post | Posts | Views |
| None |
