Conrad C-Control PRO Mini-Station
The Conrad Mini-Station module provides an interface from RoboRealm to the Mini-Station over a serial connection. The Mini-Station (distributed by Conrad) provides high current relays, digital in and out and analog to digital capabilities. The housing is extremely compact and is also dust and splash-proof till IP66, as such, it can be used in rough conditions. The Mini-Station can be programmed in Basic, Compact-C and Assembler.The module assumes that the following code has been uploaded via the C-Control IDE into the Mini-Station. This code is needed as it provides the interface to the RoboRealm module via a serial to USB interface. If this code is not uploaded to the Mini-Station this module will not function correctly.
Connection Diagram
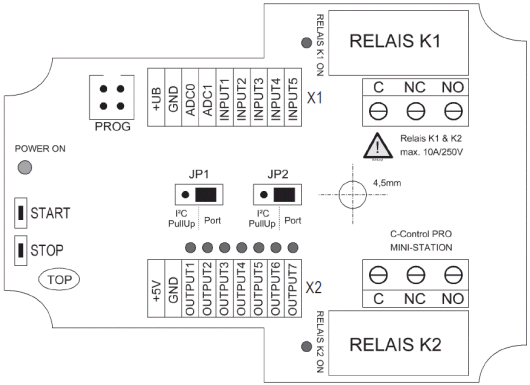
This module makes assumptions about what pins are called what. When reviewing the interface below, the following diagram represents the location of the specified pins. Note that as the Mini-Station provides many kinds of functionalities, some pins (esp. the OUTPUT1 pin) is unsed across different functions. Should you notice that you cannot enable a particular pin that is most likely because it is being used elsewhere. As a single pin cannot be used more than once, the interface will reflect that.

Interface


Instructions
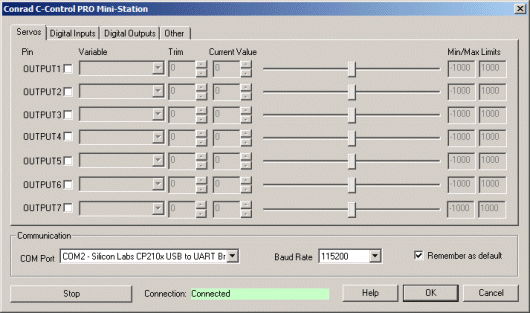
1. COM Port - Select the appropriate COM Port that the Mini-Station is connected to. You will only see COM ports that are recognized by your computer. Note that direct serial connections normally use com ports lower than 4 whilst virtual COM ports created by USB to Serial connections are much higher.
2. Baud Rate - Select the appropriate baud rate. 115200 which is the default speed used by the onboard code linked to above. If you modify the firmware code to change the baud rate, you can select a different rate.
3. Digital Inputs - The Mini-Station provides 5 digital input pins. The checkbox (in a disabled state) will reflect the high or low state of the pin.
To automatically receive a bit select or type in a variable that will be set. Note that you can tell RoboRealm which bit of the variable you want to set by using the provided bit dropdown. If no bit is specified the entire value is considered during a set/output.
4. Digital Outputs - The Mini-Station provides 7 digital output pins. Note that if you are using servos those pins will already be used. The remaining pins can be used to drive outputs.
To automatically send a bit select or type in a variable that will contain the bit to set. Note that you can tell RoboRealm which bit of the variable you want to set/get by using the provided bit dropdown. If no bit is specified the entire value is considered during a set/output.
As an experiment, you can select the IMAGE_COUNT variable (which holds the current image counter) as the variable and select Bit 6 the LED associated with that output port will blink for every six frames captured. Selecting successively higher bits will slow the blinking by a factor of 2 for every bit.
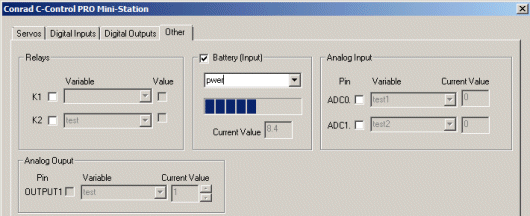
5. Battery - once the Mini-Station is communicating with RoboRealm you can turn on the battery monitor in the Other tab to test the connection. Do this by simply selecting the Battery area checkbox in the interface. The power level will be shown in blue bars with the number of volts in the "Current Value" textbox. If you want to use the volts within other areas of RoboRealm select a variable that the module will write the number of volts to. This variable will then be updated each time the Element module is run with the current voltage of the robot. Note that the volts are multiplied by 10.
6. Analog Input - The Mini-Station provides 2 user analog inputs. (There is actually one more but that is tied to the battery). If you enable the Analog pin you will notice the values in the corresponding read only text boxes change based on the voltage across those pins. If you have a distance sensor connected to an analog pin move your hand in front of the sensor to see these values change. By specifying a variable in the corresponding dropdown you can access that value elsewhere in RoboRealm in order to make decisions about the sensors value. The values will range from 0 to 1023 corresponding to 0 to 5Volts.
7. Relays - The Mini-Station provides 2 relays that can be activated by selecting the checkbox or by selecting a variable that will contain the value to switch off and on the relay. Note that there is an audiable click and a red led that comes on/off corresponding to the state of the relay.
8. Analog Output - The Mini-Station can produce a PWM signal on OUTPUT1 which can be used to create an analog voltage on that pin using the Timer0 within the Mini-Station. Note that if this is enabled, the pin is no longer available for servo or output functionality.
For more information
Conrad C-Control PRO Mini-Station
| New Post |
| Conrad_Mini_Station Related Forum Posts | Last post | Posts | Views |
| None |
