
Finch Robot
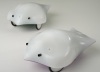
The Finch Robot module provides an interface to the BirdBrain Technologies Finch Robot from RoboRealm. This $99 dollar robot has 2 servo motors, 2 photoresistors (light sensors), 2 IR distance sensors, a thermister, buzzer, 3 axis accelerometer and a multi-colored LED. This module provides access to all the robot's features from a GUI and allows you to combine them with the additional capabilities of a camera.
Interface
Instructions
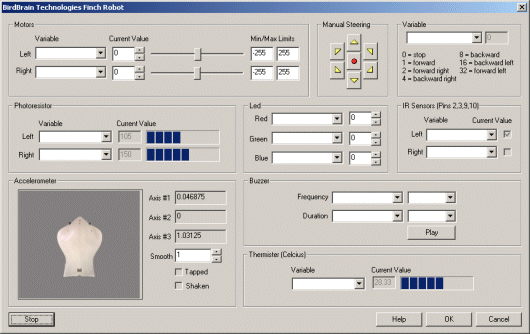
1. You should have already plugged in your Finch robot otherwise the module will indicate that it cannot find the robot. If you see this popup warning ensure that your Finch is plugged in and cycling the LED nose colors prior to activating the module. Once activated the Finch's LED nose should be unlit. This indicates that the Finch has power and is waiting on commands.
2. Manual Steering - There are two ways to move the finch. The manual steering buttons will move the robot as long as the button is pressed. Releasing the button will stop the robot moving in a particular direction.
3. Variable - If you want to automate the movement of the robot you can select a variable in the dropdown menu that contains or will contain which direction to move the robot. Note that this variable will be populated by some other module. It offers a simple way to direct the robot without needing to worry about what wheel needs to do what in order to generate a particular movement. See Variable Control for more information on how to programatically move the robot.
4. Motors - To independently control the wheels you can move the scroll bars or change the values in the editable text box. To automate the movement of the robot you can select or type in variables that contain values that will be sent to the robot as motor intensity values. Keep in mind the STOP button at the bottom of the interface to quickly stop an out of control robot!
Once you select a variable you will not be able to manually adjust the motor bar as it will now respond to the value within the variable. Also be sure to select the appropriate minimum and maximum values to ensure that the variables do not exceed the motor limits. Note that the values for the motors range from 0 to 255 with 128 being neutral.
5. Photo Resistors - you should start see the bar graph adjust based on the amount of detect light. To utilize this number in other modules select or type a variable that will be set to the resistance amount. Keep in mind that any ambient light will be detected by the resistor including sunlight or spotlights.
You can notice the change in the value by covering both your hands over the finch's nose. You should see the values decrease and increase when you release your hands.
6. LED - The led is a full color LED capable of generating a lot of colors. You can use the spin buttons or type in a number in the provided text boxes to see an immediate change in the nose LED. The 3 channels (red, green and blue) can be used in combination to specify many colors. Note that when a variable is selected the value field will be disabled to indicate that the specific LED channel value is now being received from a variable.
7. IR Sensors - The appropriate checkbox will turn on when something is in front of the IR sensor. If you move your hand in front of the robot you should see one or both checks in the checkboxes. Note that the IR sensor used is a digital sensor and detects an object at a set distance. The dropdown combo box next to the checkboxes can be used to specify a variable that will contain the value of 1 or 0 depending on if something is detected by the specific IR sensor.
8. Buzzer - to test that the piezo buzzer is working correctly select a frequency from the second dropdown menu and a appropriate during in the next dropdown directly below. Click on Play and you should hear the note coming from the robot.
To automatically play a sound type in or select a variable for both frequency and duration that will contain the appropriate frequency and duration number. When these variables become set RoboRealm will command the robot to play the note and will then remove the variables' values. The variables are cleared to prevent the note from being played again and again. To once again play a note, simply set the variables again with appropriate values.
9. Thermister - The temperature value is shown in the bar chart with the actual value in Celsius in the disabled text box. You can specify a variable in the combo box that will contain this value as sent back from the Finch.
10 Accelerometer - The 3 axis accelerometer provides position information for the Finch. The X and Y values indicate roll and tilt with the Z axis being a check to determine if the device is upside down. Keep in mind that the Accelerometer only measures tilt and NOT orientation (Z axis). The values are stored in 3 variables that can be accessed by other modules (FINCH_AXIS_X, FINCH_AXIS_Y, FINCH_AXIS_Z).
Note that the simulation graphic uses Axis1 and Axis2 for tilt sensing and checks Axis 3 to determine if the device is upside down. Keep in mind that the Accelerometer only measures tilt and NOT orientation (Z axis) and thus the simulation graphic will assume you are holding the robot with the USB cable connection oriented towards you and the nose pointing away.
11. Smooth - if the accelerometer values are not as responsive as you would like try reducing the smooth value. This will allow the numbers to be much more reactive but may also cause some unwanted jitter due to noise in the determined values. By decreasing the smooth value you make the sensors much more responsive to movement, increasing the value will delay the sharpness of the movement but also make it much more smooth. Note this is reflected in the simulation graphic.
Examples
Joystick
![]() Click Here to load a robofile that will allow you to drive your Finch using a joystick. When you load this configuration
you will need to edit the Joystick module to select which joystick to use to control the robot.
Click Here to load a robofile that will allow you to drive your Finch using a joystick. When you load this configuration
you will need to edit the Joystick module to select which joystick to use to control the robot.
This robofile is configured for a playstation type of joystick with the first knob providing motion control. Moving the knob forward/backward moves the robot forward/backward. Moving the knob left/right pivots the robot in the appropriate direction.
If you do not like the configuration we have chosen simply edit the Joystick module and change the variables around to different buttons.
Once that is done have a safe and happy drive!
Color Sample
![]() Click Here to load a robofile that will change the nose LED color based on the
sample within the current image in RoboRealm. By moving the camera around
you can change the nose color to the average color seen in the camera.
Click Here to load a robofile that will change the nose LED color based on the
sample within the current image in RoboRealm. By moving the camera around
you can change the nose color to the average color seen in the camera.
Variables
FINCH_AXIS_X - the X value of the accelerometer
FINCH_AXIS_Y - the Y value of the accelerometer
FINCH_AXIS_Z - the Z value of the accelerometer
FINCH_TAPPED - true (non-zero) when the finch was tapped
FINCH_SHAKEN - true (non-zero) when the finch was shaken
For more information
BirdBrain Technologies Finch Robot
| New Post |
| BirdBrain_Technologies_Finch_Robot Related Forum Posts | Last post | Posts | Views |
| None |