
Display Image
The Display Image module provides a way to display images within the current image similar to a picture in picture (PIP) functionality seen in many television sets today. The module is useful as many other modules will provide images as named images that can be displayed within the current image for reference. For example, the Image Matching module provides an "image_match" image which can be used in this module for display.
Interface
Instructions
1. Image - Select which image to display.
2. Mask - If needed select a Mask that will indicate where the image pixels are valid and will overwrite the currently displayed image. The mask allows you to introduce an alpha or transparency to the image that you are displaying. Wherever the Mask is non-zero the pixels in the Image will be copied onto the currently displayed image.
3. Position - Select one of the nine possible positions to place the image. Or select the radio button next to the X,Y coordinates. Once this radio button is selected you can enter in the X,Y values for image placement or use the [variable] specification to use the value within a RoboRealm variable for placement.
4. Rotation - Specify the Z rotation for the image to be rotated prior to display. Note that this field is specified in degrees from 0 to 360. To use a variable in this field use the [variable] notation. This will cause the module to query the variable's value and use that for the rotation amount.
5. Scale - Select the PIP size. Note that this is relative to the original PIP image size and NOT the currently displayed image. Note that selecting 100% replaces the current image with the PIP selected image.
6. Border Color - Select the border color what will outline the PIP
7. Display as Annotation - Select if you want the graphic to be draw after all processing has been completed. If this is NOT selected then the next module in the processing pipeline will see the graphic as if it were part of the image and process it accordingly.
Example
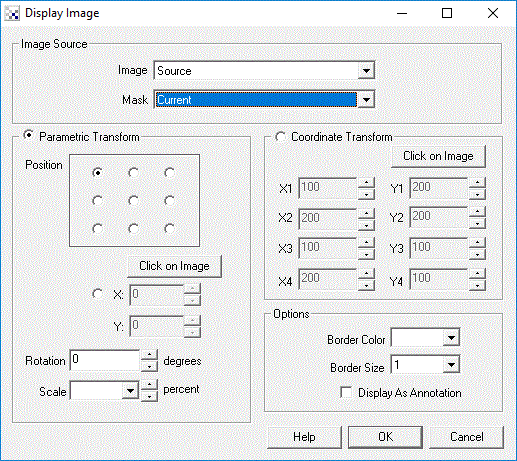
| Example#1 - RGBFilter Yellow | Example#2 - Smaller PIP on right side |
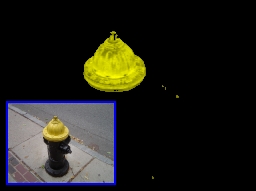 |  |
See Also
Display Variables
| New Post |
| Display_Image Related Forum Posts | Last post | Posts | Views |
 How to rotate compass image?
Hi STeven, I’d like to display compass graphics on screen. Compass image should rotate accordingly... |
11 year | 2 | 3101 |
 Display variables - great feature!
This program continues to surprise me with useful options. I've just discovered the "display variables" module - a brilliant... |
11 year | 3 | 2784 |

Hi, I'm trying to remove the amp glow from a astronomical image. My logic seems sound, but alas my... |
12 year | 4 | 3293 |
|
Hi, Is there a way to put the cropped processed image on top of the original image (just the white... |
12 year | 3 | 3018 |
|
Hi, I'm new here. Is there anyway to draw arc in Roborealm? What i know is that it can draw circle... |
13 year | 6 | 3135 |

Hi, I want to use the spykee module and have some very basic questions. What I want i... |
14 year | 3 | 3994 |
|
overlay bmp
I look for it but apparently there is no way to overlay a image (bmp, jpg, marker) in a set XY from a variable (like a cog/blob... |
14 year | 3 | 3749 |