
Color Filter
The Color Filter module provides a way to isolate specific colors from the current image. This module functions similar to the RGB Filter but allows for custom colors and grays to be detected.The module will convert the current image into the HLS (see HLS Channel) format and use the Hue and Lighting fields to segment the image into the specified colors.
Keep in mind that the amount of light plays an important part in detecting colors. Objects not under enough lighting will appear different than objects with appropriate lighting and may cause detection failure. Object with too much light will appear much more pale and actually not contain much 'color' information. The best detection can be performed under even illumination that lights all the parts evenly.
Care should also be given to try to eliminate any reflective surfaces. Reflective surfaces will cause that surface to appear different in color than it actually is. (See the extra blue detected around the spirals below which is actually the white table reflecting the color blue.) This is also apparent on glossy objects that will reflect the illumination directly. You can see this issue on the brown marker where the top middle of the marker is reflecting white light. This causes some failure in detection of that object as the colors will not match.
Even images of gray, white, black surfaces will typically have some small amount of color information but will be mainly due to noise. Depending on the settings of the parameters below you may see these non-colors be detected incorrectly as colors. If this happens check the minimum color setting as that will help to eliminate detection of non-colored surfaces as colored. You can also reduce this error by adding in grays that are close to the surface causing the error.
While the module will attempt to best connect a pixel with a selected color it can still make what appear to be mistakes to us. This illustrates the way that we perceive color is different from the way the module compares colors. If this happens try to add colors into the "Added Color" list that are as close as possible to the desired color.
Note that often objects may contain dithered (speckled) colors that differ from one pixel to the next but appears different when viewed from a distance. If this occurs add the Mean module just before this module in order to blur the colors into each other which will aid in detection.
The image will be black if no colors are specified. Once colors are entered in the image will change to show the detected color as specified in the "Added Colors" list. With very few colors most of the detection may be incorrect depending on the color settings. Thus, if you are detecting the color red, have added that to the list but the entire image now appears red try reducing the Match Distance as that will help to tighten up the color detection. Or, conversely, if you find that your red object is not being detected try to increase that value.
Interface
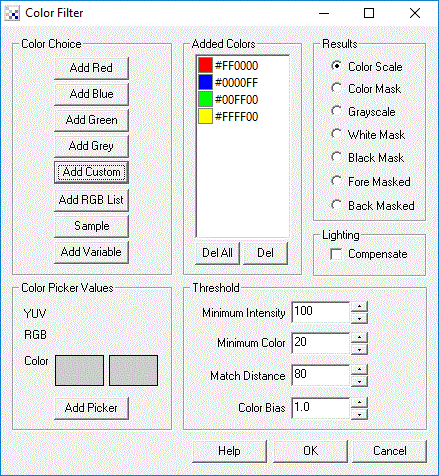
Instructions
1. Color Choice - Chose the desired way to add RGB values to the focus Added Colors.
Add Red - adds the RGB red value to the list.
Add Blue - adds the RGB blue value to the list.
Add Green - adds the RGB green value to the list.
Add Grey - adds the RGB grey value to the list.
Add Custom - you can select the RGB value from the color picker.
Add RGB List - provides an interface to add a list of RGB values specified as hexadecimal or decimal triplet.
Add Sample - adds the RGB values from the current image. You will
be provided an interface to define an image in the current image. On pressing OK the most
common color will be added. Thus you don't need to select your color area exactly as small
amounts of the wrong color will be ignored.
Add Variable - adds the RGB value specified in the selected RoboRealm variable.
2. Color Picker - Shows the color values directly under the mouse as seen on your computer screen as an YUV, RGB value and as a color square. Clicking with the mouse will update the second color box with that clicked on color. Pressing the "Add Picker" button adds that clicked on color to the "Added Color" list.
3. Added List - Shows the colors to be detected within the image. If you had make a mistake and added a color incorrectly you can delete a color by using 'Del All' or selecting the color and pressing 'Del'.
3. Minimum Intensity - Dark colors, i.e. black, will still have some color information contained within them (although not visibly) which may cause some incorrect matches to occur. If you are not detecting black it is a good idea to remove those pixels from match consideration by increasing the Minimum Intensity to a higher number. 0 would just eliminate pure black whereas 255 would eliminate white. Most appropriate values will be around 50. Note that this value will not depend on the colors in the Added List.
4. Minimum Color - White, gray and black are not real colors in that they contain no color information but are instead based entirely on intensity. If you are not detecting those colors increase the minimum color threshold until non-colors are removed from the image. Note that this value will not depend on the colors in the Added List.
5. Match Distance - Specifies how close a match should be before it is considered a match. If you specify 0 then the colors in image will have to be exactly the same as those in the Added List in order for a match to occur. Normally this is highly unlikely given the noise level present in most real images. In order to relax this precision match incase the value to all less precise matches to occur. This value will be the most influential in attempting to remove unwanted objects.
6. Color Bias - If your Added List does not include grays you can bias the detection more towards colors in order to better match darker or lighter colors. Biases above 1.0 will match more based on color, whereas below 1.0 will favor matches based more on intensity.
7. Lighting Compensation - If you find that your colors are not matching well try selecting this checkbox. This will magnify colors and decrease intensity variations in the image in an attempt to get a better color match.
8. Results - Select how the results should be represented
RGB Scale - resulting values are scaled RGB values from 0 to 255 that depend on how close the original color is to one in the Added Colors list
RGB Mask - resulting value is the color that is most similar to one in the Added Colors list
Grayscale - resulting value is how close the color is to a color in the Added Colors list but represented in grayscale values
White Mask - resulting match value is white, non-match is black
Black Mask - resulting match value is black, non-match is white
Fore Masked - resulting image shows original color where a match is made
Back Masked - resulting image shows original colors where a match was NOT made. This is useful in determining how
well your matched colors are working on the actual image.
9. Train button - Select the Train button to open an interface where you can specify the object to detect and have the module parameters be updated to achieve that goal. See the Label Object documentation for more information.
10. X colors - The numerical dropdown next to the Train button allows you to select how many colors to train towards. The default is just to use one color in the profile but more can be used if the object has several main colors.
The color picker works by showing the color of the pixel the mouse is currently hovering over. When you click the second square box is updated with that color. Selecting Add Picker will then add that value to the Added Colors list. This functionality allows you to select any color on your desktop (except colors within the RGB Filter interface) to be added to the Added Colors list.
One a single instance of a color will be added to the Added List. If you attempt to add exactly the same color to the list it will not be added. The list order is irrelevant and does not affect color detection.
Example
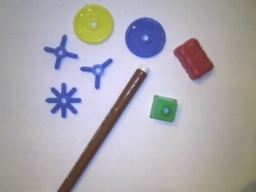
| Source Image | Color Filter on Red, Green, Blue, Yellow and Brown ( |
 |  |
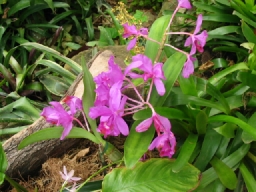
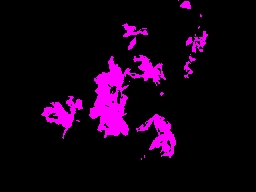
| Source Image | Color Filter on Purple |
 |  |
See Also
RGB Filter
RGB Channel
Threshold
Auto Threshold
| New Post |
| Color_Filter Related Forum Posts | Last post | Posts | Views |

Has anyone created a simple C# Form Application for RGB Filter? Not really able to follow the sample project that I downloaded a... |
10 year | 4 | 3702 |
 help!!!!!
work with 3 different colors with variables... |
12 year | 5 | 3488 |
|
color recognition
hi i want the colour filter to identify red and then give a signal to the serial port to start running please tell me how i can... |
12 year | 2 | 3126 |
|
Hi Nice piece of software, just to begin with. I was wondering if ther... |
14 year | 3 | 3711 |
|
multiple objects...same characteristics
hey, i'm trying to get the COG of multiple balls of the same color and dimensions. any ideas | 15 year | 3 | 3605 |

I am new in robo realm, but i think there is a problem with shape matching, i have 5 forms. 3 arrow... |
15 year | 9 | 5278 |
|
vb script for color filter
what should i edit for the vb script if i want the output to be voice pronunciation?thank you very much for your help.... |
15 year | 2 | 3951 |
|
Color_Filter Variable Issue
When passing a variable for color to the Color_Filter, I seem to only be able to pass a hex value (#FF00FF), not the RGB value (... |
15 year | 3 | 3573 |