
Finding a bullseye target

![]() Download the Find Target Symbol robofile.
Download the Find Target Symbol robofile.
 First double click on the WowWee module in the processing pipeline. It may take a while to appear since it
will immediately try to connect to the default Rovio setting at 192.168.1.10. When it does appear change the IP address
to the one you are using. If you do not know the IP address of the robot you will have to check your router information.
First double click on the WowWee module in the processing pipeline. It may take a while to appear since it
will immediately try to connect to the default Rovio setting at 192.168.1.10. When it does appear change the IP address
to the one you are using. If you do not know the IP address of the robot you will have to check your router information.
If you have already configured the Rovio in a previous robofile then the IP address should already be configured for your robot assuming the "Remember as default" in the Rovio GUI interface is set.
- Once you get the right IP address you should see the image from the Rovio in the main RoboRealm GUI. From here you can
now place the robot in proximity of a bullseye target. Use the following link to view and then print out this target using your browser's File->Print menu.
Once printed place
the target somewhere within the line of sight of the Rovio. The Rovio will head
towards it as soon as the target is seen.
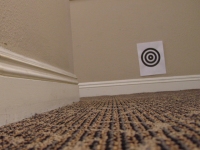 We track the bullseye target using specific properties of the target that are unlikely to exist
elsewhere in the environment. First we start with an example image that could be seen from
your robot while navigating around your hallway. Note that the target is placed low to the floor to ensure
best viewing by the Rovio.
We track the bullseye target using specific properties of the target that are unlikely to exist
elsewhere in the environment. First we start with an example image that could be seen from
your robot while navigating around your hallway. Note that the target is placed low to the floor to ensure
best viewing by the Rovio.
 To segment the bullseye from the scene we first use the Adaptive Threshold module to identify
localized parts of the image that are much brighter or darker than their surrounding. This removes many bad lighting
issues (the Rovio camera needs a lot of light to work) and allows the target to easily be seen while most of the rest of the image is reduced to white. Note that
this thresholding works only on the intensity of the image and disregards the color so black and white images will
work too.
To segment the bullseye from the scene we first use the Adaptive Threshold module to identify
localized parts of the image that are much brighter or darker than their surrounding. This removes many bad lighting
issues (the Rovio camera needs a lot of light to work) and allows the target to easily be seen while most of the rest of the image is reduced to white. Note that
this thresholding works only on the intensity of the image and disregards the color so black and white images will
work too.
 From there we invert the image using the
Negative module as RoboRealm likes to
work with white objects instead of black ones.
From there we invert the image using the
Negative module as RoboRealm likes to
work with white objects instead of black ones.
 To remove all non-target objects we use the
specific property of a bullseye target that the center of gravity (i.e. where you would balance the shape on a finger) of each of the rings will be very close to
each other and in most cases in exactly the same spot. This is typically seen by a circular target and thus is a very
effective filter for this type of symbol. We use the blob filter module to
eliminate any objects that do not have a close COG near to another blob, to eliminate any small objects from
consideration and finally check that we only result with blobs that are inside of other blobs. Thus we do lose
the outer ring of the target but the inner two are kept.
To remove all non-target objects we use the
specific property of a bullseye target that the center of gravity (i.e. where you would balance the shape on a finger) of each of the rings will be very close to
each other and in most cases in exactly the same spot. This is typically seen by a circular target and thus is a very
effective filter for this type of symbol. We use the blob filter module to
eliminate any objects that do not have a close COG near to another blob, to eliminate any small objects from
consideration and finally check that we only result with blobs that are inside of other blobs. Thus we do lose
the outer ring of the target but the inner two are kept.
-
 Finally we now need to tell the Rovio how to move in order to get to the identified light. We do this by
understanding on what side of the image the identified target is. In our case it is on the right side.
If the desired target point is right of the center of the
image we need to move the robot right, whilst if it is on the left we need to move left. If we create this
behavior the robot will move in the direction of the light. The VBscript
module allows us to write some VBScript to set the motor values of the Rovio based on the X coordinate of the target
point. The more the X location is to the right the harder we should turn LEFT and vice versa for the other side. The VBScript module produces
a 'move' variable that contains the suggested direction that the Rovio should perform. The Rovio module then grabs this value
and passes it to the Rovio robot to complete the cycle.
Finally we now need to tell the Rovio how to move in order to get to the identified light. We do this by
understanding on what side of the image the identified target is. In our case it is on the right side.
If the desired target point is right of the center of the
image we need to move the robot right, whilst if it is on the left we need to move left. If we create this
behavior the robot will move in the direction of the light. The VBscript
module allows us to write some VBScript to set the motor values of the Rovio based on the X coordinate of the target
point. The more the X location is to the right the harder we should turn LEFT and vice versa for the other side. The VBScript module produces
a 'move' variable that contains the suggested direction that the Rovio should perform. The Rovio module then grabs this value
and passes it to the Rovio robot to complete the cycle.