
Creative Senz3D
The Creative Senz3D module provides access to the Creative Senz3D RGB-D camera. Similar to the Kinect and the Xtion Pro, the Senz3D provides information about the distance to objects as well as RGB images. The main differences between the Senz3D is the method which is used to determine distance. The Kinect and Xtion both used a projection system to project a dot pattern which is then processed accordingly. The Senz3D uses 'time-of-flight' in that it determines the amount of time it takes for light to travel and reflect from objects within its field of view. Because of this technique, edges are sharper than seen in the Kinect but at a lower resolution (320x240 is the maximum depth image size in the Senz3D).Other differences include only requiring a single USB cable (no power cable like the Kinect) and much smaller form factor. The Senz3D is rated for 0.5ft to 3.25ft which is a much shorter range than the Kinect but allows for closer objects to register (the Kinect has about a 2ft blind spot for objects too close). The IR image in the Senz3D is higher bit depth which allows for more of the scene to be viewed (i.e. it is a very useful night camera).
Currently, the camera does not appear to be as popular as the Kinect largely due to lack of apps/games/etc. Due to this it is currently available from the Creative website at $99.00 USD. This is the cheapest depth camera that we are currently aware of (as of Jan 12th, 2015).
A note on installation: While the Senz3D is part of the Intel Real-Sense initiative, we found that installing the 32bit DepthSenseSDK from SoftKinetic rather than the Creative or Intel programs that came along with the device to be much quicker and provide just the basics to use the camera. The applications provided along with the camera appear to be quite large (several gigs) and install various webcam annoyances that caused ALL webcams to suddenly be under face tracking control!
Newer versions of this camera called BasterX do NOT work with this module as the camera is not supported by the SoftKinect software. Instead, please refer to Creative_BlasterX_Senz3D.
Interface
Instructions
1. Device - Select while Senz3D device you wish to connect to.
2. Images - Select what data you'd like to view and which you'd like to save as a Marker. Markers (images saved in memory) can be brought up later and used in other modules.
3. RGB Brightness - refers to an intensity or luminosity scale of the RGB image that ranges from totally black to totally white and has no effect on color values.
4. RGB Contrast - refers to how far pixel values can deviate from gray in the RGB image. The higher the contrast the more black and white and image appears. The lower the contrast the more gray an image appears.
5. RGB Saturation - refers to the intensity of the RGB colors, i.e. how red a red color is. By decreasing the saturation of an image you remove color and produce a monochrome grayscale picture that represents only darkness and brightness, or luminance. Increasing saturation in an image produces artificially intense colors.
6. RGB Gamma - specify the gamma gain to be applied to the image. Note that a gain < 1.0 will increase the overall intensity of the image whilst a gain > 1.0 increases the image's contrast.
7. RGB Sharpness - refers to strong the edges in the image are.
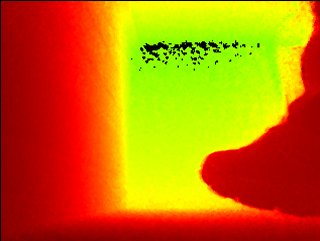
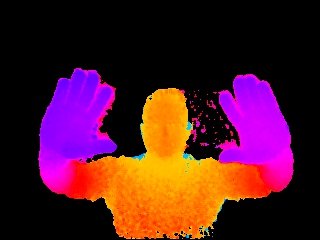
8. Depth Options - The depth image that the devices produce is a 10 bit (0 - 1024 values) number that can be displayed in several ways. The most common depth map display uses intensity (black to white) to indicate the distance to any particular pixel within the image. This can be useful for successive processing (for example threshold) but may not best indicate the different depth levels. Thus you can use the different color schemes to provide more insight into what depth levels are present in the image.
Grayscale - reduces the depth information from 10 bits to 8 for each RGB pixel
Color Scheme X - uses the depth value as an index into a color palette. Each palette uses a different color transition.
Line - produces a line that indicates the closest depth to an object. This is similar to what a SICK or LIDAR laser would produce. Note this option enables the Top and Bottom settings which allow you to crop the depth map to a specific height. Reducing the height allows objects that are above or below the needed detection level to be ignored when creating the distance line.
Raw Depth - the 10 bit number is encoded with 8 bits in the red channel and the remaining 2 in the green channel. This allows you to access the full depth resolution in external applications by decoding the R and G channel. (Note the B channel is set to 0).
9. Noise Reduction - Due to the depth determination method the device can produce a lot of noisy pixels. By selecting the Noise Reduction checkbox a Median filter is automatically applied to help reduce the noise. This is very noticeable when using the Line mode which looks for maximum valued pixels and is very noise prone.
10. Min Confidence - Each depth value is also correlated with a confidence map. To eliminate very noisy pixels increase the confidence until the pixels stabilize. Note that pixels representing objects further away are often more noisy than closer pixels. The confidence measure is essentially how bright a particular pixel is within the IR space. The brighter (and closer) a pixel is the higher the confidence is on its depth.
11. Gamma - While the devices can produce up to 1024 depth levels not all the values will be displayed or used given a particular scene. You may want to focus more on closer depths and lose some resolution at more distant depths (since gray images are 0-255 you lose 2 bits). Using the gamma correction can help to bunch up values to better highlight the different depth values.
12. Min/Max Threshold - You may not want objects that are too far or too close from the devices to appear in the depth map. Using the threshold value you can remove far away objects and also compress the color space of the resulting image to better show depth differences. Using the threshold you can eliminate all but nearby objects that can then be further processed by other modules.
13. Top/Bottom Line - Specifies the row to start and stop when displaying the Line view. This allows you to eliminate floor planes or objects that are too high or low to be of concern.
14. Resolution - The resolution for the RGB image. Note that the Depth and IR image are set at 320x240 and cannot be changed.
15. IR Options - The IR image pixel is 13 bits which is 5 more than what can be represented in an image. To focus what part of that range you want to preserve, select the appropriate technique. There are many ways this can be accomplished:
- High - Uses the upper 8 bits of the image
- Low - Uses the lower 8 bits of the image
- Sqrt - Square root's the image pixel to the 8 bit range
- Inv Sqrt - The Sqrt function will favor darker pixels, the Inv Sqrt favors lighter
- Center Mean - Forces the high bit range to be centered at the image mean
- Below Mean - Shows only pixel below the image mean compressed into 24 bits
- Above Mean - Shows only pixel above the image mean compressed into 24 bits
- Around Mean - Similar to Center Mean but thresholds values on either side to improve contrast
- Normalize - Determines image low and high values and scales to 24 bit
- Pseudo X - Translates image intensity into a higher color range for improved visibility
- Logarithm - Takes the logarithm of the image pixel and then stretches to 8 bit range
Example
Variables
SENZ3D_DEPTH - when saved as a marker this variable contains the depth image
SENZ3D_RGB - when saved as a marker this variable contains the RGB image
SENZ3D_LINE - array containing the Line data (only when line mode enabled)
See Also
LeapMotion Controller
Microsoft Kinect
OpenNI 1.0 & 2.0
Hokuyo Laser
Stereo Depth
Visible Laser Line
For more information
Creative Senz3D
| New Post |
| Creative_Senz3D Related Forum Posts | Last post | Posts | Views |

Hello STeven, I try to use a depth or disparity map from minoru 3d camera with the stereo module. ... |
10 year | 12 | 4299 |