
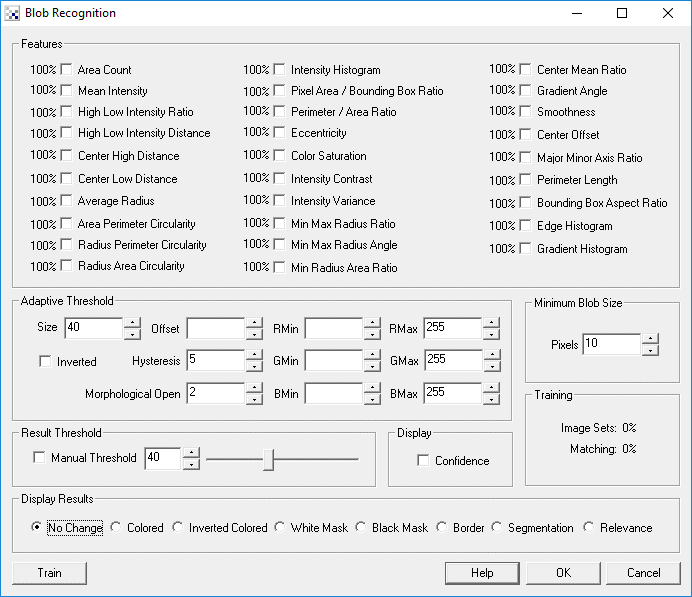
Blob Recognition
The blob recognition module allows you to train a detection engine on specific blob based on supplied training images. The supplied training images (in sets of 2) should consist of the "raw" pixel image as taken by a camera and the manually annotated "mask" image showing which parts of the image are to be recognized. The "mask" image is typically a binary image where black areas are concluded to be background data with non-black (normally white) pixels specify the locations of blobs that should be detected.The module's interface allows you to specify where the training folders is located and which features are used in detection. Once training is complete the weight or relevance of that feature in performing the detection is displayed next to the feature. The module then utilizes this weight information to display recognized objects in subsequent images for testing purposes. The overall goal of the module is to automate the detection of trained blobs without having to determine the relevance of any specific feature such as that performed in the Blob Filter module.
The usage of the module first requires you to train on a set of images (one raw pixels and one binary mask) which will configure the threshold and other configuration values based on that training set. You can then make any changes as needed (most likely this is NOT recommended) and then just drag in images that you want classified. These numbers reflect the TRAINING set and NOT the current image since the current image will typically not have an annotated mask in which to compare the results to in order to determine the correctness of the classification.
Keep in mind the two different approaches to the system, training has the "answer key" but when a new image is run through you do not have an "answer key".
Once training is complete a ".blob" file is created in the source folder that contains the model generated from the training images. Once this file is created you can restart RoboRealm and not have to re-train in order to load in the classification model.
Interface
Instructions
1. Features - The Features list are those features calculated from the mask/annotated image using the raw image to actually determine the numbers. It is important to use the raw data for the statistics otherwise when a new image is shown it needs to work on that data and not on the mask. Thus it is VERY important that the raw image and the mask overlay exactly otherwise the statistics and verification will be wrong.
The checkboxes controls which, if any, features are used for identification for objects. If you uncheck one of the features, it will be removed from the analysis and not used to determine a valid or invalid object.
The percentages next to each feature reflects the relevance of that feature. It is an indication of how powerful/useful a feature is to distinguishing an object from a non-object. So if a feature is 0 then it is essentially useless in distinguishing an object from the background. If it is 100% then that feature is a perfect classifier in determining object versus background.
For example, if an animal has fur, does that uniquely identify a dog? Not quite, but it can be used to narrow the search by say 50%. Barking, that may be 60%, and by combining fur and barking that helps narrow it down even more.
Following is a brief description of the features:
- Size/Area - the pixel count of the blob
- Mean Intensity - the average intensity value of each pixel within the blob
- High Low Intensity Ratio - The intensity difference between the average intensity below the mean and above the mean intensity.
- High Low Intensity Distance - The distance in pixels between the average intensity below the mean and above the mean intensity.
- Center High Distance - the distance between high cog and mean cog divided by the average ratio (to normalize)
- Center Low Distance - the distance between low cog and mean cog divided by the average ratio (to normalize)
- Average Radius - The average distance from the center of gravity of the object and each perimeter pixel
- Circularity - The ratio of a radius determined by the perimeter and the radius determined by the area of the blob.
- Center Offset - The distance in pixels between the gray level center of gravity and the binary (mask) center of gravity.
- Major Minor Axis Ratio - minor axis divided by the major axis as determined by moment analysis
- Perimeter Length - the number of pixels (count) of the perimeter of the blob
- Bounding Box Aspect Ratio - bounding box width divided by height
- Intensity Histogram - distance to trained 16 valued intensity histogram
- Pixel Area / Bounding Box Ratio - pixel area count divided by the size of the bounding box
- Perimeter / Area Ratio - perimeter count divided by pixel area count
- Eccentricity - A measure of circular versus oval shape
- Color Saturation - the maximum color value minus the minimum color value (assumes RGB image)
- Intensity Contrast - the minimum intensity value as compared to the maximum intensity value
- Intensity Variance - difference of pixel intensities around mean intensity
- Min Max Radius Ratio - The ratio of the minimum radius over the maximum as found when traversing the blob's perimeter
- Min Max Radius Angle - The angle between the nearest point and furthest point on the perimeter relative to the blob's center of gravity
- Min Max Radius Area - The ratio between actual area and the area defined between the min and max radius
- Center Mean Ratio - The ratio between the intensity value at the center of gravity relative to the mean intensity value of the blob
- Gradient Angle - Average Surface Gradient of blob (0-90 deg)
- Smoothness - The average difference in intensity within neighboring pixels
- Edge Histogram - distance to trained edge changes (pixel neighbors) in a 16 bucket histogram
- Gradient Histogram - distance to trained surface gradient (angle) in a 16 bucket histogram
The numbers next to each of the features are relevance or the feature's contributing weight. Basically the weight is calculated by determining how well that individual feature separates signal from background (i.e. egg versus garbage). If the signal and background have the same response then the weight is close to zero. If it does a good job then the weight will be near 100%.
2. Threshold - based on the match quality of all selected features the threshold can be used to eliminate those bad matches. This can be done automatically or manually depending on which features are used.
The threshold is for all combined features. It is the minimum weight necessary for a blobs combined feature weight to be classified as an object. The automatic value is determined by running the training set through the current classification weights and determines the best weight were most of the blobs are classified correctly. The manual threshold is just for testing how close object and background are in terms of classification. I.e. you can move the threshold around and see what is close to being object or not.
3. Display - There are various ways to display the match results including showing the actual confidence value of each blob. This can aid in determining the correctness of the match.
4. Train - The train button brings up an interface to select where the raw and mask combinations of training images are located in the filesystem. On specifying that the module will use those images to create a recognition model using all the selected features in order to discern between good and bad detections. The train button brings up the train interface that allows you to specify the folder that contains raw and mask images on which to train.
5. Segmentation - This implies how well the current threshold technique is at segmenting the current image into signal blobs. Any threshold will also cause a lot of noise or garbage blobs to appear. This number reflects how well candidate objects are extracted from the image. After candidates are identified the features are then used to classify and eliminate background blobs.
6. Matching - The final score of how well the blobs are classified as objects or background based on the training set.
Training Sets
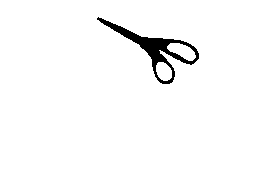
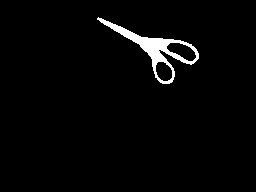
The Blob Recognition module expects two images for a training set. One image is the raw pixel information as you would expect to see directly from a camera or imaging device. The second image should be a binary black and white image that has white pixel that depict where the blob you want to train on is located within the image. For example,
| Source | Mask |
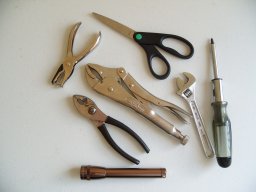 | 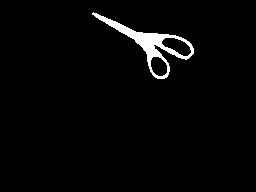 |
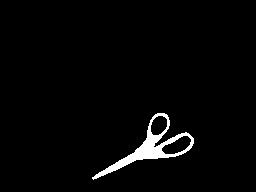
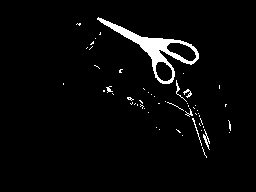
is a good training set. The mask image MUST align perfectly (pixel to pixel) with the original raw image. If this is even off by a couple pixels the training will not return good results. The following are NOT good masks.
| Source | Mask |
 |  |
 |  |
 |  |
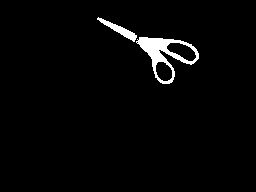 |  |
A couple points about creating a good mask:
- Be sure to align the mask with the original image. Often the easiest way is to paint over the original image (using your favorite paint program) to ensure that the mask will align with the original.
- You can include several of the objects in one image training set, just be sure that they do NOT touch.
- Ensure that the image is binary (black and white) and does not include grayscale pixels. Anything non-black will be treated as white. Grayscale masks are not recommended.
- Use a non-lossy image format such as GIF, PNG, BMP, or TIFF for the mask. This ensures 100% mask accuracy and will not introduce noise into the image due to lossy compression (such as that used in JPG).
- The mask image MUST be exactly the same size as the raw image. Even if the object's size is the same, if the image is 1 pixel larger than the raw image the module will ignore the training set.
You will have to name the raw image and the mask image using the same filename (the extensions can be different though) and ensure that some term is present in each that can be used for identification. For example if your original file is called somethingABCD.jpg you will need to rename it to somethingABCD-raw.jpg for the raw file and create somethingABCD-mask.gif for the mask file. Note that addition of the words "raw" and "mask" into the filename. These terms help the module determine which file is which. These terms are then entered into the training interface (seen when the train button is pressed). It is important that most of the name elements of the filenames are approximately the same in order for the module to match raw and mask files.
See Also
Blob Filter
| New Post |
| Blob_Recognition Related Forum Posts | Last post | Posts | Views |
 Blob Recognition
Hello Steven, great software... I am trying to detect and count coke cans stacked together in images and draw a green border aro... |
10 year | 2 | 3296 |