
Blob Inspection
The Blob Inspection module is meant to be used with verification systems that require comparing new objects with model or template objects. This module allows you to specify a database (collection of image files on the filesystem) of golden or ideal images that are compared in various ways to new blobs. There are several features which can be used that highlight or ignore aspects of the object to allow for some features to be very rigid while others to be more flexible. This is necessary as each object may be allowed variance in one aspect but not another.Similar to the Blob Filter module, this module has various features that it creates given a specified blob (collection of pixels) and the associated raw pixel image (source). By using the binary blob image it collects statistics from the source image and compares these statistics to the model images to determine similarity. If any of the features falls below a specified threshold, that object is considered rejected and does not pass the verification process.
Using multiple features one can create a verification system to ensure that quality is maintained for a certain aspect of a product along an assembly line.
Interface
Instructions
1. Pre-Requisite - Ensure that you have loaded an image (most likely using Load Image) that is black and white with white being the signal/blobs/object that you want to run through the verification process. Typically this means using the Threshold or Auto Threshold, Adaptive Threshold, etc. modules to create a mask image that indicates where the blobs are within the current image that you want to verify. Note, the dimensions of the mask image and the current image MUST be the same as they are simply overlays and need to match. The image entering this module would be the raw colored pixels.
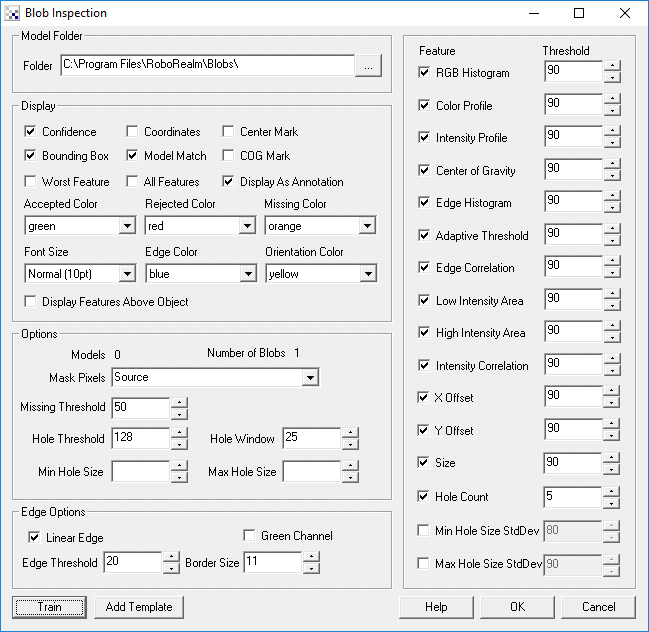
2. Model Folder - Specify where the module has or will store all the model images that are created or will be created. The model folder specifies where this module should find its model database/images that constitute the standard to which all other blobs are compared against. Note, this folder should be writeable by you.
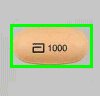
3. Add Blob - Select this button to view the current image and in order to select which blobs/objects are considered ideal or model examples of what you are inspecting. Once selected that blob will change color and after pressing OK will be added to the model database and saved in the Model Folder. Note, images within the model folder are regular images and can be loaded in any image editor. The major difference is that the non-object areas are colored in pure green (0,255,0) which indicates the Mask or non-object areas. Its important to preserve these areas to avoid causing the background of an object to be included in the analysis.
4. Feature - Select which features you want to use for the comparison process. You can enable a particular feature by clicking on the associated checkbox and specifying a threshold value. All objects that fall below this threshold when compared to the images in the model database will be considered rejected.If you are unsure of the value, specify a non-zero value and then see which objects are passed versus failed and their values. By quickly scanning the results you can get a good idea of if a particular feature is useful or not in segmenting the pass versus fail objects.
This can be used to eliminate objects of different color and intensity than the templates.
This can be used to eliminate objects of different color than the templates.
This can be used to eliminate objects of different intensity than the templates.
This can be used to eliminate objects with un-centered labels.
This can be used to eliminate objects where labels/graphics/text is different than the templates.
This can be used to eliminate objects where labels/graphics/text is different than the templates.
This can be used to eliminate objects where labels/graphics/text is different than the templates.
This can be used to eliminate objects where labels/graphics/text is different than the templates.
This can be used to eliminate objects where labels/graphics/text is different than the templates.
This can be used to eliminate objects where objects are overall different than the templates.
This can be used to eliminate objects where labels/graphics/text are centered differently than the templates.
5. Mask Pixels - Specify the Image Marker that contains the mask (black and white) pixels that define where the blobs are located in the image. Both the mask image that indicates a blob/object and the raw pixel values have to be in the same image location as the binary image is used as a mask over the raw pixels. This allows a blob to be specified in many different ways.
6. Missing Threshold - Specify the confidence level below which would indicate the absence of a blob.
7. Min/Max Hole Size - Specify the minimum and maximum hole size that should be considered in the Hole Count and Hole Size StdDev features. Its possible that some blobs may have a single dark pixel (by accident) that can throw off these features. The eliminate this from happening, you can set the Min Hole Size to 1. The same goes for really large holes that should be ignored.
8. Linear Edge - Edge features rely on edge detection. The default method is to highlight stronger edges over weaker ones. Occasionally highlighting edges evenly is preferred. In this case the Linear edge selection should be selected.
9. Edge Threshold - Specify the intensity level below which edges are not considered. This can be useful to eliminate background noise from affecting the feature results.
10. Green Channel - Select if you want to use just the green channel to calculate features as apposed to a combination of the Red/Green/Blue channel.
11. Border Size - Specify how much space away from the border of the blob will the features be calculated. Because blobs can move slightly from one frame to the next, its sometimes desirable to avoid the edges of the blob as they can contain non-standard pixels due to reflections or irregular lighting. Increasing the Border Size would cause the feature calculates to be done more on the inner parts of the blob.
12. Display - Select which options you want for display purposes. This will annotate the current image with the results generated from the comparisons.
13. Rejected/Accepted Color - Indicates which colors to use to display the above information which indicates if an object was accepted or rejected.
14. Display As Annotation - Draw the annotations but only on the second pipeline pass so as not to affect subsequent processing due to the drawn graphics.
Variables
BLOB_INSPECTION_PASS - Number of blobs that passed inspection

BLOB_INSPECTION_FAIL - Number of blobs that failed inspection

BLOB_INSPECTION_COUNT - Total number of blobs inspected

BLOB_INSPECTION_RESULTS - Contains the results of the inspection module. This is
an integer array of values in blocks of 12 per result. The individual elements are

Offset  Contents
0       Pass/Fail - Blob is accepted or not. 1: pass, 0: fail
1       Confidence - Confidence of blob associated to model (0 to 100)
2       Worst Feature - The feature that generated the lowest confidence value.
          1 - RGB Threshold
          2 - Color Profile
          3 - Intensity Profile
          4 - Center Of Gravity
          5 - Edge Histogram
          6 - Adaptive Threshold
          7 - Edge Correlation
          8 - Low Area
          9 - High Area
          10 - Intensity Correlation
          11 - X Offset
          12 - Y offset
3       Worst Model - The Index of the model that created the worst comparison
4       Start X bounding box coordinate
5       Start Y bounding box coordinate
6       End X bounding box coordinate
7       End Y bounding box coordinate
8       X center of gravity
9       Y center of gravity
10      X blob center
11      Y blob center

For example, to count all failed objects the VBScript code would be

blobs = GetArrayVariable("BLOB_INSPECTION_RESULTS")
for i = 0 to ubound(blobs)-1 step 12
  if blobs(i) <> 1 then
    count = count + 1
  end if
next

SetVariable "total_failed", count
Variable Commands
BLOB_INSPECTION_DELETE_ALL - Causes the module to remove all images and its cache roborealm.inspect file from the model folder.
BLOB_INSPECTION_ADD - Causes the module to add a new model to its model database based on the coordinate
variables below. Note, this is as if a user clicked on a blob within the "Add Blob" button.
BLOB_INSPECTION_ADD_X - The X coordinate of the blob to add.
BLOB_INSPECTION_ADD_Y - The Y coordinate of the blob to add.
BLOB_INSPECTION_TRAIN - Triggers a retraining of the image database. (In case the model folder changed externally to RoboRealm).
See Also
Blob Filter
Blob Recognition
Blob Size
Shape Match
| New Post |
| Blob_Inspection Related Forum Posts | Last post | Posts | Views |
|
blob sum pixel values
is there any variables that report the sum of all pixel values inside a blob? does it report every blob in the blob array? ... |
9 year | 2 | 2970 |
 Blob_Inspection Module RoboRealm
Hello, For my project, I am trying to figure use parking spaces as my blobs to inspect on whether parking spaces a... |
10 year | 4 | 3897 |
 labels
Dear Steve, I upgraded RoboRealm and must develop a vision system for the label control. I need you to do me an example with the... |
10 year | 2 | 3356 |
|
Label
Dear Steve, I upgraded RoboRealm robot and must develop a vision system for the label control. I need you ... |
10 year | 0 | 2531 |
|
xy table
Hi Everyone- Well, I'm brand new to the forum, so please bear with me......What I'm trying to do is this: I am in manufacturing,... |
10 year | 5 | 5041 |