
USB Missile Launcher
The following tutorial illustrates how a to translate values from your PC Joystick to control a USB Missile Launcher and fire at objects that you see from its point of view.If you are impatient you can skip to the last page of this tutorial and watch the videos!
The USB Missile Launcher used in this tutorial is sold by Dream Cheeky and is available from serveral retailers like Geeks.com for around $30.00. We used an inexpensive WebCam that you can get for around $15.00 for the targeting video view. Held together by elastic bands (yes, very sophisticated construction here!) the system comes together for under $50.00 with about 5 minutes of construction time ... and hours of fun!
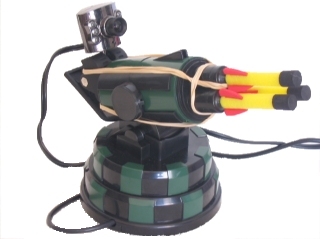
The goal of this project was to use a PC based joystick to control the Launcher whilst looking at the video camera stream on the PC. This platform would allow for distance based firing without needing to be within the vicinity of the Launcher.
In order to connect the software pieces together we used three RoboRealm modules.
- Joystick - provides access to the joystick values
- VBScript - used to scale the joystick values to Launcher control values
- DC_Missile - provides the interface to the Dream Cheeky USB Missile Launcher
Joystick Mapping
Below we see the RoboRealm Joystick mapping interface with the appropriate values mapped to RoboRealm variables. The interface shows all the elements that can be mapped into RoboRealm but we are only interested in left, right, up, down and fire. If you move your Joystick around and press the fire and other buttons you should see the appropriate values and indicators change in the interface. Note that we are using a Logitech Joystick for this project.
As you can see from the image we have assigned the joystick X coordinates to a variable called "joy_x", Y to "joy_y" and the fire button to the variable "fire".
The X values of the joystick vary from -1000 to 1000 with -1000 being extreme left and 1000 being extreme right. Likewise with the Y coordinate but for up and down. The "fire" button will be a 0 (false) unless it is pressed in which case it becomes a 1 (true). The issue now is how to map those values into values that the USB Missile Launcher understands.
The Launcher has uses the following command values that are sent over USB to the device.
0 = stop
1 = up
2 = down
4 = left
8 = right
16 = fire
These are bit values meaning that if you want to move up and to the left you would send a 5 to the Launcher.
Below is the module interface for the Launcher. Note the one variable field that we can use to tell the Launcher module which variable will contain the value to send to the Launcher. For now we don't have such a variable since we have to create one using the values from the joystick. Note that you can immediately use the manual buttons to send commands to the Launcher to test that everything is connected and has power.

To provide this mapping of joystick domain to the launcher domain we use a bit of VBScript ...
VBScript Program
The VBScript module is used to run a small conversion program that creates a single variable from the values received from the PC Joystick. The following is the top part of the VBScript module interface showing part of the code within a text box (you can alternatively use the filename to specify a file on your filesystem).
The VBScript program is as follows
move=0
' if the joystick is to the right assign bit 2
if GetVariable("joy_x") < -200 then
move = 4
' otherwise if it is to the left assign bit 3
elseif GetVariable("joy_x") > 200 then
move = 8
end if
' now add in the y coordinate by ORing the
' value with the appropriate bits
if GetVariable("joy_y") > 200 then
move = move OR 1
elseif GetVariable("joy_y") < -200 then
move = move OR 2
end if
' and finally add in the fire button
' if it is pressed
if GetVariable("fire") then
move = move OR 16
end if
' the results are in the single
' variable move. Assign that
' back into RoboRealm so we
' can use it in other modules
SetVariable "move", move
We finally go back to our DC_Missile module and assign the variable to "move" since that is the variable we created in the VBScript program that contains the correct bits that the Launcher understands.
The RoboRealm program pipeline finally looks like
Given all these parts lets see what it looks like in action ...
Vision Based USB Missile Launcher
 (3.5 MB) Video of the USB Missile launcher with attached camera being controller by a joystick.
The components of this tutorial were purposely kept cheap which translates into very noisy equipment and imprecise movements and firing ... but the system is nevertheless capable of performing the desired task.
Your turn ...
From this tutorial you should be able to create an automated Sentry gun that instead detects visual based objects and targets those objects instead of using manual control.
Want to try this yourself?
![]() Download the USB Missile Launcher .robo file to run an example yourself.
Download the USB Missile Launcher .robo file to run an example yourself.
If you don't have a Joystick ![]() try this one which is configured to use your keyboard cursor keys
to move the launcher. Press space for fire! Note that you need RoboRealm installed to run this file.
Clicking on any of the modules within the RoboRealm pipeline will bring up that interface and
allow you to customize it for yourself.
try this one which is configured to use your keyboard cursor keys
to move the launcher. Press space for fire! Note that you need RoboRealm installed to run this file.
Clicking on any of the modules within the RoboRealm pipeline will bring up that interface and
allow you to customize it for yourself.
The End
That's all folks. We hope you've enjoyed this little adventure into an application of machine vision processing. If you have any questions or comments about this tutorial please feel free to contact us.
Have a nice day!
| New Post |
| USB Missile Launcher Related Forum Posts | Last post | Posts | Views |
| None |