
Chasing Movement
![]() Download the Chase Movement robofile.
Download the Chase Movement robofile.
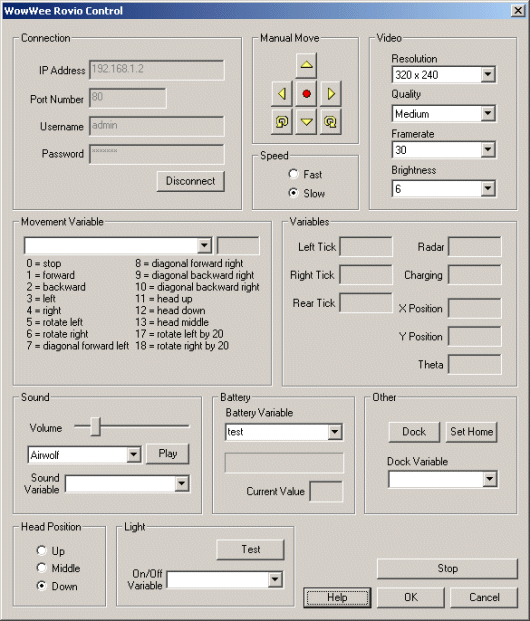 First double click on the WowWee module in the processing pipeline. It may take a while to appear since it
will immediately try to connect to the default Rovio setting at 192.168.1.10. When it does appear change the IP address
to the one you are using. If you do not know the IP address of the robot you will have to check your router information.
First double click on the WowWee module in the processing pipeline. It may take a while to appear since it
will immediately try to connect to the default Rovio setting at 192.168.1.10. When it does appear change the IP address
to the one you are using. If you do not know the IP address of the robot you will have to check your router information.
If you have already configured the Rovio in a previous robofile then the IP address should already be configured for your robot assuming the "Remember as default" in the Rovio GUI interface is set.
- Once the Rovio is connected you should see the Rovio camera image in the main RoboRealm interface. Try placing the
robot down on the floor away from any movement. It should remain still. Then try to move something in the right
or left view of the Rovio and see if it moves towards that movement.
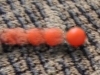
 To detect movement we need two images; the current image and a previous image.
Seen here are the two images merged together to give you an idea of what the actual object movement is between the
two sample images.
To detect movement we need two images; the current image and a previous image.
Seen here are the two images merged together to give you an idea of what the actual object movement is between the
two sample images.
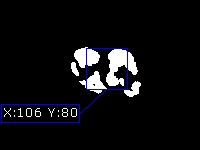
 We can refer to those two images using the Movement module which will determine the
difference between the current image and the previous image in order to determine those pixels that
have changed. For example, given two images the movement detected appears as white blobs.
We can refer to those two images using the Movement module which will determine the
difference between the current image and the previous image in order to determine those pixels that
have changed. For example, given two images the movement detected appears as white blobs.
This works well, however, an issue happens when the robot is also moving as the entire scene will change from one image to another. This will incorrectly indicate that the entire image has moved instead of just identifying the independent movement within the image. To compensate for this issue we ensure that the "Reduce global movement" checkbox in the Movement module is selected. When selected this will attempt to globally align the current image with the past image such that the overall image movement is eliminated or reduced while the independent movement remains pronounced. Note that some texture in the image needs to be visible in order for this alignment process to work.
 Once the pixels that have changed between the
current image and a previous one have been detected we need to chose a point to target for the robot. An easy point is to
choose is the Center of Gravity or middle point of the blob. We
do this using the Center of Gravity module.
Once the pixels that have changed between the
current image and a previous one have been detected we need to chose a point to target for the robot. An easy point is to
choose is the Center of Gravity or middle point of the blob. We
do this using the Center of Gravity module.
-
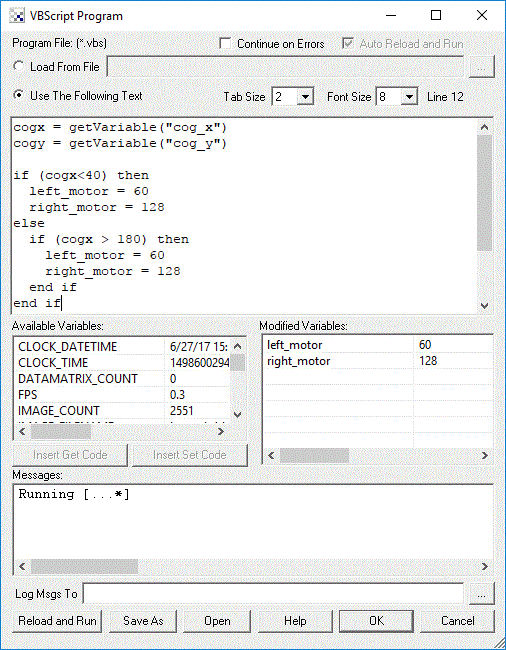 Finally we now need to tell the Rovio how to move in order to get to the identified light. We do this by
understanding on what side of the image the identified target is. In our case it is on the right side.
If the desired target point is right of the center of the
image we need to move the robot right, whilst if it is on the left we need to move left. If we create this
behavior the robot will move in the direction of the light. The VBscript
module allows us to write some VBScript to set the motor values of the Rovio based on the X coordinate of the target
point. The more the X location is to the right the harder we should turn LEFT and vice versa for the other side. The VBScript module produces
a 'move' variable that contains the suggested direction that the Rovio should perform. The Rovio module then grabs this value
and passes it to the Rovio robot to complete the cycle.
Finally we now need to tell the Rovio how to move in order to get to the identified light. We do this by
understanding on what side of the image the identified target is. In our case it is on the right side.
If the desired target point is right of the center of the
image we need to move the robot right, whilst if it is on the left we need to move left. If we create this
behavior the robot will move in the direction of the light. The VBscript
module allows us to write some VBScript to set the motor values of the Rovio based on the X coordinate of the target
point. The more the X location is to the right the harder we should turn LEFT and vice versa for the other side. The VBScript module produces
a 'move' variable that contains the suggested direction that the Rovio should perform. The Rovio module then grabs this value
and passes it to the Rovio robot to complete the cycle.