
Chasing Light
![]() Download the Chase Light robofile.
Download the Chase Light robofile.
- This is an autonomous demo that will steer the Roomba towards a light source. This works best with a completely
mobile system with the Netbook, Camera, and base all attached ontop of the Roomba as it requires free movement.
This works best in the evening or at night when you can isolate a single light source towards the robot. Something
akin to a flashlight works well but if used in daylight the flashlight will rarely be the brightest source of light.
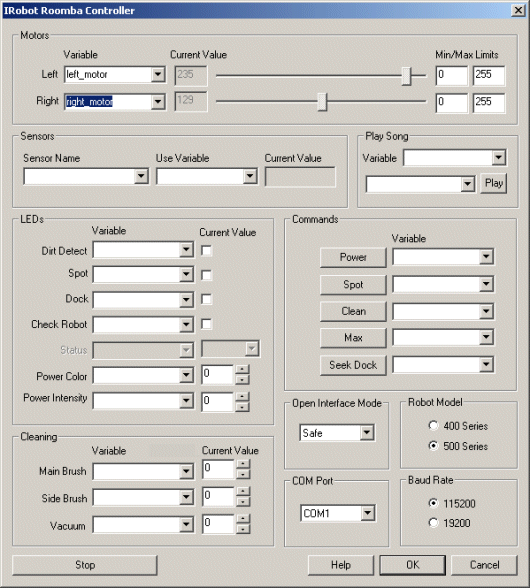 First double click on the
Roomba module in the processing pipeline and change the serial COM port
to the one you are using. Note that if you happen to have a serial port on your Netbook then the COM port will most likely be from COM1 to COM4. If you are using
a USB to serial converter then it can be a much higher number. RoboRealm will only display those COM ports that are active within the system
so the COM port selection should be limited to only a few selections. If you are not sure on which COM port is being used start with the highest one and
test while moving to lower ones.
First double click on the
Roomba module in the processing pipeline and change the serial COM port
to the one you are using. Note that if you happen to have a serial port on your Netbook then the COM port will most likely be from COM1 to COM4. If you are using
a USB to serial converter then it can be a much higher number. RoboRealm will only display those COM ports that are active within the system
so the COM port selection should be limited to only a few selections. If you are not sure on which COM port is being used start with the highest one and
test while moving to lower ones.
If you have already configured the Roomba in a previous robofile then the COM port should already be configured for your robot assuming the "Remember as default" checkbox in the Roomba GUI interface is set.
- If the camera view is not already present press the Camera button in the main RoboRealm interface to show you the USB webcam image.
If you have multiple cameras installed or other imaging devices you may need to press the Options button->Video Tab and select the
camera from the dropdown list that shows all the imaging devices installed in the system.
- Once you get the COM port and camera set you should see the image from the Roomba in the main RoboRealm GUI and the
robot starting to react to light and dark areas. Try using just a single flashlight in your room to see
if the Roomba heads towards that light.
-
 We perform this behaviour by first cropping the image to ignore lights on the ceiling
using the Crop module.
We perform this behaviour by first cropping the image to ignore lights on the ceiling
using the Crop module.
-
 Then we remove pixels that are not very bright
using the RGB_Filter module.
Then we remove pixels that are not very bright
using the RGB_Filter module.
-
 Since small blobs are not very good indicators of where light
is we remove them from the image using the Blob Size module.
Since small blobs are not very good indicators of where light
is we remove them from the image using the Blob Size module.
-
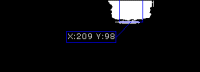 Now we want to know the center of gravity of the remaining light
blobs which is a good indication of where we should move the robot in order to follow the light. We
do this using the Center of Gravity module.
Now we want to know the center of gravity of the remaining light
blobs which is a good indication of where we should move the robot in order to follow the light. We
do this using the Center of Gravity module.
-
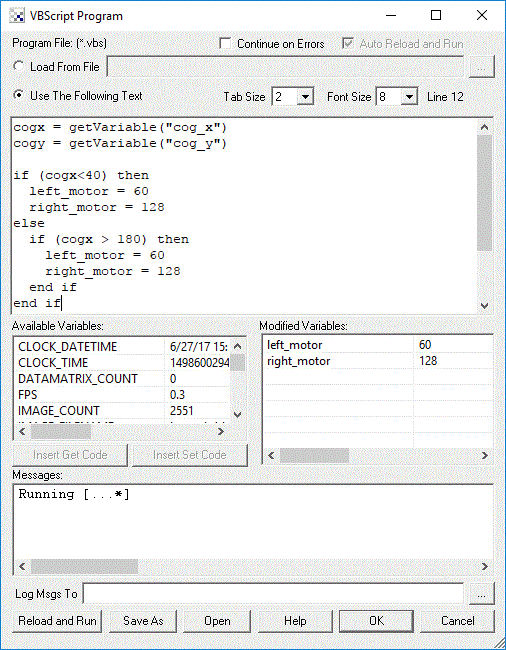 Finally we now need to tell the Roomba how to move in order to get to the identified light. We do this by
understanding on what side of the image the identified target is. In our case it is on the right side.
If the desired target point is right of the center of the
image we need to move the robot right, whilst if it is on the left we need to move left. If we create this
behavior the robot will move in the direction of the light. The VBscript
module allows us to write some VBScript to set the motor values of the Roomba based on the X coordinate of the target
point. The more the X location is to the right the harder we should turn LEFT and vice versa for the other side. The VBScript module produces
the left and right motor variables that contains the suggested direction that the Roomba should move. The Roomba module then grabs this value
and passes it to the Roomba robot to complete the cycle.
Finally we now need to tell the Roomba how to move in order to get to the identified light. We do this by
understanding on what side of the image the identified target is. In our case it is on the right side.
If the desired target point is right of the center of the
image we need to move the robot right, whilst if it is on the left we need to move left. If we create this
behavior the robot will move in the direction of the light. The VBscript
module allows us to write some VBScript to set the motor values of the Roomba based on the X coordinate of the target
point. The more the X location is to the right the harder we should turn LEFT and vice versa for the other side. The VBScript module produces
the left and right motor variables that contains the suggested direction that the Roomba should move. The Roomba module then grabs this value
and passes it to the Roomba robot to complete the cycle.