
Yost Engineering ServoCenter™ 3.0
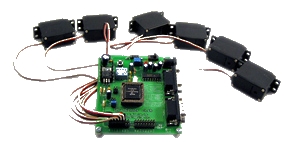 The ServoCenter™ board (no longer available!) provides for the control of up to 16 servos per board. Each board can be separately identified and
serially chained to
control up to a total of 256 servos. The ServoCenter offers seek speed and scaled resolution for each individual servo. This
allows you to move one servo to a position slowly, while another is moving to a different position at a faster speed.
The ServoCenter™ board (no longer available!) provides for the control of up to 16 servos per board. Each board can be separately identified and
serially chained to
control up to a total of 256 servos. The ServoCenter offers seek speed and scaled resolution for each individual servo. This
allows you to move one servo to a position slowly, while another is moving to a different position at a faster speed.
Interface
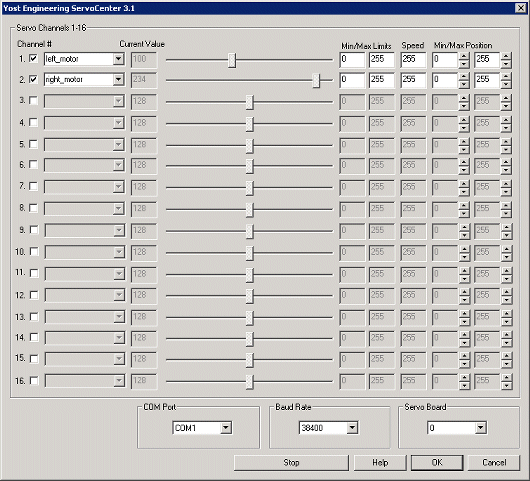
Instructions
1. COM Port - Select the appropriate COM Port that the ServoCenter is connected to. You will only see COM ports that are recognized by your computer.
2. Baud Rate - Select the appropriate baud rate. 9600 is the default speed used to provide fastest response. Select a higher baud rate if you want to increase the communications speed. Be aware of the Jumper settings for JP2 as they specify the baud rate. Be sure to select a buad rate in the interface that corresponds with the jumper settings. Note that the board comes default to 9600 with no jumpers on.
3. Servo Board - Select the id of the ServoCenter board that you want to communicate to. Note that the board comes default with id 0.
4. Sliders - After specifying the COM Port you should be able to move your servos by dragging the sliders to the right or left or by specifying a number within the current value text box in the Servo Channels area. If the servos do not move check your COM Port setting and/or board connections.
5. Variables - Select the appropriate variables that contain or will contain the position value that will be sent to the servo board. This is used to automatically change the servo values based on your VBScript (using the SetVariable function) or Extension based program.
6. Current Value - To manually set the servo position type in the appropriate number (0-255, 128 is the default neutral) into the text area or use the slider to adjust the value. The servo position will be updated as appropriate. Be sure to select the correct COM port that you are using to control the ServoCenter.
7. Min/Max Limits - You can also use the min/max limits to ensure that even if the variables specify large or low values (due to programming errors) that the board does not actually attempt to move the servos above or below the specified limits. This can be used as an additional precaution in case your servos cannot physically move beyond certain limits.
8. Speed - You can also set the servo speed using the next text box. Using 255 will move the servo as quickly as possible. Setting it to 1 will move the servo very slowly to the destination position. Using 127 will move it quite quickly to the appropriate position.
9. Min/Max Position - If you need finer control over a smaller turning range of the servo increase the minimum position or decrease the maximum position to confine the range in which the servo will move. At 0 and 255 you will have about 180 degree control. If you use 0 and 128 or 128 and 255 you will reduce the range to 90 degrees but with twice the resolution. Note that using 0 and 128 will restrict the movement in the first half of the total range whilst using 128 and 255 will restrict it to the second half of the total range. In this way you use the min/max positioning to reduce the range of the servo AND also specify the range position.
10. STOP - Press STOP if you need to quickly disable all the servos and return them to the middle or neutral (128) position.
11. Enable - To enable/disable using a particular servo you can click on the checkbox next to each channel. A disabled servo will not be sent any signals and will be turned off. This allows you to manually move the servo as needed. Once you enable it again the servo will return to its last position before being disabled.
| New Post |
| YEI_ServoCenter_3 Related Forum Posts | Last post | Posts | Views |
| None |