|
sub-pixel alignment in 'noisy' lighting
keith from United States [12 posts] |
11 year
|
This software is fantastic!
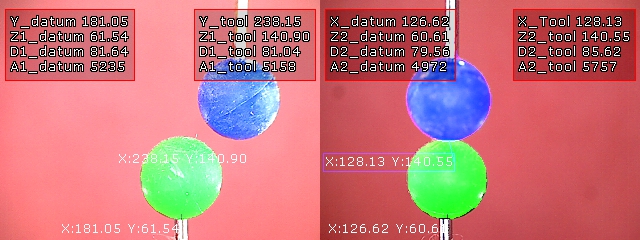
Attached are two images. One is the raw front image, and the other is the processed-image mosaic. Also attached is the script I am using.
I am using roborealm to calculate the X,Y,Z distances between two balls. My approach up till now has been to capture blobs centroids. This works well 0.05 pixel stability when I am doing the measurements at night, but not in the daylight hours where I cannot fully control some of the glare through workshop windows. The steel shafts which support the balls begin reflecting colors so that my blobs start bleeding up the shafts.
Since the balls are circular, I thought I could use the 'circles' or 'blob replace' functions to filter out some of the noise. But I cannot find a way to access the coordinates of these functions with subpixel resolution. How can I make this happen, or is there a better way to filter out non-circular image noise?
Thank you so much for supporting your product in this way.
 
 program.robo program.robo
|
|
|
|
Carl from Your Country [1447 posts] |
11 year
|
Keith,
It may be possible to use a circular shape to help with that .. but I'd like to try something else quickly before we get into that process.
Can you decrease the exposure or increase the shutter speed on the camera to make the image a lot dimmer? The problem you are running into is that too much light is causing the color to saturate out of the pixel. This is a common issue when using cameras with lasers ... the sunlight is light a really big laser!
You will find that the techniques will work just as well with much darker images ... ones that we think are not appropriate. As long as the pixel intensity is below the CCD threshold it will preserve the color a lot better, be detected easier and be less likely to cause issues when more light is added.
Secondly, one practice that many do is to place a polarizing filter in front of the camera lens. Sunlight is very polarized once it gets to earth and can be eliminated (sometimes) even with simple filters like the ones you use in 3D movies. If you happen to have some of those lying around that might be worth a quick test.
If both of those fail, we can then research a better shape matching technique. If you can then include another of the front images where the COG is found to be different that will help with the analysis.
Cheers,
STeven.
|
|
|
|
keith from United States [12 posts] |
11 year
|
Great! These are some really helpful suggestions.
I have not done anything with the camera setup, other than clicking the ‘auto’ button under the ‘color’ tab.
What should I do on the ‘Exposure’ tab to dial it down (understanding that the background sunlight conditions changed drastically over the course of the day).
I don’t have any filters at the moment, but can easily purchase some. Installation will be a little bit tricky as I am using macroscopes which were never intended to have a filter mounted, but hey – that’s what tape and hot melt glue is for, right? I am purchasing left-handed circular polarizing film, 42% transmission (Edmund Stock No. #88-084). Is that a good first choice, or do you recommend something else?
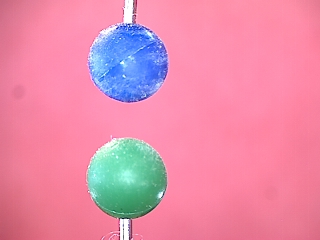
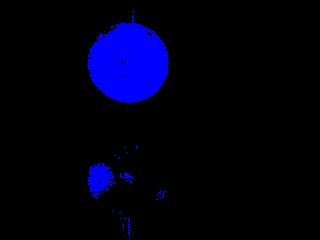
Here is the best I could do at recreating the problem this morning (raw and processed snapshots are also attached as files). It is MUCH worse in late afternoon:
At the top the metal shaft is reflecting enough blue to cause the blob to have a point going upward along the shaft, while at the same time one of the shoulders of the ball has gone partially dark. My thought was that if I could somehow inform the software filter that I was only interested in a circular shape, then the results would be superior as it would be biased toward ignoring the spike and filling in the dark patch. The ‘detect_circles function looked perfect, but it only returns an integer value for COG pixel coordinates. If you could add a ‘calculate sub-pixel COG’ to the ‘detect circles’ function (same as already on the ‘COG function’ now) that would be terrific.
In writing this I have had a ‘Duh’ moment. There is no reason that I can’t sheath the steel shafts in some sort of matte coating. That would help considerably.
Again, thanks for all your help.
 
|
|
|
|
Carl from Your Country [1447 posts] |
11 year
|
Keith,
Assuming your camera supports it you should be able to move the Exposure slider to the left or right which will cause the image to get darker. (Switch off the Auto checkbox if it is selected) Sometimes cameras do not expose this setting such that this module can access it. If that's the case, then go to Options Button->Video Tab->Format or Source or Display button and look in those interfaces. The interfaces that those buttons create come directly from the camera and are not from RR so they will be different for each camera. See if you can find something in those interfaces that reduce the exposure time or increase the shutter speed. It is still possible that there will be nothing there since not all cameras support this.
You can also try putting a dimming filter in front of the camera lens (like the polarizing filter) i.e. just grab a pair of sunglasses and try that out. All you need to do is to reduce the amount of light getting to the camera.
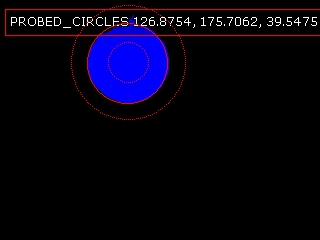
The circles module will not give you the accuracy that you are looking for just because of the way it is implemented (more for speed than accuracy). What you can do instead (and this should work right now) is to use the Circle Probe module to get a very accurate position information. This module will assume a more defined location but you can use the initial blob results to localize the probe better. I'd still try the other techniques before this one ... but included is a robofile that will use that module to provide the circle center for you to try.
The other advantage with the circle probe is that the metal shaft can be ignored when calculating the circle.
STeven.

program.robo
|
|
|
|
keith from United States [12 posts] |
11 year
|
Steven,
I wanted to let you know that the improvements were incredible when I dialed back the exposure. I am now routinely getting better than 1 micron repeatability in 3-dimensional non-contact measurement. Thanks!
|
|
|
|
Carl from Your Country [1447 posts] |
11 year
|
Keith,
Excellent! Glad that did the trick. It seems a bit counter intuitive but it does make a big difference in machine vision processing. I'll surely keep this post handy to convince other folks of checking exposure levels!
Cheers,
STeven.
|
|