
Lego Mindstorms Orientation
The Lego Mindstorms RCX is a great platform for experimenting in machine vision. While the IR tower used to connect to ver. 2.0 and below is somewhat limiting in distance it is strong enough to provide an interesting platform for experimentation.
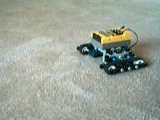
In any mobile robot project the orientation of the robot is important to know as motor commands need to be based on the current robot configuration. As an example of what is possible we set out to create a technique that will determine when the Lego Mindstorm is pointing directly toward the camera. The setup requires an external USB camera that is statically mounted in view of the Lego Mindstorm's RCX brick. We chose the tracked Roverbot as a simple example.
First we need to detect the Lego Roverbot...
Detecting the Lego Roverbot
The yellow RCX brick of the Lego Roverbot is a nice property to it that makes it quite easy to detect. We can use the yellow RGBFilter to filter out all other colors but the brick color.
If we move the Roverbot around in terms of its orientation we notice that the yellow area widens and then narrows depending on what side of the RoverBot is visible to the camera. We are assuming the static camera viewing the Roverbot is tilted towards the ground at an angle where the sides of the Roverbot are the predominant yellow areas.
Seen below are a few more images from the Roverbot at different orientations.
Next we need to detect the size of the yellow area.
Sizing the Lego Roverbot
As we have noticed the yellow area is largest when the Roverbot's sides are visible by the camera and smallest when viewed from the front or back. We can use the COG module to tell us more about the size of this yellow area. By selecting a bounding box that covers 90% of the detected yellow are we can be sure that we have a good relative approximation of the RCX brick. The COG_AREA will be smaller than when the RCX brick is pointed directly away or towards the camera and larger when the left or right sides are showing.
The following images show the bounding box overlaid on the detected yellow Roverbot.
But how do we know how small the COG_AREA should be when the Roverbot is orientated towards the camera?
Scanning with the Lego Roverbot
Given that the Roverbots position within the camera's field of view is unknown we cannot use absolute pixel size to determine which orientation the Roverbot is relative to the camera. We can only determine the smallest yellow blob size by scanning all sizes of the Roverbot. This scanning technique involves using a VBScript to spin the Roverbot for at least one revolution by setting the left motor to an opposite value to the right motor. While spinning the camera continues to detect the blob size and records the minimum pixels of that blob size. The minimum area will be the side that is facing us as the Roverbot front is where the IR receiver on the Roverbot is located. Since the back of the Roverbot is all yellow the front will contain fewer yellow pixels than the back.
Once the smallest yellow blob is detected we can continue spinning the Roverbot until we once again see this smallest yellow area (within a specified error margin). Once this is detected we can stop the spinning and the Roverbot will be oriented straight towards the camera.
The following VBScript program performs this scan.
select case GetVariable("state")
case "0"
' if we are still sampling then get
' the sample count
sample = GetVariable("sample")
' set the motors to rotate
SetVariable "LEFT_MOTOR", 3
SetVariable "RIGHT_MOTOR", -3
' get how many pixels exist in the
' current bounding box
size = GetVariable("COG_AREA")
min_size = GetVariable("min_size")
if min_size = 0 then
SetVariable "min_size", size
else
' if it is the smallest we've seen
' then remember that
if size<min_size then
SetVariable "min_size", size
end if
end if
sample = sample + 1
' if we're done sampling
' change the state to the next
' step
if sample>80 then
SetVariable "state", "2"
SetVariable "sample", 0
else
SetVariable "sample", sample
end if
case "2"
' we're done sampling, now we
' need to keep rotating until
' we see the smallest side
' again
SetVariable "LEFT_MOTOR", 3
SetVariable "RIGHT_MOTOR", -3
size = GetVariable("COG_AREA")
min_size = GetVariable("min_size")
' if the current pixels within the
' bounding box is with 80% of the
' smallest recorded amount then
' assume that we have a match
if (min_size / size) > .8 then
' we have a match so stop
' the motors and jump to the
' next state
SetVariable "LEFT_MOTOR", 0
SetVariable "RIGHT_MOTOR", 0
SetVariable "state", "3"
end if
case "3"
' we're done ... reset the min_size
' in case we run this again.
SetVariable "min_size", 10000
end select
Now that we have the script we need to map the left_motor and right_motor values to the Lego Mindstorm's RCX brick through the IR tower.
Lego Roverbot Motor Control
Mapping the RoboRealm variables created by the orientation.vbs script is done by using the Lego Control module. Specifically we are interested in mapping the two variables to the motor values of the Lego RCX system.
That should do it! Now lets see it in action ...
Lego Roverbot Orientation
 (2.6 MB) Video of the Roverbot from our perspective as it spins and stops pointing towards the camera.
The camera and IR tower are positioned on the right of the image facing towards the Roverbot. Notice
as the RCX starts to move the two flashes in the front of the yellow brick. That is the
IR transmission being picked up by the overhead camera. Many cameras can see IR light that is not
visible to the naked eye.
(2.6 MB) Video of the Roverbot from our perspective as it spins and stops pointing towards the camera.
The camera and IR tower are positioned on the right of the image facing towards the Roverbot. Notice
as the RCX starts to move the two flashes in the front of the yellow brick. That is the
IR transmission being picked up by the overhead camera. Many cameras can see IR light that is not
visible to the naked eye.
 (3.2 MB) Video of the Roverbot as seen from the tracking camera. This is the original
unprocessed video.
(3.2 MB) Video of the Roverbot as seen from the tracking camera. This is the original
unprocessed video.
 (389 KB)
The processed video as seen by the static tracking camera (i.e. processed version of video above). The
yellow blob is the Roverbot. Notice how the green bounding box changes in size as
the Roverbot spins.
(389 KB)
The processed video as seen by the static tracking camera (i.e. processed version of video above). The
yellow blob is the Roverbot. Notice how the green bounding box changes in size as
the Roverbot spins.
Your turn ...
Want to try this yourself?
![]() Download the Lego Orientation .robo file that you can download and run yourself.
Note that you need RoboRealm installed to run this file. You will also need the Phantom DLL (no longer available!) installed to
communicate with the Lego RCX using the USB or Serial communication. Clicking on any of the modules will bring up that interface and allow you to customize it for yourself.
Download the Lego Orientation .robo file that you can download and run yourself.
Note that you need RoboRealm installed to run this file. You will also need the Phantom DLL (no longer available!) installed to
communicate with the Lego RCX using the USB or Serial communication. Clicking on any of the modules will bring up that interface and allow you to customize it for yourself.
The End
That's all folks. We hope you've enjoyed this little adventure into an application of machine vision processing. If you have any questions or comments about this tutorial please feel free to contact us.
Have a nice day!
| New Post |
| Lego Orientation Related Forum Posts | Last post | Posts | Views |
| None |