
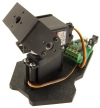
Trossen Robot Turret
The Trossen Robot Turret module provides an interface to the Trossen Robot Turret Pan/Tilt systems created and sold by Trossen Robotics. The pan/tilt platform provides a very complete and easy way to integrate pan and tilt functionality into your robotics project. The starter Desktop version is an Arduino based Robot Turret board providing 2 servo PWM signals for the pan/tilt system and also has 2 motor controller ports, 3 analog in pins and 5 digital input/output pins. This provides enough control capability for whatever you happen to chose to attach to the top of the pan/tilt system.The higher end versions starting with the PhantomX version offers more servo strength (can support more weight on the end of the arm). more digital IO, more analog IO and is based on the RobotiX line of controllers.
This module provides an interface to these platforms and provides you the ability to control or read in all inputs from the boards using RoboRealm variables. While it's a lot of fun to use the manual controls to move the system around the variables associated with each control is what provides the automation capabilities for the system.
Interface
Instructions
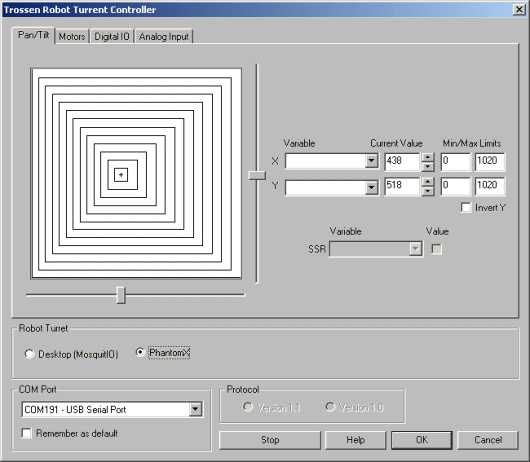
1. Com Port - Specify the COM port that your turret is connected to. Note that the turret comes with a USB cable that simulates a serial port on your PC. The port number for these kinds of virtual ports are normally above the standard 1-4 physical ports.
2. Remember As Default - Select the "Remember as Default" checkbox if you would like the current COM setting to be remembered by RoboRealm such that whenever the Robot_Turret module is loaded the COM port will be auto-populated to the current setting. This ability allows you to not have to constantly change the COM port setting when loading in successive RoboRealm robofile configurations.
3. Turret Type - Select which Robot Turret you wish to control. Note that there are some differences between the turrets besides servo power. Some have more/less digital and analog IO.
4. Protocol - The Desktop Robot Turret board is currently in version 1.1. If you have an order board you can try selecting the version 1.0 protocol which handles the Digital IO differently than version 1.0. Despite which version you may have the Pan/Tilt/M3 will work regardless as the protocol change does not affect these areas.
5. Pan/Tilt - Once you have selected the appropriate COM port, click and drag anywhere in the white area to move the pan/tilt system to those coordinates. You can also drag the sliders on the side to move each axis separately.
6. Variables - Select the appropriate variables that contain or will contain the position value that will be sent to the board. This is used to automatically change the servo values based on your VBScript/Python/etc. (using the SetVariable function) or Plugin based program. Note that once selected the manual controls are disabled to avoid interference.
7. Current Value - To manually set the servo position type in the appropriate number (0-255, 128 is the default neutral) into the text area or use the slider to adjust the value. The servo position will be updated as appropriate. Note that the current limits of 0 and 255 will most likely be beyond the capabilities of your pan/tilt system so you may want to tighten the range.
8. Min/Max Limits - You can also use the min/max limits to ensure that even if the variables specify large or low values (due to programming errors) that the board does not actually attempt to move the servos above or below the specified limits. This can be used as an additional precaution in case your servos cannot physically move beyond certain limits.
9. SSR - Select a variable that will contain a non-zero value that will turn on the SSR led on the Robot_Turret board. To see where this LED is select the SSR checkbox which will cause the LED to turn on and off. This can be useful if you want to indicate some condition on the board without having a monitor nearby.
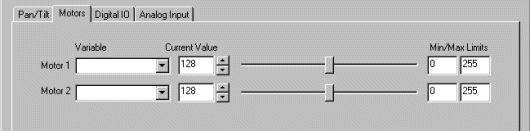
10. Motors - Similar to the servo interface the motor interface provides the same controls that can be used to manually move the motors by changing the current value by typing in the number, using the up/down scroll arrows or by using the sliders. The Min and Max settings are also provided to limit the range of possible values that will be fed to the motors. Finally, the variable selection can be used to select a variable that will have the appropriate motor values to send to the motors automatically. Note selecting a variable will disable all the manual controls.
See Variable Control for more information on how to programatically move the robot.
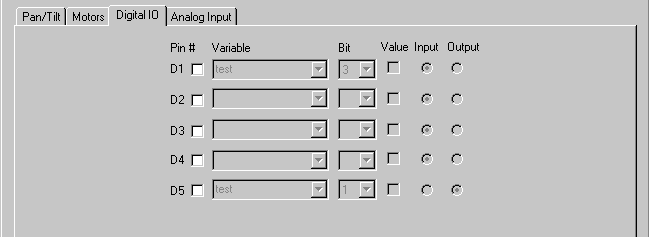
11. Digital Pins - The Robot_Turret comes with 5 digital IO pins that can be configured as an input or an output. Unlike the Analog pins, Digital pins can only receive a 1 or 0 (on or off) as apposed to a full numeric value. Likewise, a digital pin set to an output can only send an on or off to the pin similar to a switch.
Each pin can either be set as an input or output. Do this by selecting the "input" or "output" radio button next to each pin. If you are specifying a pin as an output selecting the checkbox will then turn that pin high or low. Be sure the enable the pin (first checkbox) to enable the controls for that pin.
When specified as an input the pin's value checkbox will then reflect the read high or low state of the pin but will remain disabled.
To automatically send or receive a bit select or type in a variable that will be set if the pin is configured as an input or read into if the pin is configured as an input. Note that you can tell RoboRealm which bit of the variable you want to set/get by using the provided bit dropdown.
As an experiment, you can connect an LED to pin 1 and then select the pin as an "out", By checking and un-checking the checkbox you can make the LED blink.
If you then select the IMAGE_COUNT variable (which holds the current image counter) as the variable and select Bit 0 the LED will blink for every two times the processing pipeline is run. Selecting successively higher bits will slow the blinking by a factor of 2 for every bit.
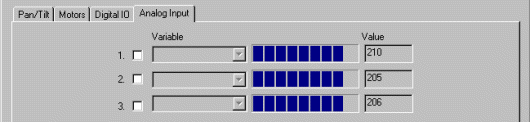
12. Analog - If you want to sample the analog values specify a variable or type one in that will contain the value from the appropriate pin. Note that you must select the checkbox next to the Analog Pin in order to activate this functionality. As soon as the pin is activated the value read at that pin will be displayed in the progress bar and text area. Note that even when unattached the pin will show a value due to noise.
Once the value is placed within the variable you can then use this value in other modules, or accessed via the API, extension, etc. in order to move the value outside of the RoboRealm application.
Examples
![]() Click Here to load a robofile that will cause the Desktop Turret to track red objects. (Note this
assumes 320x240 resolution!)
Click Here to load a robofile that will cause the Desktop Turret to track red objects. (Note this
assumes 320x240 resolution!)
![]() Click Here to load a more sophisticated robofile that will cause the Desktop Turret to keep moving
in the last known direction of red objects. This helps when objects are moving very quickly
and move out of the frame. (Note this
assumes 320x240 resolution!)
Click Here to load a more sophisticated robofile that will cause the Desktop Turret to keep moving
in the last known direction of red objects. This helps when objects are moving very quickly
and move out of the frame. (Note this
assumes 320x240 resolution!)
![]() Click Here to load a robofile that will cause the Desktop Turret to keep turn towards
movement. Note that a lot of movement will confuse the turret and cause it to move
erratically. If you want it to follow your hand try wiggling your fingers in front
of the camera after it has stabilized and stopped moving. (Note this
assumes 320x240 resolution!)
Click Here to load a robofile that will cause the Desktop Turret to keep turn towards
movement. Note that a lot of movement will confuse the turret and cause it to move
erratically. If you want it to follow your hand try wiggling your fingers in front
of the camera after it has stabilized and stopped moving. (Note this
assumes 320x240 resolution!)
![]() Click Here to load a robofile that will cause the Interbotix line of Turrets (PhantomX, WidowX, etc) to track red objects. (Note this
assumes 320x240 resolution!)
Click Here to load a robofile that will cause the Interbotix line of Turrets (PhantomX, WidowX, etc) to track red objects. (Note this
assumes 320x240 resolution!)
![]() Click Here to load a robofile that will cause the Interbotix line of Turrets (PhantomX, WidowX, etc) to track red objects with
the laser on. The will cause the laser to point to the object that it is tracking! (Note this
assumes 320x240 resolution!)
Click Here to load a robofile that will cause the Interbotix line of Turrets (PhantomX, WidowX, etc) to track red objects with
the laser on. The will cause the laser to point to the object that it is tracking! (Note this
assumes 320x240 resolution!)
![]() Click Here to load a robofile that will cause the Interbotix (PhantomX, WidowX, etc) Turret to keep turn towards
movement. Note that a lot of movement will confuse the turret and cause it to move
erratically. If you want it to follow your hand try wiggling your fingers in front
of the camera after it has stabilized and stopped moving. (Note this
assumes 320x240 resolution!)
Click Here to load a robofile that will cause the Interbotix (PhantomX, WidowX, etc) Turret to keep turn towards
movement. Note that a lot of movement will confuse the turret and cause it to move
erratically. If you want it to follow your hand try wiggling your fingers in front
of the camera after it has stabilized and stopped moving. (Note this
assumes 320x240 resolution!)
![]() Click Here to load a robofile that will cause the Interbotix (PhantomX, WidowX, etc) Turret to move
towards movement. This is meant to be used with a stationary camera that will trigger
the turret movement and laser on to target the movement. When it senses movement it
will move the turret to point to the movement location for 3 seconds and then return the
turret to the neutral position and wait again for movement.
(Note this assumes 320x240 resolution!)
Click Here to load a robofile that will cause the Interbotix (PhantomX, WidowX, etc) Turret to move
towards movement. This is meant to be used with a stationary camera that will trigger
the turret movement and laser on to target the movement. When it senses movement it
will move the turret to point to the movement location for 3 seconds and then return the
turret to the neutral position and wait again for movement.
(Note this assumes 320x240 resolution!)
For more information
Trossen Desktop Robot Turret
Trossen PhantomX Robot Turret
| New Post |
| Trossen_Robot_Turret Related Forum Posts | Last post | Posts | Views |
| None |