

Stabilize
The Stabilize module provides a video stabilization function to eliminate camera shake. Removing video shake is an important component when comparing video sequences from frame to frame.
Interface
Instructions
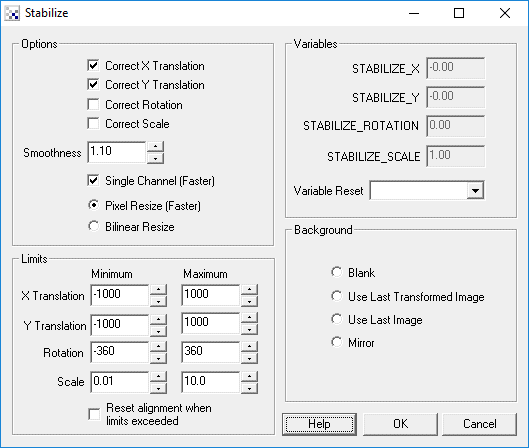
1. Options - Select which correction you want to use to stabilize the video.
2. Variables - Select the smoothness (greater than 1.0) that is used to smooth the frame sequence. At 1.0 frames will be kept stable with no adjustment. Thus if the video sequence has global movement that leads the image to the extreme right the video stabilization will eventually cause the video to disappear. At high numbers 5.0+ the video sequence will update very abruptly and essentially invalidate any smoothing that would be performed. Thus if your video has many twists and turns a number above 1.1 should probably be used otherwise quick turns can cause a large amount of the stabilized video to be offscreen.
3. Limits - Specify the maximum transform limits to avoid over adjustment of very unstable video. This will limit the range of adjustments and lower the ability of the module to stabilize the video. Using these limits you can confine the adjustment to the specified pixels/rotation/scale in order to be able to crop the image such that the black borders can be eliminated.
4. Reset - Reset alignment when limits are exceeded. Selecting this checkbox will cause the video to snap back into the original video if the limits are exceeded. This provides a way for rotations of the camera to not be overadjusted when rotating on purpose.
5. Background - Selects how to fill in the black borders created due to offsets of the current frame from previous frames that have not yet been filled.
Examples
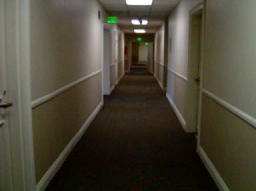
The examples show video taken while walking with a camera through a couple different environments. No effort during the filming of these videos was taken to stabilize the video and thus the individual steps taken during the filming are evident in the video. Each video shows the original images on the left side whilst the stabilized video is on the right side. Note the black areas around the images in the stabilized video. These are the offscreen parts of the image that are created due to stabilizing the video. Whenever video is stabilized the current image needs to be realigned with the previous image. This alignment process may cause most of the image to be offscreen and thus black areas are used to fill in the remaining area.
Note the example robofile below that can be used to process your own videos, or simply delete the Media Reader module and switch on the camera to perform this stabilization processing live on your webcam! Note that the videos below show the stabilization process at frame rate, i.e. stabilization is performed while video is recording!
Indoor corridor scene.
Outdoors pathway forward.
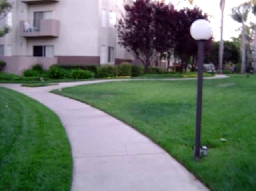
Outdoors pathway reverse.
![]() Click here
to load how we created the above videos. Once loaded double click on the first module (Media Reader)
and specify a video to stabilize. Press the Start button in that interface to start the stabilization
process and then click on the Mosaic module to see the rendered results. (Note that clicking on
individual modules shows the processing up to that point including that module.)
Click here
to load how we created the above videos. Once loaded double click on the first module (Media Reader)
and specify a video to stabilize. Press the Start button in that interface to start the stabilization
process and then click on the Mosaic module to see the rendered results. (Note that clicking on
individual modules shows the processing up to that point including that module.)
Variables
STABILIZE_X - contains the horizontal offset applied to
              stabilize the video
STABILIZE_Y - contains the vertical offset applied to
              stabilize the video
STABILIZE_ROTATION - contains the degree of rotation to
              stabilize the video
STABILIZE_SCALE - contains the scale amount applied to
              stabilize the video
See Also
Align_Image
Visual_Anchor
For more information
SteadyHand
Microsoft Research - Full-frame Video Stabilization
| New Post |
| Stabilize Related Forum Posts | Last post | Posts | Views |
|
hardware needed
Hi Steven, We would like to know what hardware needed to process the Real-Time stabilizer and is t... |
8 year | 2 | 2043 |
|
image stabilization
I'm looking for real-time image stabilization software for a moving robotic application. There will be plenty of cam... |
14 year | 2 | 3821 |