
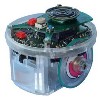
GCtronic e-puck
The GCtronic e-puck module provides an easy way to interface RoboRealm to the GCtronic e-puck robot sold in the USA by RoadNarrows Robotics. The E-puck has several sensors and is an ideal robot for small desktop based research and experimentation. More about this robot can be read from the RoadNarrows website.The e-puck provides for on-board robot programming. For RoboRealm to interface correctly to the e-puck you will have to have installed the GCtronic demo installed on the robot with the selector (the white turnable knob on the top of the robot) turned to 3 (or the dot inbetween 2 and 4). Turning the selector to 3 runs the Advanced Serial Communication program. This application on the e-puck is commonly used with the e-puck monitor program. The RoboRealm module uses the same serial interface as the e-puck monitor to bring control of the e-puck within access of other RoboRealm modules.
Interface
Instructions
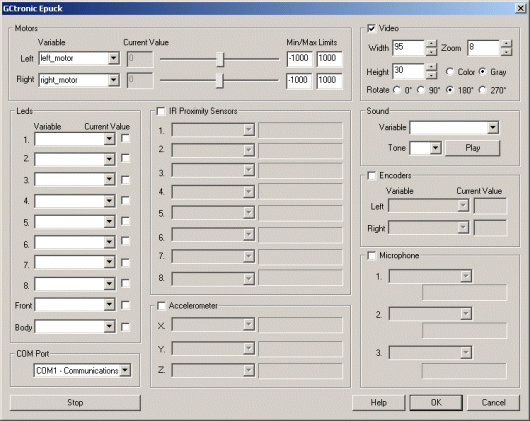
1. COM Port - First select the appropriate COM port where the bluetooth has been attached to. Note that only the COM ports that are recognized by the system are displayed. If you have not yet attached your bluetooth USB device or activated the internal bluetooth wireless capabilities you should do so before running RoboRealm otherwise the appropriate COM port may not show up.
If you do not know the COM port associated with your bluetooth device check your task bar for the blue icon that represents the bluetooth connection and investigate the properties of the epuck_XXXX connection to see which serial port is attached to the e-puck.
Once RoboRealm has connected to the e-puck successfully the yellow/orange LED will be on for as long as the connection is held.
2. Motors - To test the module slowly move the appropriate motor sliders. If everything is working the motors should slowly start to move. If this does not happen check that a bluetooth connection is made and check your COM port settings, or that your bluetooth device is on. Note that when first connecting the devices can take up to 30 seconds to secure a connection so be patient. Be on the lookup for the pairing password prompt that may pop up during the initial communication between your PC and the e-puck. Note that the pairing password format is indicated on the provided in the mini-doc.
If the motors move you can then select a variable (or type one in) that will be populated from another module that will contain the values to send to the e-puck. Note that 0 is considered neutral whilst -1000 and 1000 are the opposite extremes.
See Variable Control for more information on how to programatically move the robot.
3. Video - To enable the video stream from the e-puck select the checkbox next to the "Video" text. This will tell RoboRealm to start requesting the image from the e-puck's camera. Note that there are several controls available that allow you to customize the type of image being returned by the e-puck. This is to allow you to configure the image to your project requirements. As the e-puck uses bluetooth to transmit the image there is a severe limitation on the size and number of frames a second you can receive from the e-puck.
Width/Height - Use the text area to specify the width and height for the image to be sent. The maximum number of pixels sent per image is 3200 bytes. Thus you can change the width and height as desired but need to keep the size limited below that amount. If this amount is exceeded the image will default back to a 40x40 color mode. Note that increasing the width and height using the provided spin buttons will ensure that the total size is below this requirement by adjusting the parameters as possible.
Zoom - If you want a closer look at the object within view of the robot you can select a lower zoom value (1-8) that will cause the e-puck camera to digitally zoom into the captured image. Note that as the e-puck's camera is actually capturing images at a 640x480 resolution the zoom is not an interpolated view but in fact the unsampled pixels of the actual image captured. Thus the zoom preserves the quality of the original detailed image.
Color/Gray - Selecting Gray reduces the pixel buffer requirements by 2x (color takes 2 bytes) which will transmit the images quicker over bluetooth and achieve a faster rate. You can either remain with the faster rate or increase the image size to achieve the same rate but with a larger resulting image. If your project requires just intensity levels then using the gray option will increase the frames per second and provide you with a higher intensity resolution as the color option only provides up to 64 gray levels while the gray mode provides 256.
Rotate - Depending on the configuration of your e-puck you may need to rotate the image. Select the appropriate radio button to perform that action.
4. LEDs - You can switch on or off any of the robot LEDs by clicking on the checkbox next to the LED you wish to turn on or off. This manual method is useful to check which LED is which on the robot. To automatically switch LEDs on/off chose a variable in the dropdown (or type one in) that will contain a non-zero value when the LED should be switched on. Variables can then be changed by other modules such as the Set_Variable or VBScript or can be changes by numerous other methods including the API.
5. IR Proximity Sensors - Enable this sensor readout by clicking on the checkbox next to the "IR Proximity Sensors" text. This will tell RoboRealm to start querying those sensor values from the e-puck. If you move your hand in front of the IR sensor you should see the progress bars indicate the proximity of your hand. Higher values indicate closer objects. Note that the IR sensors are triggered by very close objects. In order to trigger the highest value the object will most likely be touching the robot in that case.
If you want to access the IR value from other modules select or type in the variable name that will contain a value ranging from 0 to approximately 3850 to indicate the proximity of an object.
6. Accelerometer - Similar to the IR proximity interface you can enable the accelerometer sensors which will start feeding those values from the e-puck into RoboRealm. To capture those values into a variable for use elsewhere in the RoboRealm application you can specify a variable using the dropdown (or type one in) next to the sensor readout. Note that these are the raw values from the accelerometers and have not been converted to angular measurements.
7. Sound - to test that the speaker on the e-puck is working select a Tone from the second dropdown menu and click on Play. You should hear a sound coming from the e-puck.
To automatically play a sound type in or select a variable that will contain the number of the tone to play. When this variable becomes set RoboRealm will command the e-puck to play the tone and will then remove the variable's value. The variable is cleared to prevent the note from being played again and again. To once again play a note, simply set the variable again with appropriate value.
8. Encoders - To read the values of the wheel encoders switch on the interface by selecting the checkbox next to the "Encoders" text. You can then specify variables that will contain the encoder count for each wheel as read from the e-puck. Encoder values will increase when the motors are driver forward and decrease (below zero in some cases) when moving backwards.
9. Microphone - There are 3 microphones on the e-puck that indicate that can be used to check the volume of sound nearby the robot. To access these volume levels you can switch on this interface by checking the checkbox next to the "Microphone" text. This will cause RoboRealm to show the volume levels of each microphone in the progress bars. The specific values of the microphones can then be placed into variables by specifying the variable in the provided dropdown.
10. Stop - The stop button is provided to stop the e-puck's motors and terminate communication to the e-puck in an attempt to stop the robot as fast as possible. Pressing the button again will resume communication with the robot.
Example
For these examples to run you must have the selector (the white turnable knob on the top of the robot) turned to 3 (advanced serial interface).
![]() Click Here to load a robofile that will allow you to drive your e-puck using a joystick. When you load this configuration
you will need to edit the e-puck module (first module) by double clicking on it to change the COM port to the
correct port. This will be the port your bluetooth device has chosen for communication with your e-puck. Second, you
will need to edit the Joystick module to select which joystick to use to control the robot. Once that is done have
a safe and happy drive!
Click Here to load a robofile that will allow you to drive your e-puck using a joystick. When you load this configuration
you will need to edit the e-puck module (first module) by double clicking on it to change the COM port to the
correct port. This will be the port your bluetooth device has chosen for communication with your e-puck. Second, you
will need to edit the Joystick module to select which joystick to use to control the robot. Once that is done have
a safe and happy drive!
![]() Click Here to load a robofile that will have the e-puck chase after a bullseye target using vision. Note that you will have to edit
the e-puck module (first module) by double clicking on it to change the COM port to the correct port. Then set the e-puck within view
of a target like
Click Here to load a robofile that will have the e-puck chase after a bullseye target using vision. Note that you will have to edit
the e-puck module (first module) by double clicking on it to change the COM port to the correct port. Then set the e-puck within view
of a target like  (you can print this to about a 2x2 inch size) and see how the robot reacts. Careful, as the image update speed is very slow AND you only have
a 40x40 image size to work with you will need to move the target VERY slowly otherwise the target will seem to just disappear from the robots view. To see a larger image in RoboRealm select a 400% zoom
from the main GUI interface.
(you can print this to about a 2x2 inch size) and see how the robot reacts. Careful, as the image update speed is very slow AND you only have
a 40x40 image size to work with you will need to move the target VERY slowly otherwise the target will seem to just disappear from the robots view. To see a larger image in RoboRealm select a 400% zoom
from the main GUI interface.
The robot is programmed to align with the target and then move forwards or backwards depending on how far or close the robot is to the target. Slowly moving the target should incur the appropriate movement from the robot.
For more information
RoadNarrows
Official e-puck website
GCtronic
| New Post |
| GCtronic_Epuck Related Forum Posts | Last post | Posts | Views |
| None |